My Red Zed - Z3 JOURNAL - (RAID Steering Wheel, 16/09/10)

Post pictures of your car and discuss it here. One car per thread, and keep it on-topic, please!
User avatar
Ian_C
Joined: Sun 10 Dec, 2006 20:10
Posts: 2415

  Z3 roadster 2.8
Location: Lytham St Annes

Post by Ian_C »

yalden wrote:Ah... I'm sure I recognise that 'journal' format somewhere... :wink:
I'm told that plagarism is the sincerest form of flattery :wink:
yalden wrote: How much work was involved in replacing the antenna base? I'm guessing it's fairly straight forward... any problems???


Yep, pretty straightforward. I followed this guide: http://www.zroadster.net/forum/viewtopic.php?t=8613

The only issue I had was a leccy spark when I removed the brown wire (in the first pic on the linked 'how to' guide). Not sure why this was but the only after effect was I had to enter the radio code when I next turned the radio on :?
Current...1998 ///M Coupe
Image
Previously...1997 Z3 2.8
Image
User avatar
Ian_C
Joined: Sun 10 Dec, 2006 20:10
Posts: 2415

  Z3 roadster 2.8
Location: Lytham St Annes

Post by Ian_C »

zzzzzzzzzzzzzzzzzzzzzzzzzzzzzzzzzzzzzzzzzzzzzzzzzzzzzzzzzzzzzzzzzzzzzzzzzzzzzzzzzzzzzzzzzzzzzzzzzzzzzzzzzzzzzzzzzzzzzzzzzzzzzzzzzzzzzz
..........................................................................................................October 09 - ///Makeover Part I
zzzzzzzzzzzzzzzzzzzzzzzzzzzzzzzzzzzzzzzzzzzzzzzzzzzzzzzzzzzzzzzzzzzzzzzzzzzzzzzzzzzzzzzzzzzzzzzzzzzzzzzzzzzzzzzzzzzzzzzzzzzzzzzzzzzzzz


- ///M door mirrors fitted

I’ve always preferred the look of the door mirrors fitted to the ///M roadster and ///M coupe and finally managed to get hold of a set in Estoril blue. I’ve had them repainted in Hellrot and am very pleased with the outcome:

<Click to enlarge>

Image Image Image

I did a couple of comparison shots whilst I was fitting them (probably to convince myself that it was worth the expense!):

<Click to enlarge>

Image Image
Last edited by Ian_C on Sun 20 Dec, 2009 17:43, edited 1 time in total.
Current...1998 ///M Coupe
Image
Previously...1997 Z3 2.8
Image
User avatar
Jonttt
Z Register member
Joined: Sun 28 Dec, 2008 16:32
Posts: 6554

  M roadster S54
Location: Liverpool

Post by Jonttt »

They look great, one of those subtle mods well worth doing thats a little more unusual as its not a quick job to source and fit. Its funny how wing mirrors have always seemed so cool on all ///M models BMW has done :thumb:
Happiness is not around the corner........happiness is the corner
Image Video or Journal Garage: 2015 FFRR Black Edition, Porsche Boxster GTS, 1997 Porsche Carrara C4S, Ex 2001 BMW S54 Z3m Roadster
User avatar
3.0 Lakes Lee
Joined: Wed 01 Apr, 2009 08:34
Posts: 258

  Z3 roadster 3.0i
Location: Kendal

Post by 3.0 Lakes Lee »

looking great myredzed!!!!.............thats something thats on my to do list, will have to wait a while though as its not a cheap mod! we'll have to meet up when the sun breaks out???................you are only up the road

Lee
<a href="http://s185.photobucket.com/albums/x201 ... ooter2.jpg" target="_blank"><img src="http://i185.photobucket.com/albums/x201 ... ooter2.jpg" border="0" alt="Photobucket"></a>
User avatar
yalden
Joined: Sun 30 Mar, 2008 18:03
Posts: 1232

  Z3 roadster 3.0i
Location: Devon

Post by yalden »

Looking good mate!

The mirrors are a bargain... I'm suprised nobody else has jumped on the bandwagon yet!

I purchased mine for £180, yet I sold my originals for £180... so the change over only cost me the price of paint. :wink:

What's next on the list Red Zed? :idea:
User avatar
3.0 Lakes Lee
Joined: Wed 01 Apr, 2009 08:34
Posts: 258

  Z3 roadster 3.0i
Location: Kendal

Post by 3.0 Lakes Lee »

Chris..................I think we should start calling you Arthur Daly!!!!! :lol:
<a href="http://s185.photobucket.com/albums/x201 ... ooter2.jpg" target="_blank"><img src="http://i185.photobucket.com/albums/x201 ... ooter2.jpg" border="0" alt="Photobucket"></a>
User avatar
Ian_C
Joined: Sun 10 Dec, 2006 20:10
Posts: 2415

  Z3 roadster 2.8
Location: Lytham St Annes

Post by Ian_C »

yalden wrote: What's next on the list Red Zed? :idea:
You'll note that I called the update ///Makeover Part I. I'll let you come to your own conclusions suffice to say that the next bits don't include ///M gills :wink:
Current...1998 ///M Coupe
Image
Previously...1997 Z3 2.8
Image
User avatar
yalden
Joined: Sun 30 Mar, 2008 18:03
Posts: 1232

  Z3 roadster 3.0i
Location: Devon

Post by yalden »

3.0 Lakes Lee wrote:Chris..................I think we should start calling you Arthur Daly!!!!! :lol:
:lol:
/|\
/\
myredzed wrote:You'll note that I called the update ///Makeover Part I. I'll let you come to your own conclusions suffice to say that the next bits don't include ///M gills :wink:
I'm intrigued, I would've said ///Vl Gills but you've already ruled that out; perhaps some Aerodynamic parts? :twisted:
User avatar
Ian_C
Joined: Sun 10 Dec, 2006 20:10
Posts: 2415

  Z3 roadster 2.8
Location: Lytham St Annes

Post by Ian_C »

zzzzzzzzzzzzzzzzzzzzzzzzzzzzzzzzzzzzzzzzzzzzzzzzzzzzzzzzzzzzzzzzzzzzzzzzzzzzzzzzzzzzzzzzzzzzzzzzzzzzzzzzzzzzzzzzzzzzzzzzzzzzzzzzzzzzzz
......................................................................................November 09 - ///Makeover Part 2
zzzzzzzzzzzzzzzzzzzzzzzzzzzzzzzzzzzzzzzzzzzzzzzzzzzzzzzzzzzzzzzzzzzzzzzzzzzzzzzzzzzzzzzzzzzzzzzzzzzzzzzzzzzzzzzzzzzzzzzzzzzzzzzzzzzzzz


- ///M Coupe red/black seats fitted

I’d been searching for a set of heated red/black seats from the ///M z3 for a while and stumbled across a set on Flea Bay that had been fitted to a Vauxhall Astra. I felt it only correct that they should be returned to a zed and bought them for a bargain price earlier in the year. They were a bargain for a reason; the seat rails had been modified to get them into the Astra and the driver’s bolster was very worn. Restoring these seats to their former glory has been a labour of love over the summer months but I was eventually happy with them and finally got them installed last month. This is the story of the restoration:

<All pics - click to enlarge>

-DISASSEMBLY-
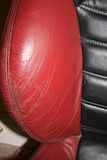
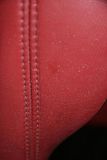
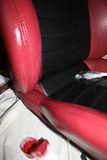
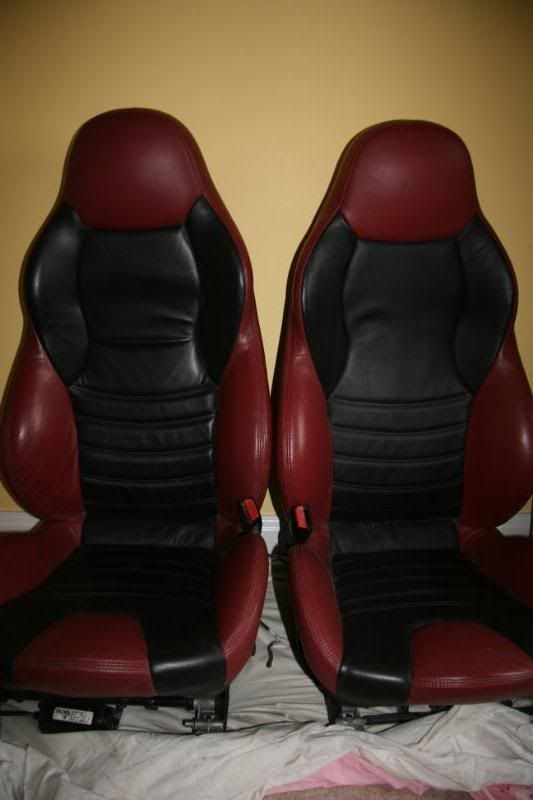
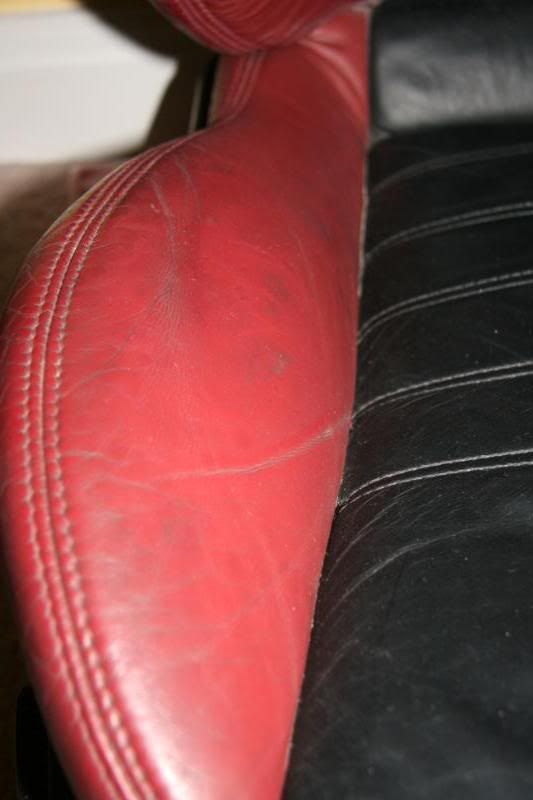
This is how the seats looked when I first collected them. They were very dirty and generally in quite poor condition:

Image Image Image Image

Image Image

The first step was to get the seats separated from the bases:

I undid the 2 bolts at the rear of the seat base. You can then hinge the seat forward to access the cables you need to disconnect:
Image

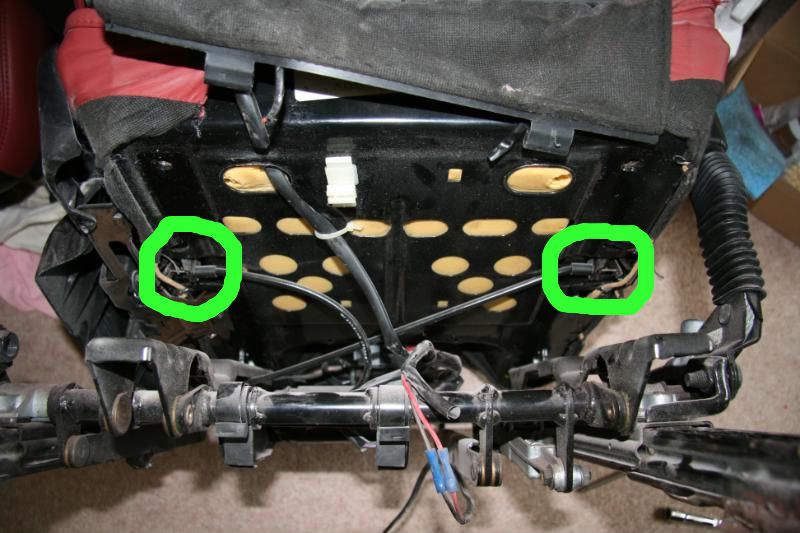
I unplugged the 2 seat motors, the seat stop connector and released all cable ties from the bottom of the seat pan.

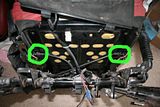
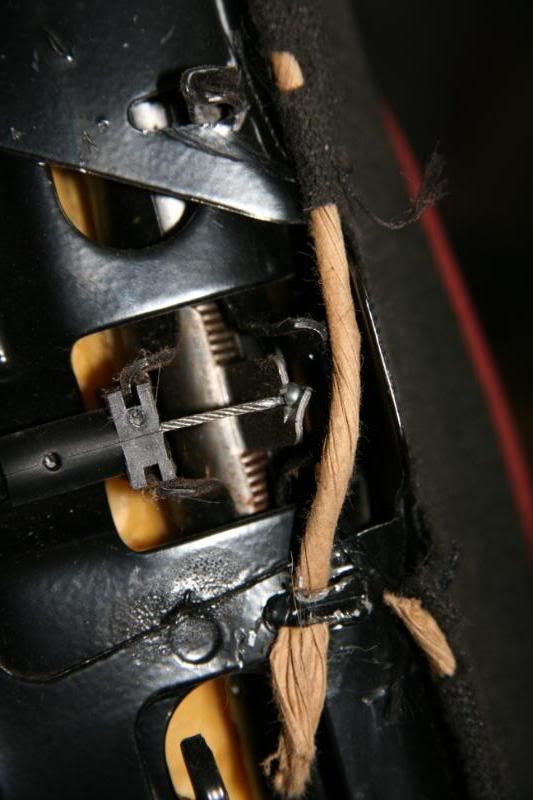
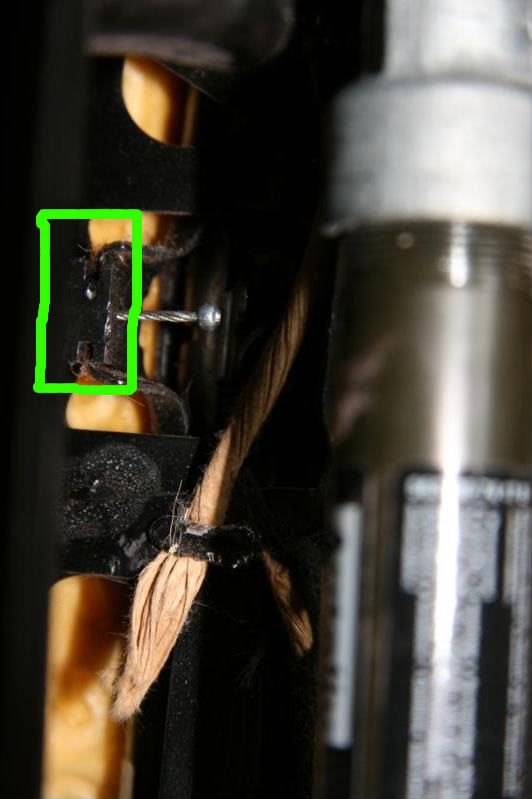
Because of the cable routeing for the seat recline mechanism you have to disconnect the cables on each side of the seat (circled on the picture above) before you can fully separate the base. This is the routeing that I needed to undo:

Image

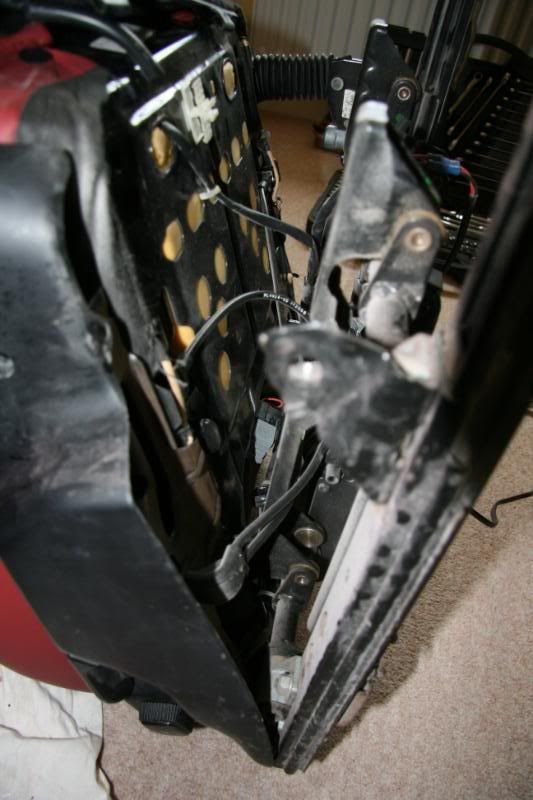
The cables are easy to remove from the retainers. Pull the cable outboard with needle nosed pliers and lift from the retaining clamp. You need to pull the plastic cable retainer from the seat pan so that you can thread it back through the seat base. You need to do this on both sides.

Recliner cable in place:
(note that on later seats the metal retainer is sometimes straight and not bent - you can bend it 'open' with pliers)
Image

Recliner cable removed from retaining clamp:
Image

The plastic cable retainer is highlighted. You can pull it away from the seat by hand. I was now able to unthread the recliner cables. The recliner mechanism plastic shroud is released from the seat by undoing the 2 screws on the side of the plastic housing and 1 on the front of the seat. I was now able to remove the seat base from the seat.
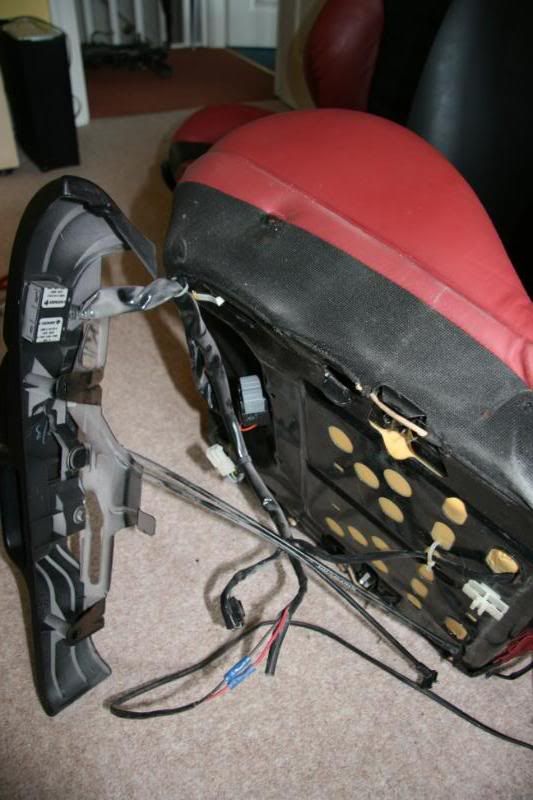
This is what I had left now (note some ‘adapted’ wiring from when the seats were in the Astra!):

Image

The seat up/down/forward/back switch pulls off by hand. You can unclip the switch mechanism from the inside of the plastic recliner mechanism so that you leave the wiring loom and switch attached to the seat. The plastic trim part was now free.

-REFURBISHMENT-
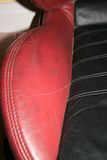
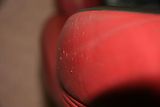
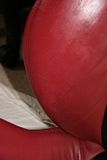
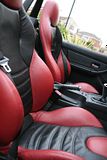
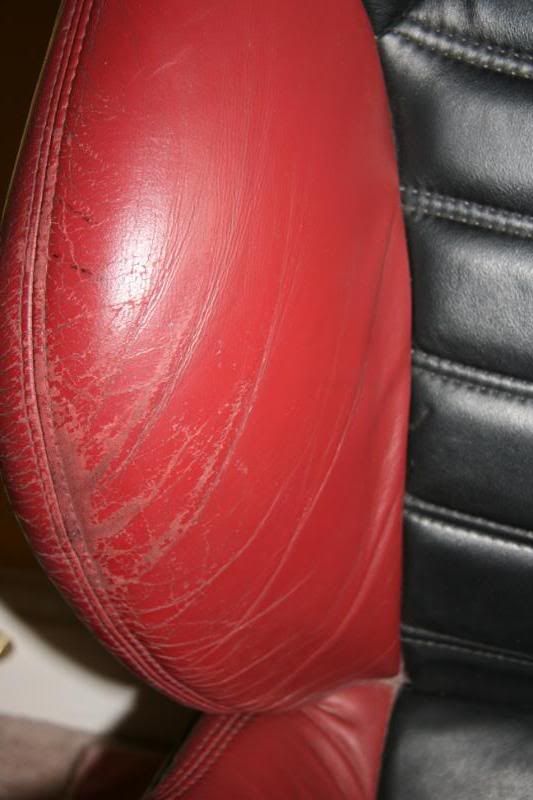
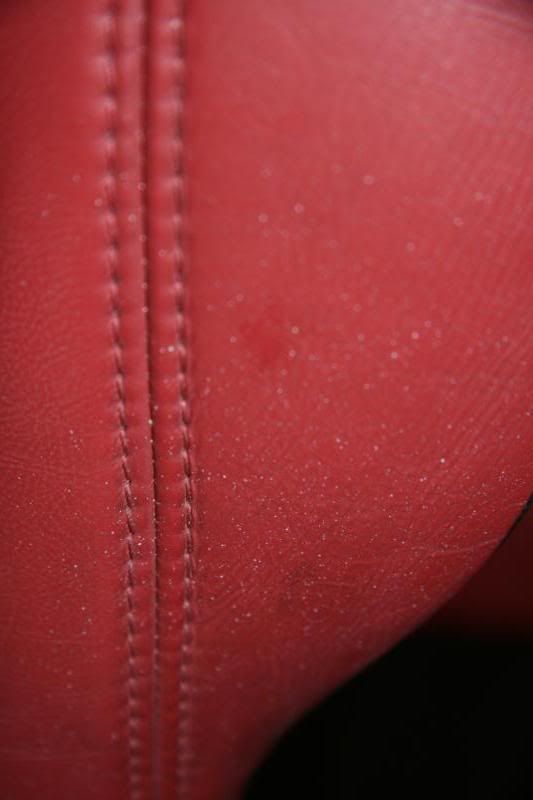
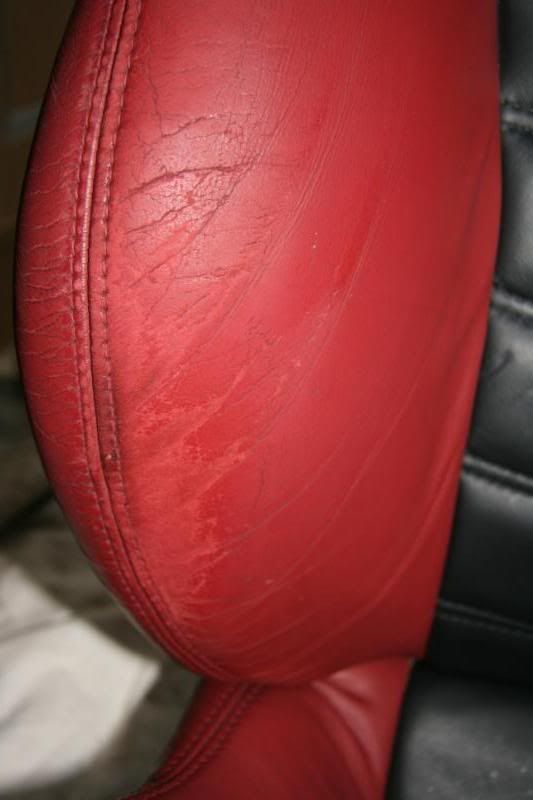
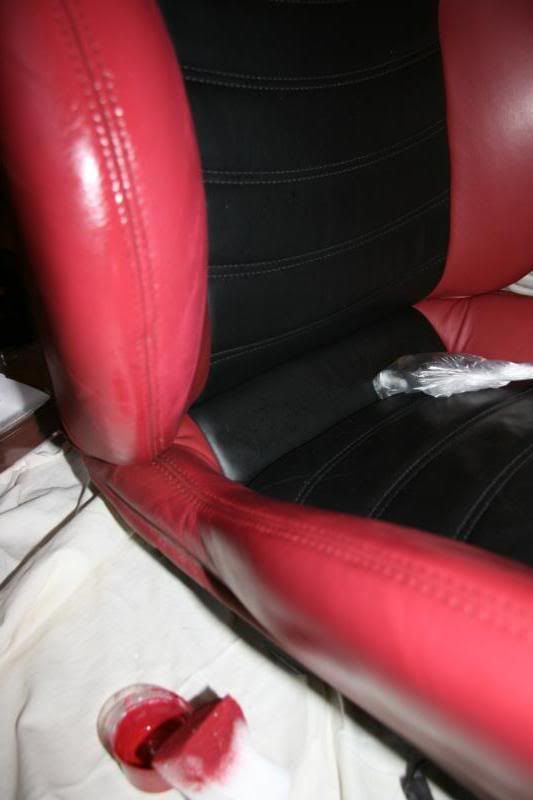
Now that the seats were separated from the bases it was time to give them a thorough clean. I used Leather Ultra Clean from Furniture Clinic and Autoglym leather cleaner. I also had to use a worn abrasive pad to get rid of some white paint spots on the seats (this might horrify leather restorer specialists however it worked a treat for me :wink: 
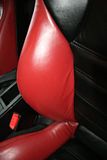
) I was extremely pleased with the cleaning results. The passenger seat was like new with very little wear. The driver's seat was the complete opposite though - the cleaning revealed the true extent of the wear. I'd read some leather restoration guides on Detailing World and they advised that the excess wear should be sanded with wet 'n' dry prior to painting. Whilst this seemed slightly alien I felt had nothing to lose and was ultimately pleased with the smooth finish that was now ready for leather paint:

Image

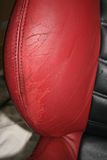
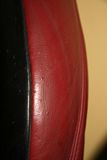
I'd also struggled to fully remove staining from the driver's side thigh support so i elected to paint this aswell. Initially I used paint from Furniture Clinic. This requires you to mix the correct shade from a base red by adding white, black, blue and yellow until you get a good match. This is quite tricky to achieve however I ended up with a reasonable match. The results were ok (but only ok, I'm a bit of a perfectionist so wasn't totally happy :roll: ):

Image Image Image

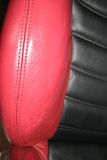
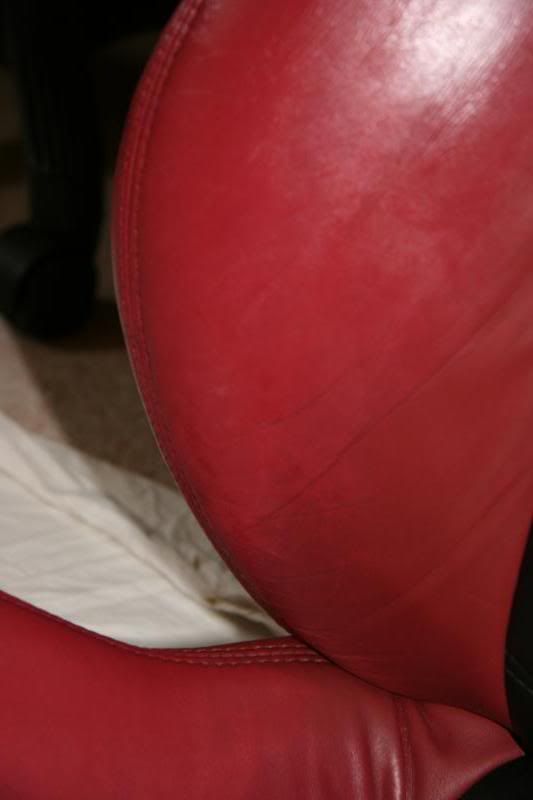
A couple of days after painting jonttt posted details of leather refurb paint that was a perfect match: http://www.zroadster.net/forum/viewtopic.php?t=21648 I had to get some! Although it's expensive the colour match was spot on. Because I'd done all the prep work applying this new colour was straightforward and I applied 3 coats to get a finish I was happy with.

-REASSEMBLY-
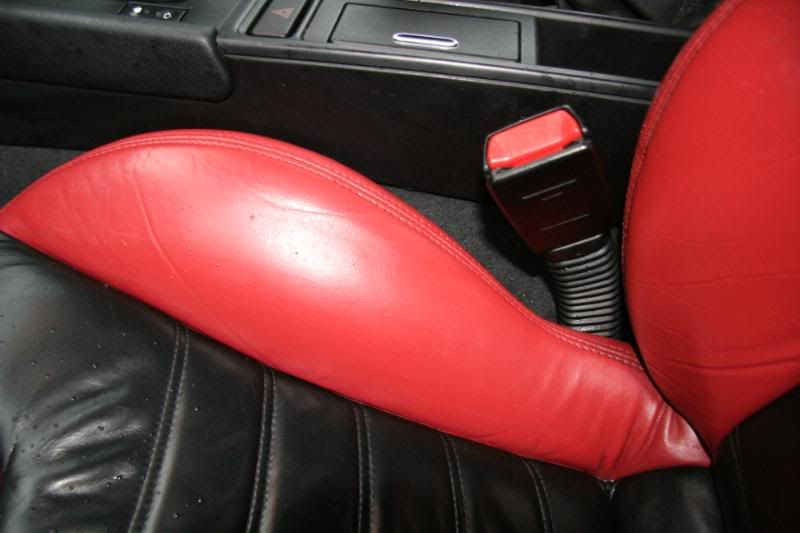
I thought it would be a good idea to use the original coupe passenger seat on my driver's side since it was in almost new condition (this would also reduce wear on the well used original driver's seat by putting it in the passenger side). This is achievable with coupe seats since they don't have the seat belt guides fitted and I suspected that the bases would be interchangeable :D I also wanted to update the seat connectors to the facelift type to avoid the recurring airbag light problem and needed new bases anyway (since the ones that came with the seats had been :ahem: modified to fit in an Astra :roll: )

All I had to do now was find some facelift seat bases......at which point Naeem.m comes to the rescue and offers his cloth seats from his facelift zed for sale on the Stock Exchange :D

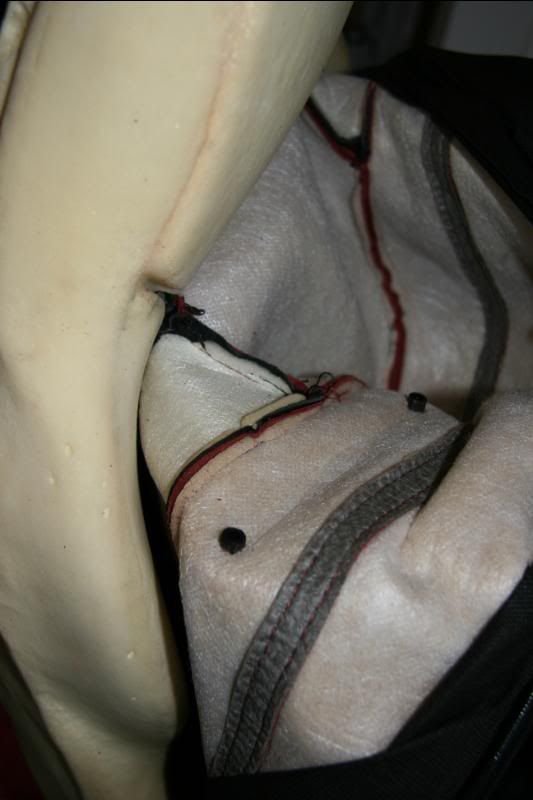
Refitting the bases was essentially the reverse of removal. The only extra thing I had to do was make some holes in the leather base to allow the recline mechanisms to swap sides. This was straightforward and proves that the seats are the same for driver and passenger except for the bases. What about the passenger seat occupancy sensor though? Although I was well prepared and had got a simulator from Vinci on Bimmerforums it turned out that I didn't need it because I don't have a passenger airbag installed. I put it in anyway as I figured that I wouldn't lose it that way:
Image Image

-INSTALLATION-
There are plenty of guides online about removing and installing seats online so I won't describe that aspect - suffice to say that one of my rear bolts was very tight and caused a couple of bruised knuckles! :head:

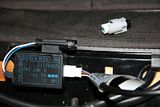
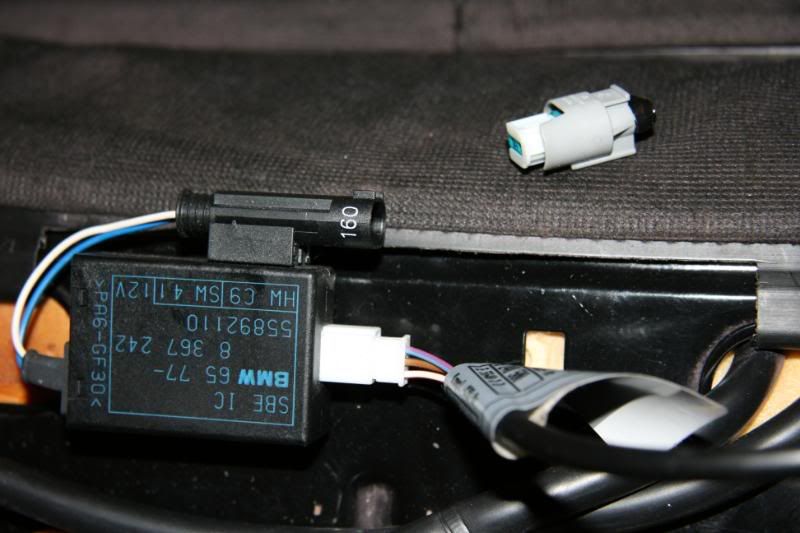
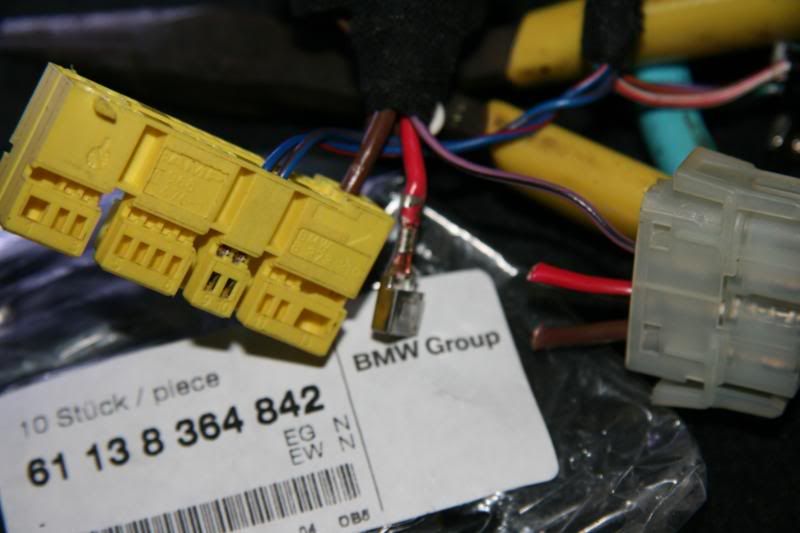
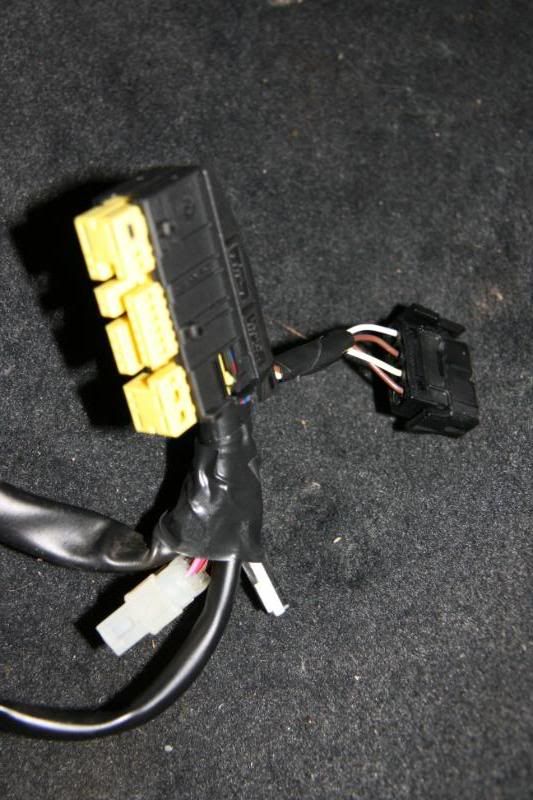
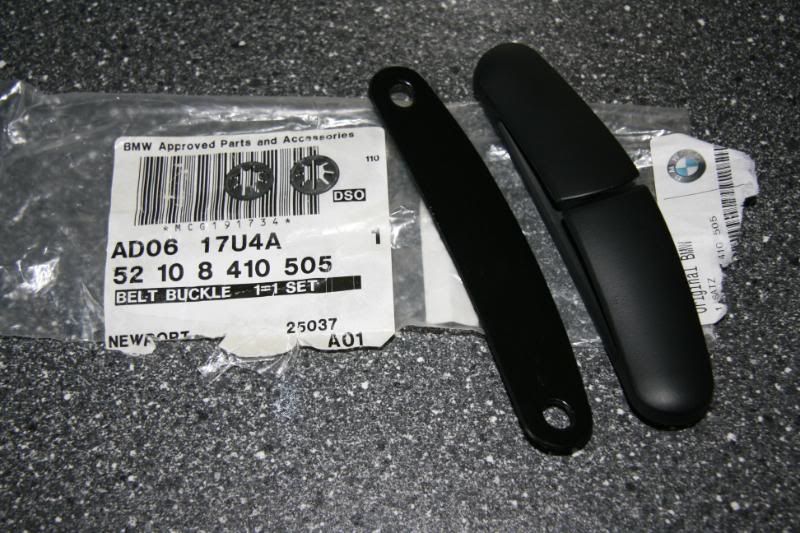
Because I was using facelift seat bases I had to replace the prefacelift connectors that were already in the car. I was prepared for a battle but it was remarkably straightforward. The wire colours are the same pre and post facelift and, luckily, Naeem.m had given me the car side connectors when he'd removed his seats (I suspect that he put pre-facelift seats into his post facelift car) and left enough wire for me to read across the pre and post facelift colours. I bought a selection of terminations from the $tealer but ultimately only needed the seat motor power ones since the pretensioner terminations were the same. Here's a few piccies to illustrate the simplicity:

Pretensioner contacts being transferred from old to new connector:
Image

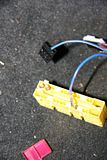
Power connectors being transferred from old to new connector:
Image Image

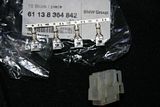
New connector alongside heated seat plug (with old connectors tied back in the loom):
Image

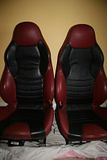
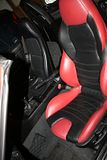
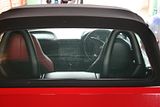
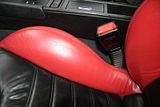
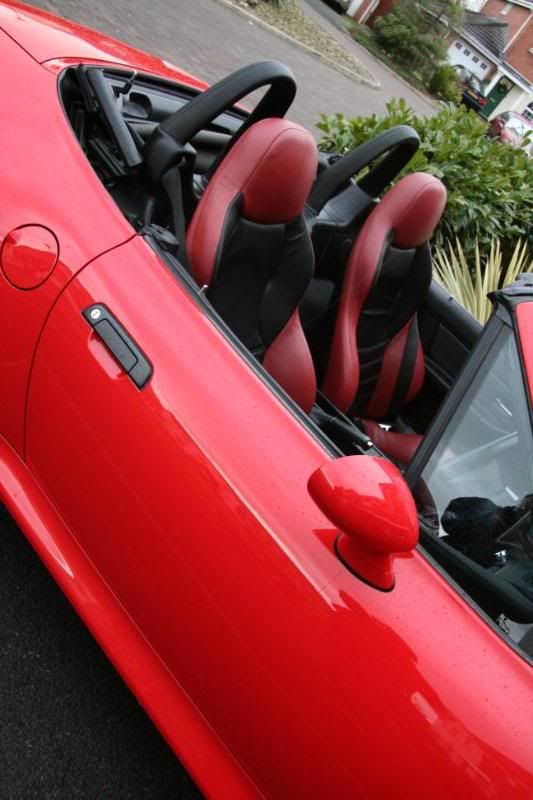
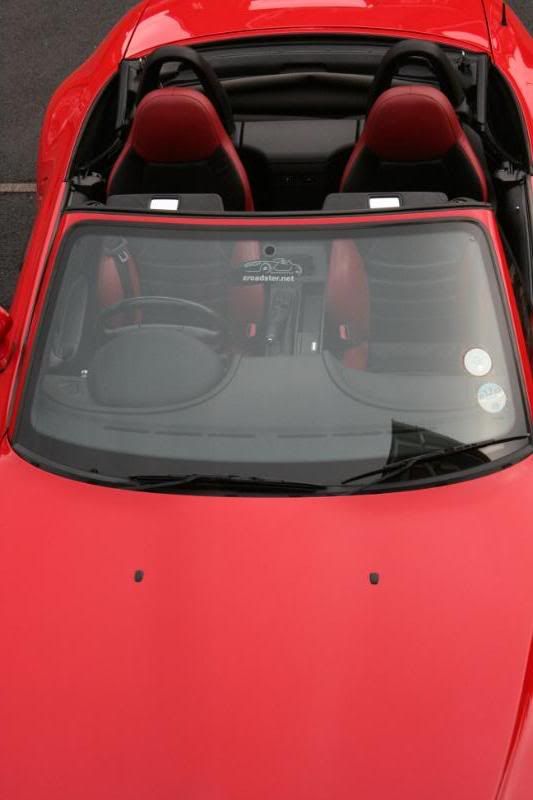
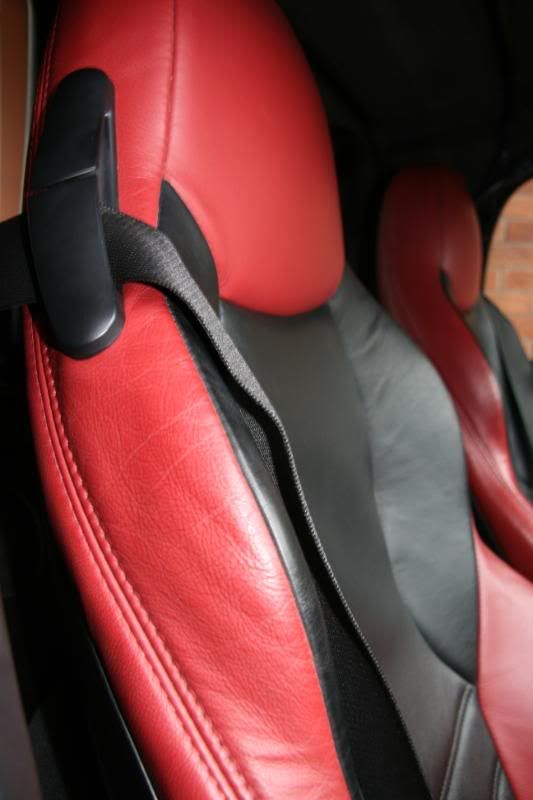
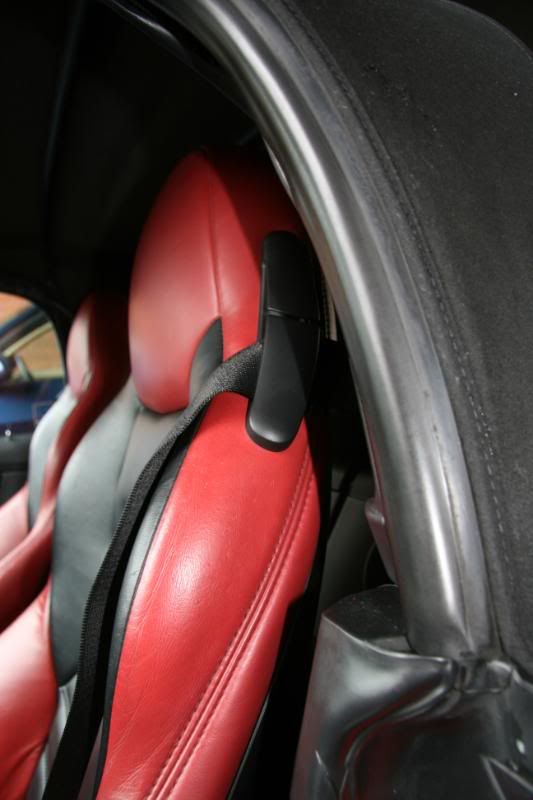
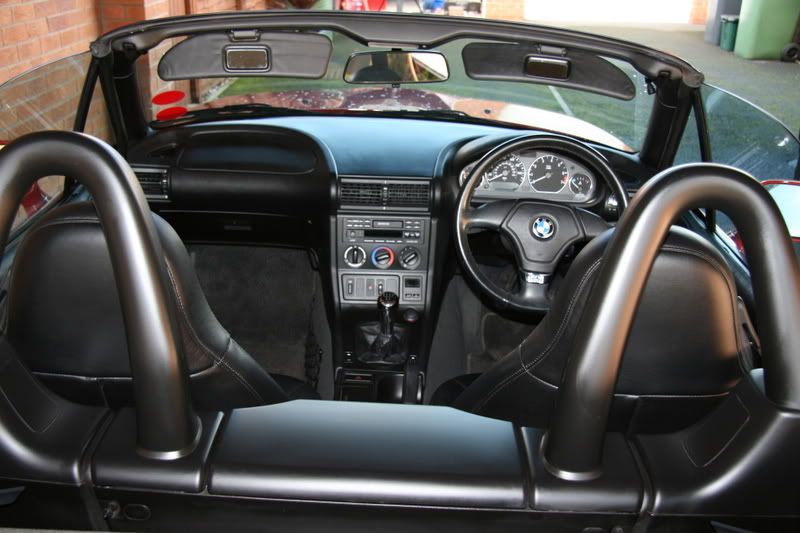
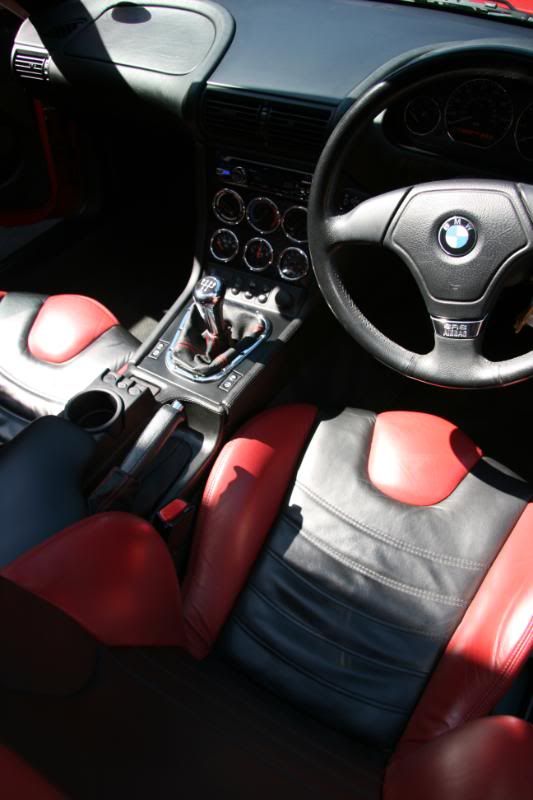
I was surprised at how much bigger the new seats look compared to the old ones once installed:
Image Image

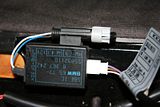
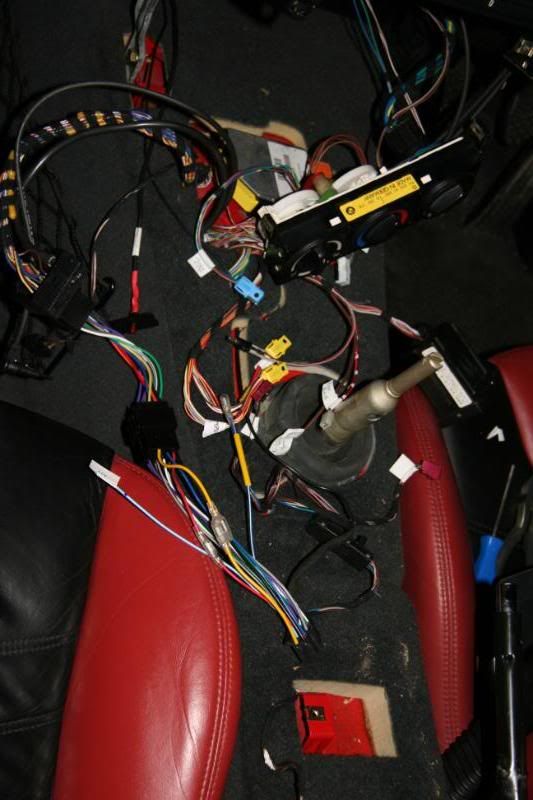
I didn't connect up the heated seat switches just yet as I have new style switches ready for my ///M console that's next to go in. I did find the connectors next to the gear lever though so everything is ready:

Image

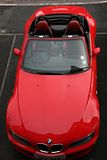
I'm very pleased with the overall result and think that the new seats are a vast improvement.

Image Image Image Image Image Image

At the moment I've not bothered fitting the seatbelt guides. For me the jury is still out as to whether I need to do this - I'll live with the seats for a while and see what I think. So far so good though.

The new seat connectors are bearing up well too. Both seats have been moved several times throughout their full range and I've not seen an airbag light yet :D
Current...1998 ///M Coupe
Image
Previously...1997 Z3 2.8
Image
User avatar
Jonttt
Z Register member
Joined: Sun 28 Dec, 2008 16:32
Posts: 6554

  M roadster S54
Location: Liverpool

Post by Jonttt »

Great post myredzed :thumb:

They really do suit your red zed. There are not many cars you either have the choice or can get away with two tone seats but the Z3 is definately one car it really suits :wink:

I must admit I've been really impressed with the comfort and support the ///M seats offer and they look soooo nice as well.

Nice job :wink:
Happiness is not around the corner........happiness is the corner
Image Video or Journal Garage: 2015 FFRR Black Edition, Porsche Boxster GTS, 1997 Porsche Carrara C4S, Ex 2001 BMW S54 Z3m Roadster
Stan 24v
Joined: Sun 07 Dec, 2008 17:16
Posts: 16

  blank.gif

Post by Stan 24v »

They're looking really good Ian! And they are loads bigger, quite surprising really. Though, as Annette says, its not all about the size :lol:
Image
User avatar
Ian_C
Joined: Sun 10 Dec, 2006 20:10
Posts: 2415

  Z3 roadster 2.8
Location: Lytham St Annes

Post by Ian_C »

Stan 24v wrote: Though, as Annette says, its not all about the size :lol:
:oops:
Current...1998 ///M Coupe
Image
Previously...1997 Z3 2.8
Image
User avatar
Ian_C
Joined: Sun 10 Dec, 2006 20:10
Posts: 2415

  Z3 roadster 2.8
Location: Lytham St Annes

Post by Ian_C »

zzzzzzzzzzzzzzzzzzzzzzzzzzzzzzzzzzzzzzzzzzzzzzzzzzzzzzzzzzzzzzzzzzzzzzzzzzzzzzzzzzzzzzzzzzzzzzzzzzzzzzzzzzzzzzzzzzzzzzzzzzzzzzzzzzzzzz
......................................................................................February 10 – Guides & Guards
zzzzzzzzzzzzzzzzzzzzzzzzzzzzzzzzzzzzzzzzzzzzzzzzzzzzzzzzzzzzzzzzzzzzzzzzzzzzzzzzzzzzzzzzzzzzzzzzzzzzzzzzzzzzzzzzzzzzzzzzzzzzzzzzzzzzzz


- Seatbelt guides fitted
- Stoneguards fitted

SEATBELT GUIDES

I’d lived without the seatbelt guides for a couple of months but found it a bit of a pain reaching for the belt and also found it annoying getting the correct angle for the belt to retract (the inertia reels must be getting tired on my 12 ½ year old car). I decided to take the plunge and get the guides fitted to my ex-coupe seats. I used this write-up http://forums.bimmerforums.com/forum/sh ... p?t=479280 as my guide and found it invaluable.

A couple of things to add to the guide by Vinci: you can get the hog-rings out from behind the centre bar; use a long flat blade screwdriver to prise them from the foam and push them down far enough to reach with your pliers. Use tywraps to reattach the seat cover ties instead of re-using the hog rings – much easier.

Here’s a few pics:

<Click to enlarge>

New passenger guide
Image

Driver's seat cover off, guide pushed through the leather ready for backing plate and securing washers to go on
Image

End result
Image Image

It took me approx 3 hours to do the first seat and just 2 hours for the second.

STONEGUARDS

I purchased a set of stoneguards from Hang_em_high and fitted them today:

<Click to enlarge>

Image Image

As well as being functional I also think that they look great against the red paintwork. Considering a set of black kidney grills now.....

Note that I've got my standard wheels on for the winter. Too much salt on the roads for my Schnitzers (and they're in for a refurb right now!)
Current...1998 ///M Coupe
Image
Previously...1997 Z3 2.8
Image
User avatar
3.0 Lakes Lee
Joined: Wed 01 Apr, 2009 08:34
Posts: 258

  Z3 roadster 3.0i
Location: Kendal

Post by 3.0 Lakes Lee »

looking good myredzed, see you on the 28th hopefully

Lee
<a href="http://s185.photobucket.com/albums/x201 ... ooter2.jpg" target="_blank"><img src="http://i185.photobucket.com/albums/x201 ... ooter2.jpg" border="0" alt="Photobucket"></a>
User avatar
yalden
Joined: Sun 30 Mar, 2008 18:03
Posts: 1232

  Z3 roadster 3.0i
Location: Devon

Post by yalden »

Nice to see that you tackled the guides yourself, this is something I've wanted to do for a long time... but just haven't got around too! I hadn't seen a guide online before so will bookmark the one you've hyperlinked.

Thanks!

Chris
Stan 24v
Joined: Sun 07 Dec, 2008 17:16
Posts: 16

  blank.gif

Post by Stan 24v »

Looks good Ian, you just need to stop trying to be arty on us all and get some full side on shots :)
Image
User avatar
Jonttt
Z Register member
Joined: Sun 28 Dec, 2008 16:32
Posts: 6554

  M roadster S54
Location: Liverpool

Post by Jonttt »

Another great job :thumb:

Really looking forward to seeing your and Lee's work on the 28th :wink:
Happiness is not around the corner........happiness is the corner
Image Video or Journal Garage: 2015 FFRR Black Edition, Porsche Boxster GTS, 1997 Porsche Carrara C4S, Ex 2001 BMW S54 Z3m Roadster
User avatar
Ian_C
Joined: Sun 10 Dec, 2006 20:10
Posts: 2415

  Z3 roadster 2.8
Location: Lytham St Annes

Post by Ian_C »

zzzzzzzzzzzzzzzzzzzzzzzzzzzzzzzzzzzzzzzzzzzzzzzzzzzzzzzzzzzzzzzzzzzzzzzzzzzzzzzzzzzzzzzzzzzzzzzzzzzzzzzzzzzzzzzzzzzzzzzzzzzzzzzzzzzzzz
......................................................................................June 10 – z3m Centre Console
zzzzzzzzzzzzzzzzzzzzzzzzzzzzzzzzzzzzzzzzzzzzzzzzzzzzzzzzzzzzzzzzzzzzzzzzzzzzzzzzzzzzzzzzzzzzzzzzzzzzzzzzzzzzzzzzzzzzzzzzzzzzzzzzzzzzzz


- z3m centre console fitted
- Justroadster armrest fitted
- Boot struts replaced
- Driver’s sidelight replaced

CENTRE CONSOLE

I’d always preferred the look of the z3m centre console as I feel that its retro styling goes well with the overall styling of the z3. The prefacelift centre console was definitely a case of function over form and whilst the facelift console goes some way towards addressing this it didn’t really hit the mark in the way that the z3m version does. I’d been on the lookout for a z3m centre console for some time and eventually found one on eBay and managed to secure it for £40. It came complete with gauges, no switches and was coloured blue:

<All pics - click to enlarge>

Image

The first job was to split the console and recolour the facia plates and leather:

Image Image Image

Switches were sourced from eBay and I elected to replace the external temperature gauge with a voltmeter (as fitted to the US S52 z3m coupe). The roof switch was a straight swap from pre to facelift version (although I had to trim the locating tab on the car connector). The ASC switch required a new connector on the car side as the pre and post facelift switches have completely different connectors. The new ASC connector (part number 61138380696) uses the same sockets as the prefacelift and only cost 67p from BMW. Moving the sockets from the old to the new connector was straightforward. I also replaced the gear lever and handbrake gaitors with some new ones from www.redlinegoods.com

Here’s a few pics:

Before:
Image

Old console removed :shock:
Image

New console fitted :D
Image Image

ARMREST

As I had gone to the trouble of fitting a new centre console I thought I might as well finish the job off by fitting an armrest. I purchased one here: http://www.justroadster.com/products/Z3 ... mrest.html
Fitting was straightforward and I took the opportunity to relocate the OBC that I’d removed from my original centre console into the armrest.

Image

BOOT STRUTS

The boot struts on my 13 year old zed had begun to sag (only to be expected I suppose :roll:) so I fitted some new ones from BMW and cleaned up the general area.

Image Image

DRIVER’S SIDELIGHT

The sidelight on the driver’s side had taken a large stone and had broken. Replacing it with a new item from BMW was a simple 5 minute job:

Image
Current...1998 ///M Coupe
Image
Previously...1997 Z3 2.8
Image
User avatar
w4tkins
Joined: Wed 08 Apr, 2009 19:59
Posts: 563

  Z3 roadster 2.0
Location: Lincoln

Post by w4tkins »

Fantastic work Ian. Your car is looking great 8-) its is a credit to you. I look forward to inspecting your work at santa pod, might pic your brains too.
Image My Journal
Favourite Quotes:
Rob Tan wrote: The Z3. Purely medicinal.
TREGZY wrote:''Ive seen the way you drive.....you got a heavy foot''
VikingSven
Joined: Sat 22 May, 2010 17:16
Posts: 195

  Z3 roadster 2.8
Location: Leeds

Post by VikingSven »

That gearstick gaiter is very nice. Where's it from? Mine is looking a bit tatty, and something like that would go perfect with the plan to add little bits of red trim to the totally black interior I have at the mo.
User avatar
Ian_C
Joined: Sun 10 Dec, 2006 20:10
Posts: 2415

  Z3 roadster 2.8
Location: Lytham St Annes

Post by Ian_C »

VikingSven wrote:That gearstick gaiter is very nice. Where's it from? Mine is looking a bit tatty, and something like that would go perfect with the plan to add little bits of red trim to the totally black interior I have at the mo.
The gaitor came from www.redlinegoods.com Lots of leather, colour and stitching combinations available to order.
Current...1998 ///M Coupe
Image
Previously...1997 Z3 2.8
Image
User avatar
Jonttt
Z Register member
Joined: Sun 28 Dec, 2008 16:32
Posts: 6554

  M roadster S54
Location: Liverpool

Post by Jonttt »

Agree with you all the way with the classic retro look the ///M consol gives (ie with the 6 round dials).

You now have the "improved" version with the voltmeter and OBC :D , great job :drive

ps that was a great price you got the complete centre for :wink:
Happiness is not around the corner........happiness is the corner
Image Video or Journal Garage: 2015 FFRR Black Edition, Porsche Boxster GTS, 1997 Porsche Carrara C4S, Ex 2001 BMW S54 Z3m Roadster
Stan 24v
Joined: Sun 07 Dec, 2008 17:16
Posts: 16

  blank.gif

Post by Stan 24v »

Ian

Any chance of some full shots of the car and the dash etc now mate?
Image
User avatar
Ian_C
Joined: Sun 10 Dec, 2006 20:10
Posts: 2415

  Z3 roadster 2.8
Location: Lytham St Annes

Post by Ian_C »

Stan 24v wrote:Ian

Any chance of some full shots of the car and the dash etc now mate?
I'll get some done at Harewood this weekend.
Current...1998 ///M Coupe
Image
Previously...1997 Z3 2.8
Image
User avatar
yalden
Joined: Sun 30 Mar, 2008 18:03
Posts: 1232

  Z3 roadster 3.0i
Location: Devon

Post by yalden »

Great addition to your interior! I wish I'd undertaken this mod before getting my original centre console wrapped in carbon. The additional dials make the interior a whole load more sophisticated!
User avatar
Ian_C
Joined: Sun 10 Dec, 2006 20:10
Posts: 2415

  Z3 roadster 2.8
Location: Lytham St Annes

Post by Ian_C »

zzzzzzzzzzzzzzzzzzzzzzzzzzzzzzzzzzzzzzzzzzzzzzzzzzzzzzzzzzzzzzzzzzzzzzzzzzzzzzzzzzzzzzzzzzzzzzzzzzzzzzzzzzzzzzzzzzzzzzzzzzzzzzzzzzzzzz
......................................................................................August 10 – ACS Wheel Centres
zzzzzzzzzzzzzzzzzzzzzzzzzzzzzzzzzzzzzzzzzzzzzzzzzzzzzzzzzzzzzzzzzzzzzzzzzzzzzzzzzzzzzzzzzzzzzzzzzzzzzzzzzzzzzzzzzzzzzzzzzzzzzzzzzzzzzz


- Replacement ACS wheel centres fitted

<All pics - click to enlarge>

When I had my ACS Type I wheels refurbed last winter it became apparent that the centre caps were in a bit of a state. Only one was complete, the rest had missing clips, the clips held on with araldite or the ACS logo missing from the front.
e.g.
Image

I tried all year to find original replacements, even resorting to contacting Rossiters at one stage, and was prepared to pay ACS' (usually extortionate) retail price. Unfortunately they were no longer available :head:

I sourced a set of Type II centres but unfortunately these only fit with lots of Dremel work and even then the fit is not perfect:
L - Standard Type II, R - Dremelled version
Image

After reading yalden's wheel thread I thought it might be worth contacting Claus at www.felgen-garage.de to see if he had anything suitable. As predicted he's come up trumps and I fitted the new centres this weekend. They are fantastic quality and appear to be made from cast aluminium with a silver painted finish on the face. They are secured with 3 grub screws:
Image

The ACS logo is a sticker and is the only aspect I'm not 100% happy with. It's not quite as sharp as an original so I'll be looking for some new stickers over the coming months - I may end up getting some made as initial searches have not been successful. Here's the before and after pics:

Before
Image

After
Image

Also passed a mileage milestone this week so thought it would be worth including for posterity:
Image
Current...1998 ///M Coupe
Image
Previously...1997 Z3 2.8
Image
User avatar
Ian_C
Joined: Sun 10 Dec, 2006 20:10
Posts: 2415

  Z3 roadster 2.8
Location: Lytham St Annes

Post by Ian_C »

zzzzzzzzzzzzzzzzzzzzzzzzzzzzzzzzzzzzzzzzzzzzzzzzzzzzzzzzzzzzzzzzzzzzzzzzzzzzzzzzzzzzzzzzzzzzzzzzzzzzzzzzzzzzzzzzzzzzzzzzzzzzzzzzzzzzzz
......................................................................................September 10 – RAID Steering Wheel
zzzzzzzzzzzzzzzzzzzzzzzzzzzzzzzzzzzzzzzzzzzzzzzzzzzzzzzzzzzzzzzzzzzzzzzzzzzzzzzzzzzzzzzzzzzzzzzzzzzzzzzzzzzzzzzzzzzzzzzzzzzzzzzzzzzzzz


- RAID Steering Wheel fitted

<All pics - click to enlarge>

I've been hankering after a replacement steering wheel for some time now as the original 3-spoke affair felt too large. There are only 2 practical options for the pre-facelift zed: an aftermarket wheel with no airbag (of which there is a large selection available at very reasonable costs) or a RAID wheel with an airbag (not such a large selection available at high cost). I wanted to retain an airbag and was therefore resigned to paying top money for a RAID wheel. My plan was to save some pennies and get myself a Christmas present at the end of year. You can imagine how chuffed I was when I found a 6 months old, 340mm RAID Daytona wheel on eBay (thanks jonttt :wink: ) and managed to win it for around 1/2 the retail price :D

The install was straightforward and has been covered in-depth a couple of times on the forum already with these excellent guides: Here and here.

The pics:

Before
Image

Wiring connections
Image

After
Image Image

Driver's eye view
Image

Overlay (new over old)
Image

I would echo the view of others that have installed 340mm RAID wheels that the transformation is well worthwhile. The wheel has a chunky feel and feels 'right' for a small 2 seat convertible. The steering feels slightly heavier (to be expected) and feels more direct.

Bottom line.... I'd have been happy with this wheel if I'd paid the full retail price for it. As I managed to snap it up for half of that it's fair to say that I'm ecstatic!
Current...1998 ///M Coupe
Image
Previously...1997 Z3 2.8
Image
User avatar
Jonttt
Z Register member
Joined: Sun 28 Dec, 2008 16:32
Posts: 6554

  M roadster S54
Location: Liverpool

Post by Jonttt »

Love it :wink:
Happiness is not around the corner........happiness is the corner
Image Video or Journal Garage: 2015 FFRR Black Edition, Porsche Boxster GTS, 1997 Porsche Carrara C4S, Ex 2001 BMW S54 Z3m Roadster
slacz
Joined: Fri 12 Mar, 2010 08:23
Posts: 28

  Z3 roadster 1.9
Contact:

Post by slacz »

I like your new center console with all the dials... adds a lot to the retro sports car interior.
User avatar
Z3MDriver
Joined: Sun 04 Jul, 2010 13:53
Posts: 37

  M roadster S50

Post by Z3MDriver »

Looking good !

340mm RAID - best mods ever !

Here is mine:

Image[/img]
«» Z3 3.2 ///M Roadster - S50B32
«» Cruise control
«» RAID Daytona Race 340mm Steering Wheel with Airbag
«» AC Schnitzer Shortshift
«» Storm Motorwerks Gear knob
«» AC Schnitzer Electric Seats
«» AC Schnitzer Carbon centre console + door trim
«» SCHMIDT REVOLUTION 19's Wheels
«» Eisenmann Race Exhaust 4x83mm + Supersprint Center exhaust
User avatar
Robert T
Site Admin
Joined: Mon 12 Jun, 2006 10:35
Posts: 10171

  Z3 roadster 1.9
Location: Cheshire

Post by Robert T »

Z3MDriver wrote:Here is mine:
Whahey! Someone with the same Pioneer headunit as me. :lol:

Cheers R.
Arctic Silver '99 Z3 1.9 & Black '59 Frogeye 1275cc
Image
Wolverine_1999
Joined: Mon 15 Feb, 2010 20:07
Posts: 454

  Z3 roadster 2.0
Location: Munich

Post by Wolverine_1999 »

Robert T wrote:
Z3MDriver wrote:Here is mine:
Whahey! Someone with the same Pioneer headunit as me. :lol:

Cheers R.
Me too :D
Stan 24v
Joined: Sun 07 Dec, 2008 17:16
Posts: 16

  blank.gif

Re: My Red Zed - Z3 JOURNAL - (RAID Steering Wheel, 16/09/10

Post by Stan 24v »

Bit quiet in here Ian :wink:
Image
Post Reply