1.9 Cobra cat back exhaust review & blog

UK forum for general and technical discussion about the Z3 roadster
Post Reply
RichP
Joined: Wed 20 Feb, 2013 00:47
Posts: 190

  Z3 roadster 1.9

1.9 Cobra cat back exhaust review & blog

Post by RichP »

I bought the Cobra cat back exhaust system last week for the 1.9 16v, and the rather large box arrived today.

I bought it because i wanted a simple bolt in replacement for my blowing and rotten original back section.

When i bought it i couldn't find a review that enabled me to know what i was getting, and considering it isn't cheap, it was a bit of a gamble. So i thought i would post this to inform anyone considering a purchase.

I wanted a bit of an exhaust 'note' as i've always felt a bit of noise was missing when driving around wales on a sunny day with the roof down (especially in the mountain tunnels!) the website http://www.cobrasport.com/exhaust/BMW/Z3+/10/0/0 describes the sound as subtle but sporty. My biggest worry was that it would sound like a 17 year old nova driven by a 17 year old lad. i'll write a bit on the noise later.

having spent so much on the exhaust i wanted to fit it myself, so what follows is roughly how it went. this is not intended as a guide to fitting, just an indication to people in my situation of whats involved. prior to this i've done nothing more advanced than change the brakes.

this is the contents of the big box:
Image

things to note are that it comes with a couple of bushes, but not the central one, so if yours is shot you will need to buy a new one. mine was ok, so i carried on. You also need some exhaust sealant (£3.99 from motor world). you do get a keyring, an air freshener, some go-faster stickers, and some instructions though.

Onto the ramps...
Image
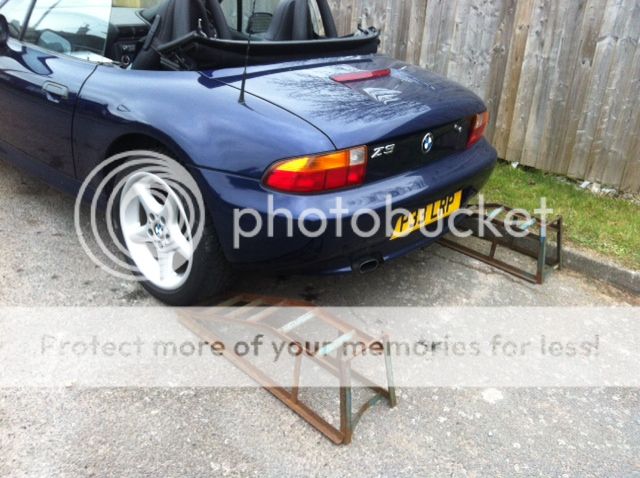
needless to say - dont do this on the jack (s) - if it falls you will die. :?

off with the old....
Image
Image

had a problem with round nuts here :shock: one of them was a no-go so i cut the bolt between the cat and the centre section with a hacksaw, took a while, a grinder would have been handy.

and on with the new. sealing joins with the sealant, i hung the back relatively easily, had a lot of trouble getting the central bushing on its hook. the method that finally worked was fixing it to the new exhaust first, then propping the pipe beneath the hanger with a jack, winding it up so i could use all my effort to hook the rubber over the metal lip. took a fair bit of failing before i managed this bit.

then i tightened the bolts to the cat with sealant in between. the bolts supplied are shorter than the ones on the original, so i couldn't replace the spring sections on the bolts (i'll post a photo of that tomorrow). perhaps someone here can tell me why the bolts are spring loaded and how important it is. If i hadn't cut the original bolt off i would have used them. finally i tighended the jubilee clip connecting the middle and rear sections.

Al in all less than 2 hours, including a lot of failing to get the bushers right.

looks quite nice i think, not too radical...
Image

Now. my insurance kicks in tomorrow, and i'm taking it for an MOT (it is currently SORN), so i have only had a sneaky drive up and down my close, i.e. i haven't got out of 2nd gear yet. It definitely has a fair bit of noise. However from the small amount of driving it is not a head turner unless you really boot it. It is at the upper end of volume that i wanted, but so far i'm happy. i had my housemate watch as i drove normally and he assures me i don't sound like a yobbo. I will report back after a proper drive tomorrow, and if it passes its mot i will have a motorway run to see if it is a droning nightmare.

as for performance i think i will find it hard to notice a difference, partly because i can't see that there will be dramatic gains, and partly because i have driven a huge diesel saloon for the last 5 months.

I took a little video, but as you can expect it is hard to portray the sound in real life on an iphone video.

Image

i'm happy to answer questions from anyone considering buying one, and if you want to have a look and listen to it fitted before parting with your cash message me and thats fine, i'm in NW england.
Last edited by RichP on Tue 26 Feb, 2013 13:25, edited 1 time in total.
Image Image
"I spent a lot of money on booze, birds and fast cars. The rest I just squandered." George Best
Jonco
Joined: Sat 04 Jun, 2011 07:24
Posts: 402

  Z3 roadster 1.9
Location: Cheshire

Re: 1.9 Cobra cat back exhaust review

Post by Jonco »

Good write up RichP. After much deliberation on what to go for, I have just ordered the same one this afternoon and before I read this. I am somewhat relieved there is nothing in your write up that tells me I've made the wrong decision. Cheers
geminimustang
Joined: Mon 11 Jun, 2012 21:06
Posts: 487

  Z3 roadster 1.9
Location: Wirral

Re: 1.9 Cobra cat back exhaust review

Post by geminimustang »

I purchased a Cobra twin pipe from eBay but haven't fitted it yet. The seller had it fitted,did 200 miles and took it off cos he thought it was too loud.Really glad to read your review,can't wait to get ours put on which will be when we get the car MOT'd in June.Whereabout in the NW are you? We live on the Wirral.
RichP
Joined: Wed 20 Feb, 2013 00:47
Posts: 190

  Z3 roadster 1.9

Re: 1.9 Cobra cat back exhaust review

Post by RichP »

Don't know if the twin pipe and oval pipe sound the same, but your welcome to have look.

By a pretty big coincidence I'm also in Wirral. In Woodchurch. If it Passes its MOT you can have a proper look if you like. (if it doesnt you can still look, but i'm too unlucky to be driving round without the correct paperwork. There would be blue flashy lights within minutes)
Image Image
"I spent a lot of money on booze, birds and fast cars. The rest I just squandered." George Best
geminimustang
Joined: Mon 11 Jun, 2012 21:06
Posts: 487

  Z3 roadster 1.9
Location: Wirral

Re: 1.9 Cobra cat back exhaust review

Post by geminimustang »

Rich,we live in Pensby but grew up on the woodchurch.Post when your car passes the MOT and I'll come down.My mum lives on the Arrowe Park.Small world,we're neighbours!
Pierrick
Joined: Fri 31 Aug, 2012 22:47
Posts: 484

  Z3 roadster 1.9

Re: 1.9 Cobra cat back exhaust review

Post by Pierrick »

Ouch! As you said it is expensive! Hope everything will be ok for your MOT!
RichP
Joined: Wed 20 Feb, 2013 00:47
Posts: 190

  Z3 roadster 1.9

Re: 1.9 Cobra cat back exhaust review

Post by RichP »

So this morning before i took the Z to its MOT i noticed there was a slight leak in the connection of the two parts of the new section. Wasn't too bad to separate a bit and reseal using a lot more paste.

As the car hasn't been driven since November I thought i'd give it a blast around, clear the cobwebs for its MOT. And it very quickly developed a serious misfire under anything more than 30-40% power :head: and with the new exhaust it sounded like a Harley Davidson and wouldn't get much above 40.

I decided to take it to its pre-booked MOT anyway, to find out any other problems, but now i guess i have another job to do. My (amateur) mechanics knowledge tells me to check/replace:

Plugs
Coil pack (£107)
MAF

and some other threads on here suggest it could need an oil + filter + O ring replacement. however it has only done a couple of 1000 miles since last oil + filter change. Another thread suggests a crankcase ventilation valve (must admit i've never heard of one).

Just waiting for the MOT results now. :(
Image Image
"I spent a lot of money on booze, birds and fast cars. The rest I just squandered." George Best
Jonco
Joined: Sat 04 Jun, 2011 07:24
Posts: 402

  Z3 roadster 1.9
Location: Cheshire

Re: 1.9 Cobra cat back exhaust review & blog

Post by Jonco »

If it was ok when you put it to `bed' in November then it's probably nothing that a bit more `exercise' will not cure. Would suggest you run it and if it doesn't calm down then have engine codes read before you start throwing money at a `maybe' fault.
User avatar
PCSAM
Joined: Sat 13 Aug, 2011 01:19
Posts: 1002

  blank
Location: Taynuilt

Re: 1.9 Cobra cat back exhaust review & blog

Post by PCSAM »

drive it like you stole it :shock: for a 10 miles or so third gear all the way . that will get everything up to proper running temp and give it a good clear out . its amazing the difference to the car after a good thrashing if its been sitting for a wile 8-)
Image
User avatar
TitanTim
Joined: Mon 23 Jun, 2008 18:56
Posts: 5488

  Z3 roadster 1.9i
Location: Stafford

Re: 1.9 Cobra cat back exhaust review & blog

Post by TitanTim »

If its misfiring under load then the last thing you want to be doing is trying to give it a good blast, I would check the plugs first and get a code reader on it if it persists. If there is a fault chances are it won't go away by magic.

Tim.
Image
2001 Z3 1.9 Roadster Sport - 2012 Z4 sDrive 2.0 M Sport
User avatar
Southernboy
Joined: Thu 07 Oct, 2010 12:39
Posts: 6436

  Z3 roadster 3.0i
Location: Johannesburg

Re: 1.9 Cobra cat back exhaust review & blog

Post by Southernboy »

Wouldn't apply too much load abruptly. It is often the case that when the motor has been idle for a long while, the lubrication in the valve lifters drains down to the sump etc. It is essentially "dry" and in the process any "sludge" type material will lodge into small tight areas it can't bypass. As the fluid oil drains away, it will thicken and cause things to stick somewhat when starting up again. You could add a can off engine flush to the old oil and leave the car at idle for 15 minutes then take it out for a short run and build up speed slowly. Don't use 5th gear, and decelerate with the clutch out as often as you can. This will flood the upper cylinder areas with oil and engine flush. Return and drain the old oil and engine flush. Leave the drain plug out for a couple of hours so that the max amount of old fluids will be removed. Remember, the oild, although hot is now everywhere from the top down throughout the motor...the longer you leave it draining the better...even overnight is OK. THEN REPLACE THE SUMP PLUG AND REPLACE WITH THE FRESH OIL... AND REPEAT THE DRIVE WITHOUT USING 5TH GEAR AND DECELERATE USING 4TH GEAR TO AGAIN FLOOD THE UPPER CYLINDER WITH FRESH OIL.
Obviously, while waiting for the oil to drain you could replace the plugs, oil and air filter elements, and clean up the engine bay etc etc...some "car caring stuff" doesn't hurt these old girls. You will probably find that sweet smooth purr will be back for your efforts.
"Normal is overrated"
Image

Z3 Upgrades and Additions
Pierrick
Joined: Fri 31 Aug, 2012 22:47
Posts: 484

  Z3 roadster 1.9

Re: 1.9 Cobra cat back exhaust review

Post by Pierrick »

RichP wrote: And it very quickly developed a serious misfire under anything more than 30-40% power

Same problem on my car... and if you have a look on the forum there is quite a few cars with the same problem! Some have changes the plugs, other the MAF, or the leads, or the coils... some have changed everything and the problem still there!!

I personally changed the plugs and problem still there, I checked my leads and there are ok, I think I'll give a good clean into the throttle assembly when I'll have enough time to do it!
RichP
Joined: Wed 20 Feb, 2013 00:47
Posts: 190

  Z3 roadster 1.9

Re: 1.9 Cobra cat back exhaust review & blog

Post by RichP »

So. It failed the MOT. :(

Surprisingly not on emissions given the backfire. He said he eventually got stable revs on all cylinders for long enough to take a pass reading.

Fails:

front suspension ball joint
rear brake pipe corrosion
handbrake not applying to one wheel

Advisories (and he said he strongly advises these):

the other front suspension ball joint
the other three brake pipes
both front suspension bushes
both rear tyres close to legal limit.

Plus i have the misfire to address.

THanks for the suggestions on the misfire issue.I will check/replace plugs tomorrow morning as thats the cheapest option and they are probably due for renewal anyway. failing that i will try the thorough oil change and flush. failing that i will cry for a while, then try other things.

I have 14 days (for free retest) to get the rest done. I''ll prob pay someone to do the brake lines as i'm not that confident yet. stopping is more important than going in my book!

I will have a go at replacing the arms & joints, and bushes myself. Not done it before but have to start sometime. learn by doing. I will internet it first of course but do i need any special equipment or is it just a dismantle, replace, put back together job? my nearest motor factor has them at £50+vat each.

the motor factor people will sell me either just the rubber bush £10+vat or the bracket + bush £30+vat, do i need to replace the bracket? only the rubber bush is mentioned in the MOT.

any ideas what to look for in the handbrake only operating one side?

Not a good first day back on the road for the little Z :bawl:
Image Image
"I spent a lot of money on booze, birds and fast cars. The rest I just squandered." George Best
User avatar
Southernboy
Joined: Thu 07 Oct, 2010 12:39
Posts: 6436

  Z3 roadster 3.0i
Location: Johannesburg

Re: 1.9 Cobra cat back exhaust review & blog

Post by Southernboy »

Sorry to hear your troubles mate...at least you know what to do first...
Have a look in the Z3 Knowledgebase. There's well documented - with pics on how to do the bushes and ball joints. You may need a ball joint splitter...they can be a hassle to remove. A good vice or a press for the bushes - getting the new ones in...the old ones are removed by use of a steel hack saw...but you'll read this in the info in the knowledgebase.
Good luck there and do some report backs on your progress.
"Normal is overrated"
Image

Z3 Upgrades and Additions
geminimustang
Joined: Mon 11 Jun, 2012 21:06
Posts: 487

  Z3 roadster 1.9
Location: Wirral

Re: 1.9 Cobra cat back exhaust review & blog

Post by geminimustang »

We had an advisory on the rear brake pipes last year.Hoylake BMW indy wanted £200 to replace so we've left it to next MOT due in June,barely done 1000 miles since last one.What alloys have you got on? I've got a set of winters in the garage.
User avatar
Southernboy
Joined: Thu 07 Oct, 2010 12:39
Posts: 6436

  Z3 roadster 3.0i
Location: Johannesburg

Re: 1.9 Cobra cat back exhaust review & blog

Post by Southernboy »

You only need to replace the bushes, but as I said earlier, getting the new bushes pressed in requires a bress or a decent steel vice to act as a press. If you buy the bush plus, it's a simple change-over. Ask the supplier if he'll give you a discount for you old bush + arm. He can re-bush and sell them on...so I would think he would want them ???
"Normal is overrated"
Image

Z3 Upgrades and Additions
RichP
Joined: Wed 20 Feb, 2013 00:47
Posts: 190

  Z3 roadster 1.9

Re: 1.9 Cobra cat back exhaust review & blog

Post by RichP »

This has turned into a bit of a blog thread now, but i'll go with it.

Thanks again for the advice! As i don't have a decent vice or press i think i will pay the extra for the simpler method of getting them pre-installed in brackets. It's one less thing to go wrong/for me to do a crappy job on.

The cats appear suspicious of my £120 worth of suspension arms:

Image
Image

Gemini: The alloys are standard 17". They currently have winter tyres on (I got part worns because i didn't have the money for decent tyres, and the majority of part worns are winter tyres from europe). I don't do much mileage in it, and they did pass the mot, so i'll run them a bit longer until hopefully i can afford some good-uns!

The brake pipes were on last years advisory, and one has moved up to a fail now :(

This morning i changed the plugs. as i was changing them i thought it had no chance of fixing the misfire as the old ones looked ok to me, no excessive corrosion/deposits:

Image

However, on a quick initial run down the lanes it has indeed solved the misfire! not often the first and cheapest solution works. lets hope it doesn't come back. And for the first time in six months driving it put a smile on my face! :D

Southernboy - i will do my next oil change with your method, can't do any harm!

Can anybody tell me the purpose of these on the exhaust plates between the cat and back section? and if not having them will cause any issues?

Image

now i need to buy some jack stands or similar..
Image Image
"I spent a lot of money on booze, birds and fast cars. The rest I just squandered." George Best
User avatar
BladeRunner919
Joined: Fri 17 Feb, 2012 20:18
Posts: 2225

  Z3 roadster 1.9

Re: 1.9 Cobra cat back exhaust review & blog

Post by BladeRunner919 »

RichP wrote:
Can anybody tell me the purpose of these on the exhaust plates between the cat and back section? and if not having them will cause any issues?

Image
They allow a small amount of flex in the joint. If you don't use them, and just bolt the joint up, you will get cracking in the pipe. When I bought my Zed, the rear section had been replaced and the joint was bolted up without the springs. It cracked a few times before I finally realised what the problem was. Luckily I can weld, so was able to repair the cracks.
gookah
Z Register member
Joined: Thu 07 Aug, 2008 09:51
Posts: 2737

  Z3 roadster 2.8

Re: 1.9 Cobra cat back exhaust review & blog

Post by gookah »

RichP wrote:
Can anybody tell me the purpose of these on the exhaust plates between the cat and back section?

Image

Please be careful inserting these at the back section of the cat,


The tortoiseshell one, particularly, looks like it may be quite viscious

RichP wrote: Image
Image

Z3 2.8 Progress Journal (Mine)
Z3 1.9 Sport Progress Journal (Wifey's)

I have an element of 'M-styling' on my car, If that's a good enough reason for the manufacturers to adorn a 320 with the M badge, then its certainly a good enough reason for me..
RichP
Joined: Wed 20 Feb, 2013 00:47
Posts: 190

  Z3 roadster 1.9

Re: 1.9 Cobra cat back exhaust review & blog

Post by RichP »

Ha ha, there will be no attachments behind the cat! :shock:

today i got to the point of getting the drivers side arm off before it got dark. tomorrow i will be trying to fit the new bits.

I will write an entry when i'm done, but i got the central ball joint nut off in a very unorthodox (but very effective!) way: by removing the plastic cover underneath, getting a socket and wrench over the nut, and positioning the jack (the type that opens from one end that came with the car) with the grooved plate over the handle of the wrench and the base against the inner bodywork (from underneath), then carefully winding it it open it effortlessly loosened the nut.

The hardest part was using the ball joint splitter and getting the unbolted arm off! i broke my eardrums with all the hammering!

Also i had to go and buy an 18mm spanner as i only had 17 and 19 in my set. this was for the outer bolt, immediately beneath the strut, that didn't have enough room to get a socket over.

Having trouble getting the new bush over the new arm. i will hit it with a big hammer and some wood tomorrow. its on, but not all the way.

Zedonist; yes, i got the whole bracket including lollipop and bush as i don't have the equipment to properly fit the bush into the bracket. I can get them on as far as the end of the arm is flush with the edge of the bushes, but no further! i will come up with a way of getting them on tomorrow.

BladeRunner: thanks! that makes sense. i'll get new bolts that are long enough to fit the spring and replace my fixed-bolt effort thats currently on.
Image Image
"I spent a lot of money on booze, birds and fast cars. The rest I just squandered." George Best
RichP
Joined: Wed 20 Feb, 2013 00:47
Posts: 190

  Z3 roadster 1.9

Re: 1.9 Cobra cat back exhaust review & blog

Post by RichP »

Side note:

had a panic today as i couldn't find my locking wheel nut key anywhere. :shake:

after a thorough search i found the dust cap for the locking nut on the path near the wheel, and it dawned on me that i must have left it on the nut when i did the brakes last week :head:

so as a last resort i walked the length of my road, and just as i had given up i spotted it in the gutter, 7 days after i had used it.

So thats my entire quota of luck used up for this year.
Image Image
"I spent a lot of money on booze, birds and fast cars. The rest I just squandered." George Best
RichP
Joined: Wed 20 Feb, 2013 00:47
Posts: 190

  Z3 roadster 1.9

Re: 1.9 Cobra cat back exhaust review & blog

Post by RichP »

I got the lollipop on a bit, then could not move it at all. very very stuck. hammers, wood, bashing, pulling, pushing, all manner of verbs all failed.

So i took the bits to the garage (its handy to know people who work in a garage) and he let me use his vice, and hydraulic ramp with car on top, to get them on. oh, and he also gave me some of his KY jelly :shock: he swears by it. much more effective than soapy water apparently. for getting car parts together that is.... :roll:

new arm went on easy enough after this. except that when tightening the drop link nut and pulling pretty hard on the 1/2" drive wrench it slipped off the nut, the handle slamming into my badly positioned forehead. This hurt more than i can begin to describe.

Literally blood sweat and tears for this car now (the tears came when looking at this months bank balance!).

Image
Image Image
"I spent a lot of money on booze, birds and fast cars. The rest I just squandered." George Best
User avatar
Southernboy
Joined: Thu 07 Oct, 2010 12:39
Posts: 6436

  Z3 roadster 3.0i
Location: Johannesburg

Re: 1.9 Cobra cat back exhaust review & blog

Post by Southernboy »

:shock: Oh wow! something very odd on your head !! Must've stunned you at the time.
"Normal is overrated"
Image

Z3 Upgrades and Additions
Del
Joined: Sat 19 Nov, 2011 18:35
Posts: 2136

  Z3 roadster 1.9

Re: 1.9 Cobra cat back exhaust review & blog

Post by Del »

Ouch - looks painful! :bawl: Thanks for sharing the ups and downs of DIY home mechanics – we’ve all been there as some point – I know I have. I spent a day trying to split my offside, outer ball joint when I did this job last August whereas the nearside one split with the first blow of the lump hammer. :D

Think of the money you’ve saved, a garage would have charged the full RRP for the wishbones, at least two hours labour plus 20% VAT. A BMW OE exhaust is over £1,000 plus fitting. :)

Just a metal brake pipe to go and hopefully that’s one of the little short ones. :)
RichP
Joined: Wed 20 Feb, 2013 00:47
Posts: 190

  Z3 roadster 1.9

Re: 1.9 Cobra cat back exhaust review & blog

Post by RichP »

Right. A little write up for people as mechanically minded as myself, i.e. i'm not useless but am new to pretty much everything.

This is my method, and it worked, if theres better methods i'm all ears. In total it took maybe 6 hours, to a more experienced mechanic 3-4 hrs i'd guess. at £40ish labour per hour thats saving £120+

Job - Changing front suspension arms. (also called control arms or wishbones).
Why? MOT failure on excessive play in ball joints & worn rear suspension arm bush

Stuff needed:

Arm(s) - £60ea
Bushes (bushes? bushings? bushers? hedges? :shrug ) already in brackets (lollipops) - £35ish
n.b. you can buy the bushthings separate to the brackets and use your current ones, but you may have a lot of trouble getting them in. depends how poor your feeling.

Spanners/sockets most notably an 18mm spanner for reasons i'll explain a spanner is required not a socket, and i needed to buy an 18mm.
extension bar(s) for 22mm socket at least 40cm long.

axle stands - £17
jack (two was helpful)
ball splitter (fork type) - £7
hammer - (if named Clarkson this is the only tool required)

Step 1 - loosen front wheel nuts, jack up, lower onto stands, remove wheels, place under sills for added safenessitude.
Image

Step 2 - remove plastic sump guard. just find the screws and undo them (couple of different small socket sizes)
Image

Step 3 - trick bit - remove centre ball joint nut. for this on the drivers side (RHD) i got the socket over the nut from underneath, clipped in the wrench, then positioned the bmw jack so the opening jaws (closed) were between the structural beam and the handle of the wrench, i could then wind the jack, effortlessly loosening the nut, the rest i did by hand. on the passenger side access is from the top with a long or collection of extension bars. no photo of the jack technique i'm afraid.
Image

Step 4 - front nut (wheel end of wishbone) - others have dismantled the suspension tower for this, but i was able to get the 18mm spanner over the nut above the ball joint and undo it enough to get the arm off. the nut will not come off with the arm in place due to the end of the strut sitting above it. ignore the shiny ball splitter tool for a minute, the nut can be seen above it loosened as much as possible..
Image

step 5 - drop link bolt - simple one - undo it (underneath)
Image

Step 6 - loosen, but don't remove two bolts on 'lollipop' (this is the bush + bracket you will prob be replacing along with the arms)
Image

step 7 - using the ball splitter bash it in like a wedge to pull the arm away from its mounting. it will be very very stuck. i found most success on centre ball from underneath/behind and not putting the fork across the joint but alongside it. it took a lot of heavy hammering, but eventually just slid down. The outer joint i cut away the rubber gaiter and bashed the fork across the joint, a lot,and hard. eventually it pops off then remove lollipop bolts and you can wiggle the arm off completely.

centre joint from behind and beneath:
Image

splitting the outer joint:
Image

the splitter gets pretty stuck to the old arm, needs some bashing to remove
Image

this video shows why you are doing the job. you can see the play in the old joins compared to new...
Image

Step 8 - fit new bushes to new arms. i had a lot of difficulty here, i could get them on but not all the way. what was needed was a good solid vice and a large socket placed over the end of the rod with a few bashes to get the lollipop on the arm. There is a left and right, so look at what has come off and make it match, angles, bolt rebates, and orientation. best lube - KY or similar :shock: as tested by a professional mechanic i know.
Image

Step 8.5 - smash wrench into head whilst tightening nut:
Image

step 9 - put the new arm on! this bit isn't too challenging. I used jacks to position it while i bolted it up (opposite of dismantling, minus the jack-to-loosen part).
Image
Image

step 10 -reassemble car, test drive, go and get tracking done.

Step 11 - revel and boast about your mechanical prowess. :squeeze:
Image Image
"I spent a lot of money on booze, birds and fast cars. The rest I just squandered." George Best
Jonco
Joined: Sat 04 Jun, 2011 07:24
Posts: 402

  Z3 roadster 1.9
Location: Cheshire

Re: 1.9 Cobra cat back exhaust review & blog

Post by Jonco »

Well done Rich - the art of improvisation.
Brought back memories of the car maintenance efforts of my youth including the bump(s) on the head and of course spanner rash on the hands!
User avatar
Mint
Joined: Tue 01 Nov, 2011 18:43
Posts: 475

  blank

Re: 1.9 Cobra cat back exhaust review & blog

Post by Mint »

Excellent write up Rich. I'm sorry but I laughed out loud when I saw the picture of your head :( . Been there, done that and got the t-shirt. At least you couldn't see how bad you'd hurt yourself until you looked in the mirror.
Pierrick
Joined: Fri 31 Aug, 2012 22:47
Posts: 484

  Z3 roadster 1.9

Re: 1.9 Cobra cat back exhaust review & blog

Post by Pierrick »

Thanks for the photos! I bed you are quite happy its finally done!

Where did you get all your parts?
Post Reply