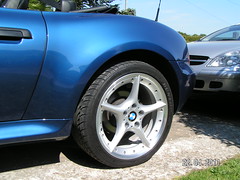
Some of you may have seen my thread about getting some new wheels. Well i managed to get a hold of a set reasonably cheap too but they were in less than great nick.
Since I had the option of keeping them off in the meantime I thought id give them a refurb from my own hand.
So heres a couple of them before sanding.

Some of the pictures dont really highlight the blemishes fully. With my ocd, i couldnt be happy putting them on in that condition.
So heres a couple of prep photos.


Im actually raging though I forgot to take some sanded pics.
Though for those interested. I used 2 mouse sanders, one with a 120 grit sheet and the 2nd with 1200 grit, I also used the same values in small sheets to hand sand particularly hard to reach areas.
There was slight bubbling on certain parts of the wheels and they proved extremely difficult to get flush and smooth as possible most kirbing if not all infact has came away with sanding (some bits were pretty bad too).
overall this part of the process took many hours today but i was insisting on getting it as good as I could possibly achieve.
The paint products I am using are;
(all halfords)
Grey Primer
Bmw artic silver for my base coat
Clear lacquer for a nice shine.
The wheels have currently been primed leaving each wheel for half an hour then touched up if necessary before moving on to the next one.
The wheels will sit overnight in the primed state as iv been told not to rush each stage of the process because it can cause cracks in the long run.
The silver base coat will be applied tomorrow aswell as pics uploaded of the primed state and the first of two layers of silver.
Thanks guys fingers crossed this turns out ok or its off to somebody local to have their attempt at it.