

Hi,
I'm planning on stripping the suspension components off the car to restore them and generally clean up the entire underneath. Well, what else is the Christmas break for (assuming the garage can be coaxed out of minus numbers by my tiny heater!)
I've already got ACS suspension that's done 15k miles, and H&R ARB's with new ARB bushes of a similar age. I'll be replacing all the other bushes with powerflex ones, and shotblasting everything and powdercoating \ smoothrite'ing.
Apart from the bushes, is anything else worth replacing, cleaning, servicing or upgrading whilst the car is in bits? I'll print out all the relevant bits from RealOEM and have a good look over them, but advice from those that have already undertaken something like this would be most welcome.
I've heard that the ARB drop links are an, erm, weak link. Are these worth doing given that I've got uprated ARB's?
I'll be replacing the rear shock top mounts, as they were flagged at Insp2 as being on the way out.
I'll be stripping and cleaning \ servicing the brakes and replacing the rear discs and pads. Fronts are new.
I'll check the diff mounts and ARB mounts while I'm there, but they were given the all clear recently.
Finally, and perhaps most important before I start, will I need any special tools, either to dismantle, or to rebuild?
Advice greatly appreciated.
Cheers, Ian
Suspension \ underside refurbishment


Ian, check out Deano's thread from last year when he refurbed his (and maybe get in touch with him)
http://www.zroadster.net/forum/viewtopic.php?t=22910
I believe the rear ARB mounts can break with the stiffer H&R anti rollbars so may be worth adding a strengthening bracket while your under there(you should be able to find something with a google search )
)
I think the only special tool you will need is thermal underwear
http://www.zroadster.net/forum/viewtopic.php?t=22910
I believe the rear ARB mounts can break with the stiffer H&R anti rollbars so may be worth adding a strengthening bracket while your under there(you should be able to find something with a google search
I think the only special tool you will need is thermal underwear
While you are taking the rear end to bits I would recommend Ireland Engineering subframe bushes and diff mount bush. These are underrated mods very worthwhile- stops rear wheel steer. The former needs a special tool. I have one in my garage
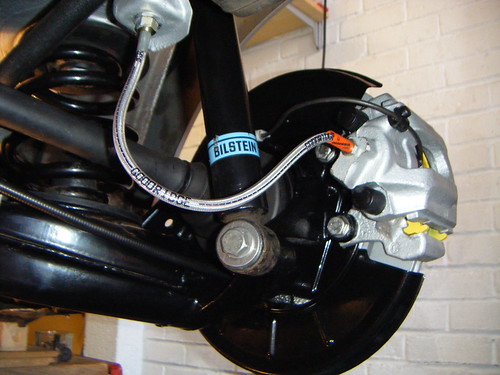
It's worth hard mounting the top of the rear shocks so they act more directly. There are a few vendors selling these. You want one with a spherical bearing.
All of these give more NVH but thats what the stereo is there for!
It's worth hard mounting the top of the rear shocks so they act more directly. There are a few vendors selling these. You want one with a spherical bearing.
All of these give more NVH but thats what the stereo is there for!
Z3M with a few mods...and a little bit more power
Thanks,
Are the IE subframe bushes the ones on either side of the subframe, to replace OEM part 33311090946 ? If so, they come as part of the powerflex kit. Are the IE ones different from normal poly bushes?
Also, for the top mounts, what type are you referring to? Is it the rogue engineering type mounts? Any specific recommendations?
Regarding NVH, if I can get the intake and exhausts modified, I won't need a stereo! I would have thought that with a gert big V8 up front neither would you!
Thanks, help much appreciated.
It sounds like you have the equivalent in the powerflex kit. Getting the old bush out is a complete pain so if you want to borrow my tool feel free.Ian Kelly wrote:Thanks,
Are the IE subframe bushes the ones on either side of the subframe, to replace OEM part 33311090946 ? If so, they come as part of the powerflex kit. Are the IE ones different from normal poly bushes?
Thanks, help much appreciated.
I think Rogue do one and IE too. See here:Ian Kelly wrote: Also, for the top mounts, what type are you referring to? Is it the rogue engineering type mounts? Any specific recommendations?
http://store.nexternal.com/shared/Store ... =571509957
I have the IE type but I think it better to get one with a spherical bearing. I'm planning on making some to my own design over the winter period. Removing the stock rubber top mount makes the shock more direct acting and the ride quality feels better.
Z3M with a few mods...and a little bit more power
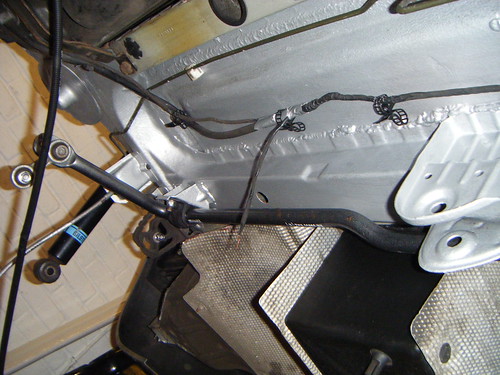
Ok, the rear suspension is partly dismantled, I've removed brakes\discs\handbrake, shocks and springs, both silencers (damn they're heavy!), wheel arch liners, and I've cracked the main subframe bolts loose on either side. I'm at the point where I'm ready to separate the diff from the prop and drop the subframe\diff\driveshafts\hubs and trailing arms as one complete assembly.
Quick question - there's a plastic 90 degree pipe c 20mm that goes up through the passenger side trailing arm. It comes out of a plastic box in front of the passenger side subframe. Is this related to the hood mechanism? If so, can I disconnect it? It's linked to the box by c 75mm of hose that i can remove.
Advice much appreciated.
Thanks, Ian
Blimey!! Can someone please tell me the right way to remove the diff\subframe assembly? And probably more importantly, how to reinstall!
The rear subframe is now off, but it was a pig to get off and I'd imagine it will be the devils own job to get back on and connected to the necessary bits.
With everything loosened and the diff \ hub assembly supported on a plank with blocks, on top of my trolley jack, I lowered the jack so that the diff bush was lower than the mount bracket. I then tapped the two subframe bushes to lower the front of the subframe, but realised that the prop bolts were still in the holes in the diff, but with nuts removed. This was preventing the subframe from coming off the bush mounts. I then got into a battle between trying to prise the diff off the prop (no luck) and trying to prise the subframe off the two bush mounts. The latter was eventually successful, but it took a good hour or so. The whole disassembly of the rear suspension has probably taken a leisurely 12 hours, but I don't have a manual and I've taken my time. And it's been cold. But I've learnt lots!
Any advice on the 'knack' to remove and reinstall the rear end is greatly appreciated.
I've got poly bushes to install in all suspension locations, and I was thinking about replacing the diff mount bush with an uprated one but I'm a bit unsure. I think that if I put a poly bush in the diff mount the reduced compliance may increase the loads acting through the diff mount. Any thoughts on this??
Also, although the diff mount and rear chassis crossmember look ok, is it worth the effort to have the crossmember seam welded while it's all accessible, or would you say that after 12 years, if it's still attached ok then best to just leave it alone?
Advice appreciated, many thanks,
Ian
Ian
Re the cross member and diff bracket I would either leave well alone if its not showing any cracks or signs of stress or go the whole hog and replace the diff bracket with the uprated one (I don't think it costs that much) and strengthen the cross member welds above / below.
To be honest if it was me and no signs of problems I would leave alone. I really think the boot floor problem is "random" due to the way the cars were originally manually spot welded and yours looks like it was done OK.
Really depends how much time you want to put into it as the actual cost of strengthening is not that great given you've already stripped the underside down.
The knack of getting it back on is to get a trolley jack under the balance point under the centre of the diff. You can find this by trial and error. As you lift it up onto the front studs ensure you keep rocking it and if it jams dont force it up, lower the assembly and start again. If you get it lined up right it will lift up easily.
Re the welds I would say that if you drive the car gently there is no need to fix was isn't broken. If you will be giving it the beans and you dont want to have to worry about degradation get some extra spot wleds added, or seam weld it/strengthen it etc.
On the rear diff bush I think some compliance adds to the loads going into the boot floor. If the subframwe assembly is moving around on compliant bushes it will impart intertial loads as well as the static loads from traction. Furthermore it seems bad to have solid front mounts and a compliant rear mount. If the rear is deflecting this could bend the M14 front studs, since there is no compliance in the bush to take up the movement. If the studs ever break you are in for a very large accident.
Z3M with a few mods...and a little bit more power
Just to confirm what others have already said - getting the rear subframe bushes out IS a total pain.
I ended up removing the alloy centre of the original bush by cutting it out with a jigsaw, then using a large hacksaw I cut through the bush steel inner section top to bottom to ease it's grip on the subframe, then I 'fabricated' a puller using a 200mm bolt, a U-shape of box section steel, and a large socket which was the same size as the steel inner of the bush but small enough to be pulled through the subframe when tightening the bolt.
The whole episode took 3 hours to come up with the solution and remove the bushes, I feel like I've been to the gym! Just the hub nuts to release now, and then the trailing arms, subframe and a few other bits are off to be blasted and powder coated. I'll reassemble with stainless nuts and bolts, paint the calipers, put new discs and pads in, tidy the diff, put poly bushes everywhere, rogue engineering top mounts (very nicely made), clean everything not already removed, and I should have an 'as new' refurbished rear end!!
The only thing I'm not sure about is whether to modify the trailing arm pick up points on the subframe to reduce the rear camber. The ACS suspension only lowers the car by c25mm, and the rear camber doesn't look excessive, although it's probably not optimum. Is there an easier way to reduce the camber slightly without having to re-weld the trailing arm brackets?
Just a thought, but could I just widen upwards the inner arm mounting holes, increasing the height of the inner arm locating bolts by say 5mm? There's plenty of metal in the bracket. I could then add a metal plate to the outside of the bracket with a hole 5mm higher than the original to ensure the bolts gain the extra few mm. Would this work or would it create a problem with the inner and outer trailing arm brackets no longer being in the same plane? Or is the amount of adjustment required to reduce the camber significantly more than 5mm?
Thanks again for advice so far,
Cheers, Ian
Good work Ian, glad to see someone else getting stuck in
You need some of these for the camber adjustment:
http://store.nexternal.com/shared/Store ... =218162178
Edit - you need to go to Z3/suspension/camber kit via that link.
If you are going to get some you can get me a set too to save on postage?
You need some of these for the camber adjustment:
http://store.nexternal.com/shared/Store ... =218162178
Edit - you need to go to Z3/suspension/camber kit via that link.
If you are going to get some you can get me a set too to save on postage?
Z3M with a few mods...and a little bit more power
Also worth thinking about whilst your tinkering is strengthening the ARB mounts (I believe others have fitted triangular plates to strengthen). They have been known to fail especially if you fit uprated ARB's.
Job sounds a good 'un so far I'm looking forward to seeing the finished article at some meets this summer 
Job sounds a good 'un so far
Cheers Jontt,
Have you had your rear camber measured? We've got the same suspension by the look of it. Just wondered if you thought yours was excessive? Thanks for the reminder on the ARB mounts, I'll have a look at them tonight.
Deano - I'm not sure about the Ireland Engineering camber solution. I'm sure it will work and be easily adjustable, but it looks like it achieves pretty much the same as what I think I can achieve by widening the inner trailing arm holes vertically.
I think I'll reassemble it all 'as is' and once I've refurbed the front end I'll have the geometry measured. If I do decide to then alter the rear camber, I'll have a lot more knowledge about the car, and everything should come apart a lot easier!
Cheers, Ian
Ian, I know my rear suspension was "adjusted" ie raised with spacers by the original owner as he felt it was too low.
I've don't have a problem with the camber but the above may be a factor.
The original wheels when I got the car had plenty of tread on them but showed no signs of uneven wear across them. I've not done enough mileage on my new tyres to tell if its an issue with tyre wear other than if it was a major factor you would be able to tell with pretty limited mileage.
To be honest Schnitzer are pretty spot on with the fit /performance of their dedicated solutions which are often (as with their suspension) rebranded high end stuff or specially manufactured for them by the high end suppliers (the suspension is a combination of both with I believe Bilstein shocks and custom made springs). If camber was an issue with their kit they would have supplied the equipment to adjust with it
I've never seen anything raising a camber issue with this suspension on a Z3m. To be honest I would leave alone as they will have tested it to death and its been on enough cars to have raised an issue before now

If the subframe is completely off the car, and if you don't have the special tool, the easiest way to remove the subframe bushes is to burn them out. Use a blow torch on low heat to set fire to the rubber and you can then simply knock them out.Ian Kelly wrote:Just to confirm what others have already said - getting the rear subframe bushes out IS a total pain.
I ended up removing the alloy centre of the original bush by cutting it out with a jigsaw, then using a large hacksaw I cut through the bush steel inner section top to bottom to ease it's grip on the subframe, then I 'fabricated' a puller using a 200mm bolt, a U-shape of box section steel, and a large socket which was the same size as the steel inner of the bush but small enough to be pulled through the subframe when tightening the bolt.
Take my advice and do NOT use poly trailing arm bushes. They squeak like mice and will drive you mental! I ended up removing my poly TA bushes and reverting to OEM. I tried all manner of ways of lubricating them but nothing worked longer than a couple of thousand miles.Ian Kelly wrote:The whole episode took 3 hours to come up with the solution and remove the bushes, I feel like I've been to the gym! Just the hub nuts to release now, and then the trailing arms, subframe and a few other bits are off to be blasted and powder coated. I'll reassemble with stainless nuts and bolts, paint the calipers, put new discs and pads in, tidy the diff, put poly bushes everywhere, rogue engineering top mounts (very nicely made), clean everything not already removed, and I should have an 'as new' refurbished rear end!!
Whilst you've got the back end dissembled, it's worth fitting the Ireland Engineering adjustable camber/toe brackets. I did this job and I have the camber set to minimum and toe at zero, and the handling is perfect (with a host of other suspension mods) PLUS the tyre wear is even across the entire width of 285mm tyres. I've managed 9 full days around The Ring with them and still got 5mm tread left.Ian Kelly wrote:The only thing I'm not sure about is whether to modify the trailing arm pick up points on the subframe to reduce the rear camber. The ACS suspension only lowers the car by c25mm, and the rear camber doesn't look excessive, although it's probably not optimum. Is there an easier way to reduce the camber slightly without having to re-weld the trailing arm brackets?
I did try the blow torch routine as well, but ended up smoking myself out of the garage! I was working in the evening and it was raining, or I'd have done it outside...
Interesting that you mention the squeaky TA poly bushes, I hadn't thought that they could cause squeaks. I'm part way through removing the old ones, so I am going to try the poly's (with lots of lube) and see how I get on. No point spending extra money on OEM bushes just yet, but if I'm posting on here in a couple of weeks about squeaks, then it's not like I wasn't warned.
BTW Exdos, do you still do the silencer mods? I was shocked at the weight of them, and wondered what was involved in making them more aerodynamic, freer breathing, and lighter. I have looked here and on the Coupe website but the pics have gone.
Cheers, Ian
You'll regret it! The metal sleeve inside the poly bushes is squeezed tight between the bracket when the bolt is tightened and so the sleeve can't rotate on the bolt, so the only way that the trailing arm can move is by the poly bush rotating on the metal sleeve, that's where the noise comes from. The poly bushes fit very tight against the sleeve so there's really no room for lubrication between the two surfaces and anything you put inside the poly bushes when you install will soon disappear through friction.Ian Kelly wrote: Interesting that you mention the squeaky TA poly bushes, I hadn't thought that they could cause squeaks. I'm part way through removing the old ones, so I am going to try the poly's (with lots of lube) and see how I get on. No point spending extra money on OEM bushes just yet, but if I'm posting on here in a couple of weeks about squeaks, then it's not like I wasn't warned.
Having started with OEM TA bushes, tried poly TA bushes and reverted to OEM, I notice that the ride is much better with OEM bushes.
Only for myself.Ian Kelly wrote:BTW Exdos, do you still do the silencer mods?
Ok, finally got round to taking some pictures.
The car when I bought it -
<a href="http://www.flickr.com/photos/49790352@N06/5348545635/" title="S50 M Roadster by Ian Kelly2, on Flickr"><img src="http://farm6.static.flickr.com/5169/534 ... 4fa838.jpg" width="500" height="199" alt="S50 M Roadster" /></a>
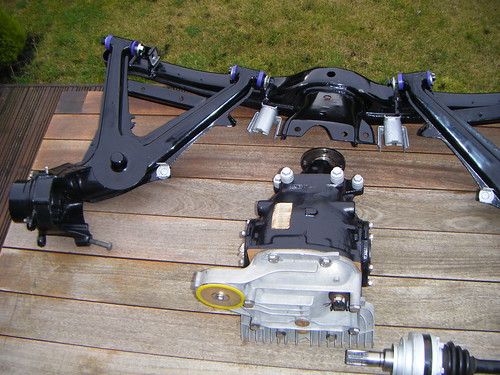
Rear end now -
<a href="http://www.flickr.com/photos/49790352@N06/5349420723/" title="rear view by Ian Kelly2, on Flickr"><img src="http://farm6.static.flickr.com/5046/534 ... 0aacf9.jpg" width="500" height="375" alt="rear view" /></a>
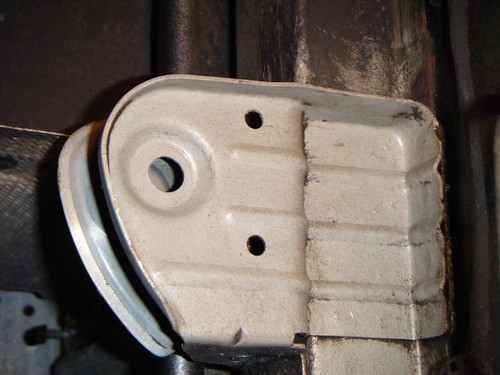
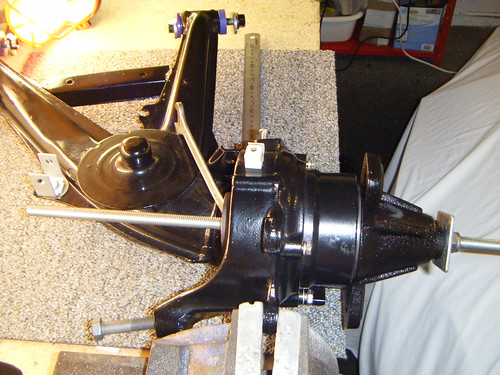
Diff mount -
<a href="http://www.flickr.com/photos/49790352@N06/5349413893/" title="diffmount3 by Ian Kelly2, on Flickr"><img src="http://farm6.static.flickr.com/5165/534 ... 65ff55.jpg" width="500" height="375" alt="diffmount3" /></a>
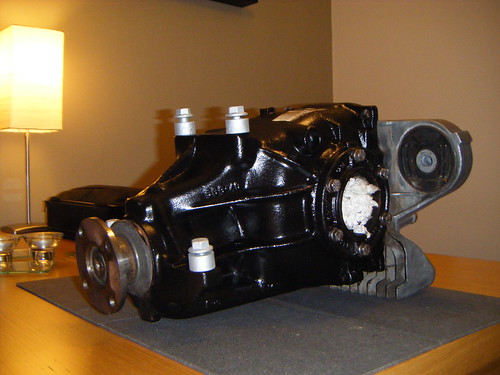
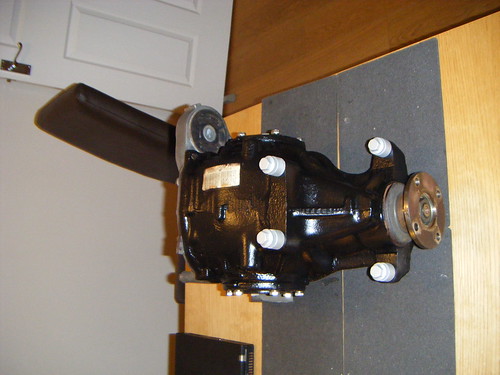
Cleaned and painted diff, before new poly bush put in (yes, that is the dining room...) -
<a href="http://www.flickr.com/photos/49790352@N06/5349543617/" title="diff1 by Ian Kelly2, on Flickr"><img src="http://farm6.static.flickr.com/5204/534 ... be8c7f.jpg" width="500" height="375" alt="diff1" /></a>
<a href="http://www.flickr.com/photos/49790352@N06/5349544739/" title="diff2 by Ian Kelly2, on Flickr"><img src="http://farm6.static.flickr.com/5042/534 ... 846e7f.jpg" width="500" height="375" alt="diff2" /></a>
Subframe bush removal "tool" now looking a bit battered -
<a href="http://www.flickr.com/photos/49790352@N06/5349406445/" title="bush removal tool by Ian Kelly2, on Flickr"><img src="http://farm6.static.flickr.com/5282/534 ... dfb218.jpg" width="500" height="375" alt="bush removal tool" /></a>
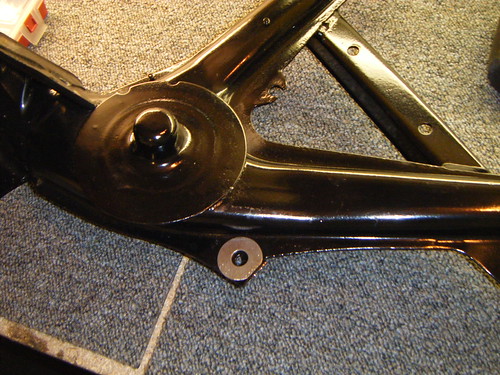
The wicked, nasty, evil and horrible subframe bushes -
<a href="http://www.flickr.com/photos/49790352@N06/5349425471/" title="subframe bushes by Ian Kelly2, on Flickr"><img src="http://farm6.static.flickr.com/5161/534 ... 567982.jpg" width="500" height="375" alt="subframe bushes" /></a>
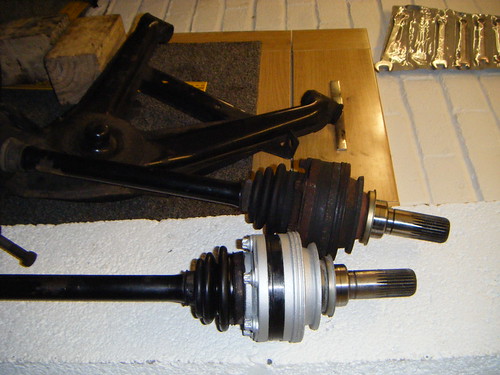
Driveshaft before and after refurb -
<a href="http://www.flickr.com/photos/49790352@N06/5350037302/" title="driveshaft refurb by Ian Kelly2, on Flickr"><img src="http://farm6.static.flickr.com/5043/535 ... 7c389e.jpg" width="500" height="375" alt="driveshaft refurb" /></a>
Eccentric bolts to allow camber and toe adjustment, adjuster plates not made yet -
<a href="http://www.flickr.com/photos/49790352@N06/5350014152/" title="eccentric4 by Ian Kelly2, on Flickr"><img src="http://farm6.static.flickr.com/5201/535 ... 5d7915.jpg" width="500" height="375" alt="eccentric4" /></a>
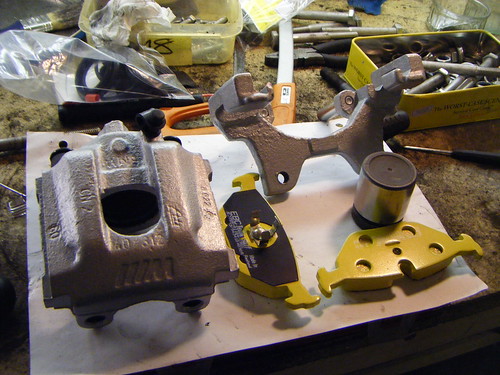
Small but rapidly growing selection of refurbed parts (dishwashers are great aren't they!) -
<a href="http://www.flickr.com/photos/49790352@N06/5349408889/" title="cleaned bits by Ian Kelly2, on Flickr"><img src="http://farm6.static.flickr.com/5165/534 ... 1ce780.jpg" width="500" height="375" alt="cleaned bits" /></a>
Adjuster plates to be made up to allow camber and toe adjustment (borrowed from an E28 website, thanks to the original poster) -
http://82.78.8.129/mye28/files/Rear_sub ... ish_r2.pdf
Excellent pictures and explanation of camber and toe adjustment on an E30 using eccentric bolts and adjuster plates (again, many thanks to the original website I found this on) -
http://www.e30m3project.com/e30m3perfor ... /index.htm
Will post more pics as things progress,
Cheers,
Ian
The car when I bought it -
<a href="http://www.flickr.com/photos/49790352@N06/5348545635/" title="S50 M Roadster by Ian Kelly2, on Flickr"><img src="http://farm6.static.flickr.com/5169/534 ... 4fa838.jpg" width="500" height="199" alt="S50 M Roadster" /></a>
Rear end now -
<a href="http://www.flickr.com/photos/49790352@N06/5349420723/" title="rear view by Ian Kelly2, on Flickr"><img src="http://farm6.static.flickr.com/5046/534 ... 0aacf9.jpg" width="500" height="375" alt="rear view" /></a>
Diff mount -
<a href="http://www.flickr.com/photos/49790352@N06/5349413893/" title="diffmount3 by Ian Kelly2, on Flickr"><img src="http://farm6.static.flickr.com/5165/534 ... 65ff55.jpg" width="500" height="375" alt="diffmount3" /></a>
Cleaned and painted diff, before new poly bush put in (yes, that is the dining room...) -
<a href="http://www.flickr.com/photos/49790352@N06/5349543617/" title="diff1 by Ian Kelly2, on Flickr"><img src="http://farm6.static.flickr.com/5204/534 ... be8c7f.jpg" width="500" height="375" alt="diff1" /></a>
<a href="http://www.flickr.com/photos/49790352@N06/5349544739/" title="diff2 by Ian Kelly2, on Flickr"><img src="http://farm6.static.flickr.com/5042/534 ... 846e7f.jpg" width="500" height="375" alt="diff2" /></a>
Subframe bush removal "tool" now looking a bit battered -
<a href="http://www.flickr.com/photos/49790352@N06/5349406445/" title="bush removal tool by Ian Kelly2, on Flickr"><img src="http://farm6.static.flickr.com/5282/534 ... dfb218.jpg" width="500" height="375" alt="bush removal tool" /></a>
The wicked, nasty, evil and horrible subframe bushes -
<a href="http://www.flickr.com/photos/49790352@N06/5349425471/" title="subframe bushes by Ian Kelly2, on Flickr"><img src="http://farm6.static.flickr.com/5161/534 ... 567982.jpg" width="500" height="375" alt="subframe bushes" /></a>
Driveshaft before and after refurb -
<a href="http://www.flickr.com/photos/49790352@N06/5350037302/" title="driveshaft refurb by Ian Kelly2, on Flickr"><img src="http://farm6.static.flickr.com/5043/535 ... 7c389e.jpg" width="500" height="375" alt="driveshaft refurb" /></a>
Eccentric bolts to allow camber and toe adjustment, adjuster plates not made yet -
<a href="http://www.flickr.com/photos/49790352@N06/5350014152/" title="eccentric4 by Ian Kelly2, on Flickr"><img src="http://farm6.static.flickr.com/5201/535 ... 5d7915.jpg" width="500" height="375" alt="eccentric4" /></a>
Small but rapidly growing selection of refurbed parts (dishwashers are great aren't they!) -
<a href="http://www.flickr.com/photos/49790352@N06/5349408889/" title="cleaned bits by Ian Kelly2, on Flickr"><img src="http://farm6.static.flickr.com/5165/534 ... 1ce780.jpg" width="500" height="375" alt="cleaned bits" /></a>
Adjuster plates to be made up to allow camber and toe adjustment (borrowed from an E28 website, thanks to the original poster) -
http://82.78.8.129/mye28/files/Rear_sub ... ish_r2.pdf
Excellent pictures and explanation of camber and toe adjustment on an E30 using eccentric bolts and adjuster plates (again, many thanks to the original website I found this on) -
http://www.e30m3project.com/e30m3perfor ... /index.htm
Will post more pics as things progress,
Cheers,
Ian
She's very tolerant of my car related behaviour, although I think she feels like a 'garage widow' at the moment...
The reason for getting this car is that I did a tour of the Alps last year in the windscreen-less kit car and had an amazing time, so I promised I'd change the kit car for something more sensible and we could do this years trip together. So I HAVE to bring bits into the house, for our holiday
The reason for getting this car is that I did a tour of the Alps last year in the windscreen-less kit car and had an amazing time, so I promised I'd change the kit car for something more sensible and we could do this years trip together. So I HAVE to bring bits into the house, for our holiday

I've managed to get one trailing arm completely bare, with the hub \ driveshaft \ bearing \ bushes all removed ready for blasting and powder coating, along with the sub frame and a pile of smaller bits.
The other side is proving more difficult. I've broken my hub puller trying to get the driveshaft pushed out of the hub. I tried a different tactic and used the slide hammer on the hub, thinking I could pull the hub off the driveshaft and out of the bearing at the same time, but no luck (didn't really think it would work). Tried drifting it out with 4lb hammer and a solid brass bar, but it didn't budge.
There's quite a few postings elsewhere on line about e36 \ e46 driveshafts stuck in hubs, and tales of 12 tonne pullers giving up the ghost followed by trips to machine shops.
Has anyone overcome this problem on the Z3? After several hours of trying and a small amount of blood, I'm loathe to give in and go to the local engineers. I think the job is made more difficult with the rear end removed from the car, but that's what I'm stuck with.
Any advice appreciated, many thanks, Ian
Project update -
I gave up with the stuck driveshaft and took it to Mr Engineer. He used a beefy looking industrial hub puller to push the driveshaft out of the hub.
So, with all rear end components dismantled I took them to be shot blasted and coated.
Subframe after trying to grind all the paint off -
<a href="http://www.flickr.com/photos/49790352@N06/5349424329/" title="subframe3 by Ian Kelly2, on Flickr"><img src="http://farm6.static.flickr.com/5003/534 ... e4e83e.jpg" width="500" height="375" alt="subframe3" /></a>
<a href="http://www.flickr.com/photos/49790352@N06/5350012944/" title="subframe2 by Ian Kelly2, on Flickr"><img src="http://farm6.static.flickr.com/5005/535 ... e6459c.jpg" width="500" height="375" alt="subframe2" /></a>
The trailing arm with driveshaft stuck in -
<a href="http://www.flickr.com/photos/49790352@N06/5349400477/" title="trailingarm1 by Ian Kelly2, on Flickr"><img src="http://farm6.static.flickr.com/5164/534 ... 22def1.jpg" width="500" height="375" alt="trailingarm1" /></a>
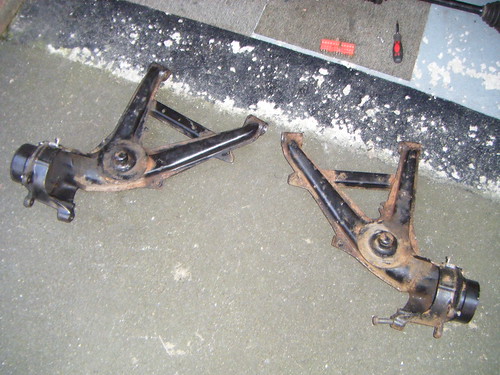
Trailing arms ready for treatment, quite a bit of rust! -
<a href="http://www.flickr.com/photos/49790352@N06/5423934761/" title="trailingarm3 by Ian Kelly2, on Flickr"><img src="http://farm6.static.flickr.com/5134/542 ... 777831.jpg" width="500" height="375" alt="trailingarm3" /></a>
<a href="http://www.flickr.com/photos/49790352@N06/5423935347/" title="trailingarm8 by Ian Kelly2, on Flickr"><img src="http://farm6.static.flickr.com/5219/542 ... 775f2c.jpg" width="500" height="375" alt="trailingarm8" /></a>
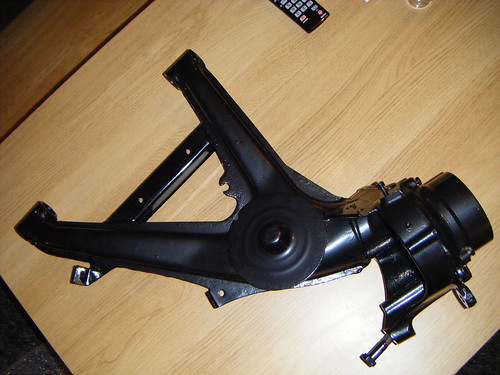
After shot blasting and powder coating -
<a href="http://www.flickr.com/photos/49790352@N06/5424536374/" title="trailing clean1 by Ian Kelly2, on Flickr"><img src="http://farm6.static.flickr.com/5135/542 ... a82847.jpg" width="500" height="375" alt="trailing clean1" /></a>
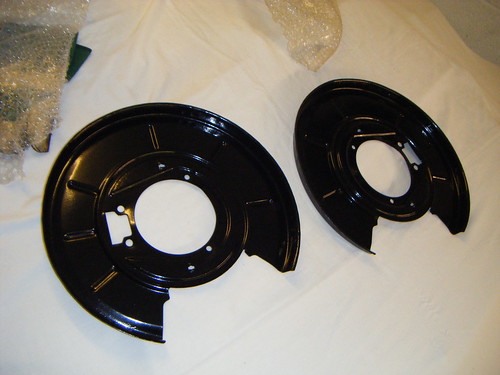
<a href="http://www.flickr.com/photos/49790352@N06/5423938737/" title="brake backplates by Ian Kelly2, on Flickr"><img src="http://farm6.static.flickr.com/5177/542 ... 63785f.jpg" width="500" height="375" alt="brake backplates" /></a>
<a href="http://www.flickr.com/photos/49790352@N06/5423910559/" title="components1 by Ian Kelly2, on Flickr"><img src="http://farm6.static.flickr.com/5178/542 ... 93f9df.jpg" width="500" height="375" alt="components1" /></a>
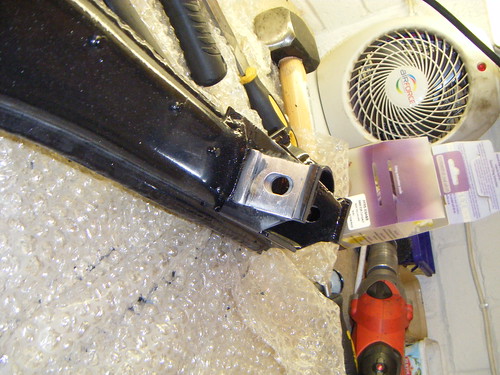
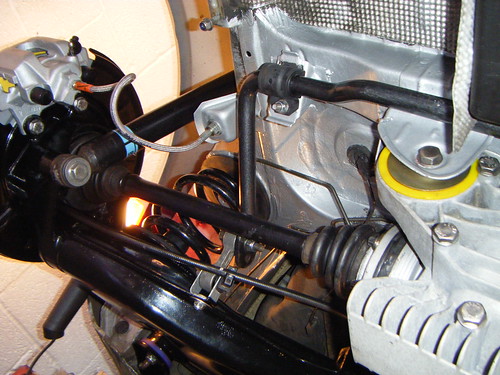
The Z3M Coupe forum mentioned that the ARB mounts can snap off the trailing arms if using uprated ARB's. They recommend welding supports from underneath, but having checked the bracket it seemed like spreading the load would ease any localised stress, so a large stainless washer was filed to fit, reckon it will be fine.
<a href="http://www.flickr.com/photos/49790352@N06/5424511618/" title="ARB link mount by Ian Kelly2, on Flickr"><img src="http://farm6.static.flickr.com/5097/542 ... aed496.jpg" width="500" height="375" alt="ARB link mount" /></a>
New bearings installed with M12 threaded bar, a hub puller, various bits of other garage stuff, and the old bearing used inside the trailing arm. Top tip - if you are replacing bearings keep the old ones, they are (obviously) exactly the right size to push the new bearing the last 5mm into the trailing arm! I used an impact driver for the last 5mm as it was getting very difficult to tighten the bolt, and the shock from the impact helps the bearing to seat all the way home.
<a href="http://www.flickr.com/photos/49790352@N06/5424512366/" title="bearing install3 by Ian Kelly2, on Flickr"><img src="http://farm6.static.flickr.com/5019/542 ... 47dc96.jpg" width="500" height="375" alt="bearing install3" /></a>
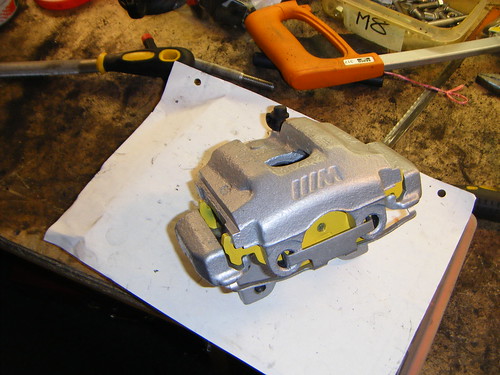
Brakes also tarted up with new seals and yellow stuff pads. Goodridge hoses on the way as well.
<a href="http://www.flickr.com/photos/49790352@N06/5423912429/" title="brake caliper refurb1 by Ian Kelly2, on Flickr"><img src="http://farm6.static.flickr.com/5251/542 ... 96e4a6.jpg" width="500" height="375" alt="brake caliper refurb1" /></a>
<a href="http://www.flickr.com/photos/49790352@N06/5424513688/" title="brake caliper refurb3 by Ian Kelly2, on Flickr"><img src="http://farm6.static.flickr.com/5172/542 ... 2abec5.jpg" width="500" height="375" alt="brake caliper refurb3" /></a>
Camber and toe adjuster plates welded to the subframe trailing arm brackets. This shows the widened slot for the eccentric bolt to move within, before widening out the original hole in the bracket -
<a href="http://www.flickr.com/photos/49790352@N06/5424533026/" title="camber plates1 by Ian Kelly2, on Flickr"><img src="http://farm6.static.flickr.com/5134/542 ... 7e2bd3.jpg" width="500" height="375" alt="camber plates1" /></a>
I had an extra set of these adjuster plates made up, cost me £40 for the full set of 8 plates. If anyone's interested in them please PM me. If you just want camber adjustment, then you'd only need 4 plates.
With the original hole now widened out, the bolt can move back \ forwards (toe) or up \ down (camber) -
<a href="http://www.flickr.com/photos/49790352@N06/5424533606/" title="camber plates4 by Ian Kelly2, on Flickr"><img src="http://farm6.static.flickr.com/5096/542 ... 4b7184.jpg" width="500" height="375" alt="camber plates4" /></a>
Eccentric bolt within the adjuster plates, with poly bush for trailing arm -
<a href="http://www.flickr.com/photos/49790352@N06/5424536946/" title="trailing arm bushes2 by Ian Kelly2, on Flickr"><img src="http://farm6.static.flickr.com/5019/542 ... dbbe49.jpg" width="500" height="375" alt="trailing arm bushes2" /></a>
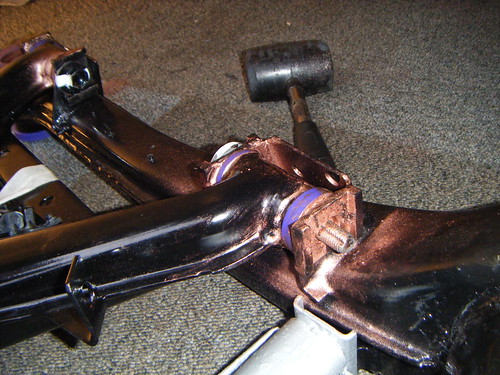
Getting the diff mount bush out was a pain. I ended up cutting the rubber centre section out, then cutting through the outer metal of the bush in 2 places. I was very wary of cutting into the diff metal, as it's quite thin around the mount. Once the cuts were mostly through I used a large screwdriver and hammer to break the cut all the way through by levering it, then the diff mount relinquished it's grip!
<a href="http://www.flickr.com/photos/49790352@N06/5424538060/" title="diff bush2 by Ian Kelly2, on Flickr"><img src="http://farm6.static.flickr.com/5294/542 ... c0498c.jpg" width="500" height="375" alt="diff bush2" /></a>
<a href="http://www.flickr.com/photos/49790352@N06/5423934159/" title="diff bush 5 by Ian Kelly2, on Flickr"><img src="http://farm6.static.flickr.com/5176/542 ... c1f51b.jpg" width="500" height="375" alt="diff bush 5" /></a>
<a href="http://www.flickr.com/photos/49790352@N06/5424534150/" title="diff bush 4 by Ian Kelly2, on Flickr"><img src="http://farm6.static.flickr.com/5139/542 ... fa118e.jpg" width="500" height="375" alt="diff bush 4" /></a>
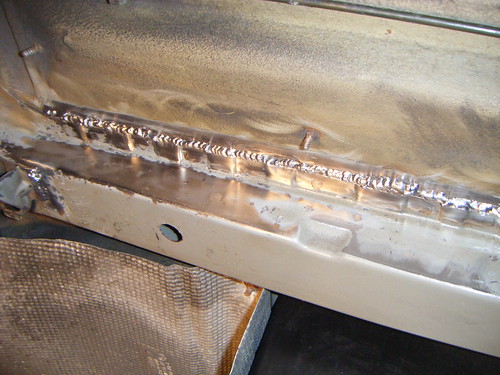
Just one more caliper to refurb, then I can look at the chassis and prepare it for welding. After all the effort I've put in so far, I've decided to seam weld the cross member to the boot floor. The diff mount bracket itself looks as new and shows no sign of stress so I'm leaving it as is.
I reckon that by fully welding the cross member to the boot the whole thing should be tied together sufficiently. 2 spot welds have been re-welded in the past, and although it all looks fine to me, it would be daft not to weld it properly while I've got access.
Cheers,
Ian
I gave up with the stuck driveshaft and took it to Mr Engineer. He used a beefy looking industrial hub puller to push the driveshaft out of the hub.
So, with all rear end components dismantled I took them to be shot blasted and coated.
Subframe after trying to grind all the paint off -
<a href="http://www.flickr.com/photos/49790352@N06/5349424329/" title="subframe3 by Ian Kelly2, on Flickr"><img src="http://farm6.static.flickr.com/5003/534 ... e4e83e.jpg" width="500" height="375" alt="subframe3" /></a>
<a href="http://www.flickr.com/photos/49790352@N06/5350012944/" title="subframe2 by Ian Kelly2, on Flickr"><img src="http://farm6.static.flickr.com/5005/535 ... e6459c.jpg" width="500" height="375" alt="subframe2" /></a>
The trailing arm with driveshaft stuck in -
<a href="http://www.flickr.com/photos/49790352@N06/5349400477/" title="trailingarm1 by Ian Kelly2, on Flickr"><img src="http://farm6.static.flickr.com/5164/534 ... 22def1.jpg" width="500" height="375" alt="trailingarm1" /></a>
Trailing arms ready for treatment, quite a bit of rust! -
<a href="http://www.flickr.com/photos/49790352@N06/5423934761/" title="trailingarm3 by Ian Kelly2, on Flickr"><img src="http://farm6.static.flickr.com/5134/542 ... 777831.jpg" width="500" height="375" alt="trailingarm3" /></a>
<a href="http://www.flickr.com/photos/49790352@N06/5423935347/" title="trailingarm8 by Ian Kelly2, on Flickr"><img src="http://farm6.static.flickr.com/5219/542 ... 775f2c.jpg" width="500" height="375" alt="trailingarm8" /></a>
After shot blasting and powder coating -
<a href="http://www.flickr.com/photos/49790352@N06/5424536374/" title="trailing clean1 by Ian Kelly2, on Flickr"><img src="http://farm6.static.flickr.com/5135/542 ... a82847.jpg" width="500" height="375" alt="trailing clean1" /></a>
<a href="http://www.flickr.com/photos/49790352@N06/5423938737/" title="brake backplates by Ian Kelly2, on Flickr"><img src="http://farm6.static.flickr.com/5177/542 ... 63785f.jpg" width="500" height="375" alt="brake backplates" /></a>
<a href="http://www.flickr.com/photos/49790352@N06/5423910559/" title="components1 by Ian Kelly2, on Flickr"><img src="http://farm6.static.flickr.com/5178/542 ... 93f9df.jpg" width="500" height="375" alt="components1" /></a>
The Z3M Coupe forum mentioned that the ARB mounts can snap off the trailing arms if using uprated ARB's. They recommend welding supports from underneath, but having checked the bracket it seemed like spreading the load would ease any localised stress, so a large stainless washer was filed to fit, reckon it will be fine.
<a href="http://www.flickr.com/photos/49790352@N06/5424511618/" title="ARB link mount by Ian Kelly2, on Flickr"><img src="http://farm6.static.flickr.com/5097/542 ... aed496.jpg" width="500" height="375" alt="ARB link mount" /></a>
New bearings installed with M12 threaded bar, a hub puller, various bits of other garage stuff, and the old bearing used inside the trailing arm. Top tip - if you are replacing bearings keep the old ones, they are (obviously) exactly the right size to push the new bearing the last 5mm into the trailing arm! I used an impact driver for the last 5mm as it was getting very difficult to tighten the bolt, and the shock from the impact helps the bearing to seat all the way home.
<a href="http://www.flickr.com/photos/49790352@N06/5424512366/" title="bearing install3 by Ian Kelly2, on Flickr"><img src="http://farm6.static.flickr.com/5019/542 ... 47dc96.jpg" width="500" height="375" alt="bearing install3" /></a>
Brakes also tarted up with new seals and yellow stuff pads. Goodridge hoses on the way as well.
<a href="http://www.flickr.com/photos/49790352@N06/5423912429/" title="brake caliper refurb1 by Ian Kelly2, on Flickr"><img src="http://farm6.static.flickr.com/5251/542 ... 96e4a6.jpg" width="500" height="375" alt="brake caliper refurb1" /></a>
<a href="http://www.flickr.com/photos/49790352@N06/5424513688/" title="brake caliper refurb3 by Ian Kelly2, on Flickr"><img src="http://farm6.static.flickr.com/5172/542 ... 2abec5.jpg" width="500" height="375" alt="brake caliper refurb3" /></a>
Camber and toe adjuster plates welded to the subframe trailing arm brackets. This shows the widened slot for the eccentric bolt to move within, before widening out the original hole in the bracket -
<a href="http://www.flickr.com/photos/49790352@N06/5424533026/" title="camber plates1 by Ian Kelly2, on Flickr"><img src="http://farm6.static.flickr.com/5134/542 ... 7e2bd3.jpg" width="500" height="375" alt="camber plates1" /></a>
I had an extra set of these adjuster plates made up, cost me £40 for the full set of 8 plates. If anyone's interested in them please PM me. If you just want camber adjustment, then you'd only need 4 plates.
With the original hole now widened out, the bolt can move back \ forwards (toe) or up \ down (camber) -
<a href="http://www.flickr.com/photos/49790352@N06/5424533606/" title="camber plates4 by Ian Kelly2, on Flickr"><img src="http://farm6.static.flickr.com/5096/542 ... 4b7184.jpg" width="500" height="375" alt="camber plates4" /></a>
Eccentric bolt within the adjuster plates, with poly bush for trailing arm -
<a href="http://www.flickr.com/photos/49790352@N06/5424536946/" title="trailing arm bushes2 by Ian Kelly2, on Flickr"><img src="http://farm6.static.flickr.com/5019/542 ... dbbe49.jpg" width="500" height="375" alt="trailing arm bushes2" /></a>
Getting the diff mount bush out was a pain. I ended up cutting the rubber centre section out, then cutting through the outer metal of the bush in 2 places. I was very wary of cutting into the diff metal, as it's quite thin around the mount. Once the cuts were mostly through I used a large screwdriver and hammer to break the cut all the way through by levering it, then the diff mount relinquished it's grip!
<a href="http://www.flickr.com/photos/49790352@N06/5424538060/" title="diff bush2 by Ian Kelly2, on Flickr"><img src="http://farm6.static.flickr.com/5294/542 ... c0498c.jpg" width="500" height="375" alt="diff bush2" /></a>
<a href="http://www.flickr.com/photos/49790352@N06/5423934159/" title="diff bush 5 by Ian Kelly2, on Flickr"><img src="http://farm6.static.flickr.com/5176/542 ... c1f51b.jpg" width="500" height="375" alt="diff bush 5" /></a>
<a href="http://www.flickr.com/photos/49790352@N06/5424534150/" title="diff bush 4 by Ian Kelly2, on Flickr"><img src="http://farm6.static.flickr.com/5139/542 ... fa118e.jpg" width="500" height="375" alt="diff bush 4" /></a>
Just one more caliper to refurb, then I can look at the chassis and prepare it for welding. After all the effort I've put in so far, I've decided to seam weld the cross member to the boot floor. The diff mount bracket itself looks as new and shows no sign of stress so I'm leaving it as is.
I reckon that by fully welding the cross member to the boot the whole thing should be tied together sufficiently. 2 spot welds have been re-welded in the past, and although it all looks fine to me, it would be daft not to weld it properly while I've got access.
Cheers,
Ian
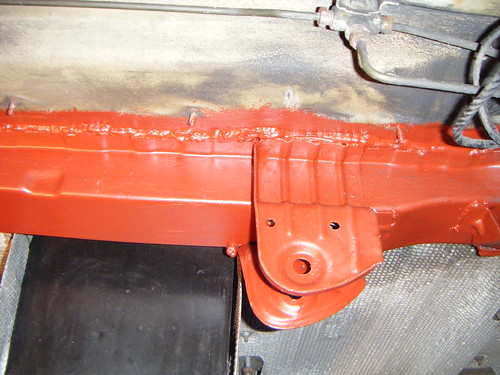
Well the rear suspension is back on and the car has passed it's MOT today, so I must have put it back together ok 
The refurb of the rear suspension has taken a lot longer than expected, but it's done and the diff cross member has been seam welded to ensure it stays put.
Anyway, quick pictorial update -
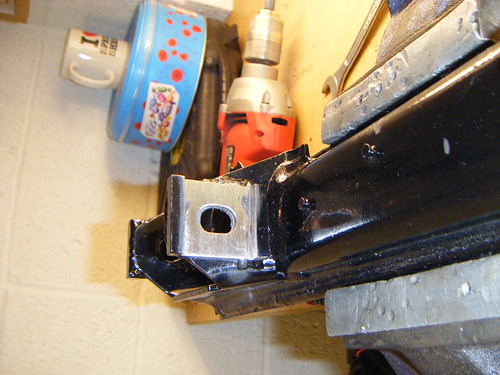
Chassis cross member seam welded, and ARB mounts \ diff mount also welded for additional strength.
<a href="http://www.flickr.com/photos/49790352@N06/5490039792/" title="DSCF2329 by Ian Kelly2, on Flickr"><img src="http://farm6.static.flickr.com/5294/549 ... 4d4aca.jpg" width="500" height="375" alt="DSCF2329" /></a>
<a href="http://www.flickr.com/photos/49790352@N06/5489443813/" title="DSCF2334 by Ian Kelly2, on Flickr"><img src="http://farm6.static.flickr.com/5096/548 ... 730207.jpg" width="500" height="375" alt="DSCF2334" /></a>
<a href="http://www.flickr.com/photos/49790352@N06/5490042374/" title="DSCF2344 by Ian Kelly2, on Flickr"><img src="http://farm6.static.flickr.com/5179/549 ... 9d886b.jpg" width="500" height="375" alt="DSCF2344" /></a>
<a href="http://www.flickr.com/photos/49790352@N06/5489447651/" title="DSCF2345 by Ian Kelly2, on Flickr"><img src="http://farm6.static.flickr.com/5177/548 ... 2844cb.jpg" width="500" height="375" alt="DSCF2345" /></a>
Everything looking much cleaner!
<a href="http://www.flickr.com/photos/49790352@N06/5490123092/" title="DSCF2359 by Ian Kelly2, on Flickr"><img src="http://farm6.static.flickr.com/5171/549 ... b134fe.jpg" width="500" height="375" alt="DSCF2359" /></a>
<a href="http://www.flickr.com/photos/49790352@N06/5489552143/" title="DSCF2357 by Ian Kelly2, on Flickr"><img src="http://farm6.static.flickr.com/5253/548 ... 0f1df7.jpg" width="500" height="375" alt="DSCF2357" /></a>
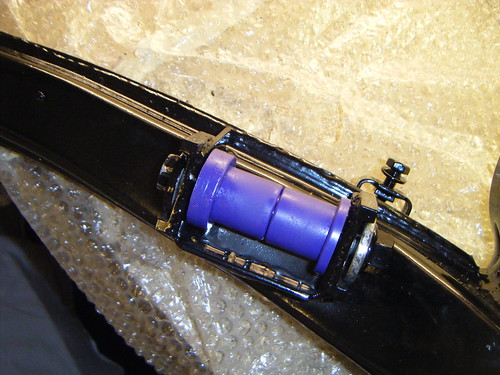
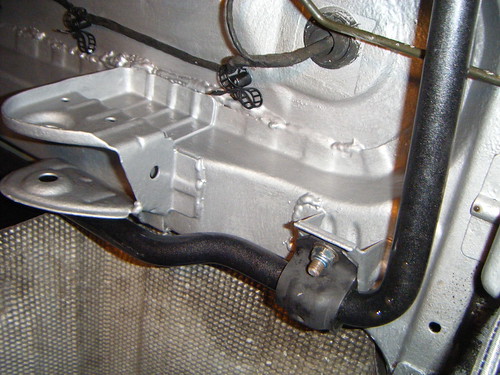
Poly bushes then installed in subframe and trailing arm mounts. TA mounts liberally coated in copper grease, in an attempt to prevent squeaks.
When installing the TA bushes, they seemed ok until I put the stainless steel inner part in, then they grew by 3-4mm and were too big for the TA mount brackets. After some thought I decided to trim the inside edge of the bush by 3mm, so that even with the steel inner the bush fitted the TA mount bracket ok. Not sure if this move will come back to haunt me, but given the advice received about TA poly bushes squeaking, thought it was worth a try. This pic shows the toe adjuster plates clearly.
<a href="http://www.flickr.com/photos/49790352@N06/5490046080/" title="DSCF2346 by Ian Kelly2, on Flickr"><img src="http://farm6.static.flickr.com/5295/549 ... 1cc8a4.jpg" width="500" height="375" alt="DSCF2346" /></a>
Finally installed the subframe bushes. Trick was to leave the stainless inners out to allow some movement of the subframe \ diff, then pop the stainless inners in once everything was in position. Ended up being nowhere near as bad as I thought to install.
<a href="http://www.flickr.com/photos/49790352@N06/5490043794/" title="DSCF2350 by Ian Kelly2, on Flickr"><img src="http://farm6.static.flickr.com/5251/549 ... 9d3862.jpg" width="500" height="375" alt="DSCF2350" /></a>
Drove the car today and the rear end feels great, really tight (in a good way) and "nuggety". Can't wait to get the front end sorted, but that will be started in a few weeks, spent far too much time in the garage recently!
Cheers,
Ian
The refurb of the rear suspension has taken a lot longer than expected, but it's done and the diff cross member has been seam welded to ensure it stays put.
Anyway, quick pictorial update -
Chassis cross member seam welded, and ARB mounts \ diff mount also welded for additional strength.
<a href="http://www.flickr.com/photos/49790352@N06/5490039792/" title="DSCF2329 by Ian Kelly2, on Flickr"><img src="http://farm6.static.flickr.com/5294/549 ... 4d4aca.jpg" width="500" height="375" alt="DSCF2329" /></a>
<a href="http://www.flickr.com/photos/49790352@N06/5489443813/" title="DSCF2334 by Ian Kelly2, on Flickr"><img src="http://farm6.static.flickr.com/5096/548 ... 730207.jpg" width="500" height="375" alt="DSCF2334" /></a>
<a href="http://www.flickr.com/photos/49790352@N06/5490042374/" title="DSCF2344 by Ian Kelly2, on Flickr"><img src="http://farm6.static.flickr.com/5179/549 ... 9d886b.jpg" width="500" height="375" alt="DSCF2344" /></a>
<a href="http://www.flickr.com/photos/49790352@N06/5489447651/" title="DSCF2345 by Ian Kelly2, on Flickr"><img src="http://farm6.static.flickr.com/5177/548 ... 2844cb.jpg" width="500" height="375" alt="DSCF2345" /></a>
Everything looking much cleaner!
<a href="http://www.flickr.com/photos/49790352@N06/5490123092/" title="DSCF2359 by Ian Kelly2, on Flickr"><img src="http://farm6.static.flickr.com/5171/549 ... b134fe.jpg" width="500" height="375" alt="DSCF2359" /></a>
<a href="http://www.flickr.com/photos/49790352@N06/5489552143/" title="DSCF2357 by Ian Kelly2, on Flickr"><img src="http://farm6.static.flickr.com/5253/548 ... 0f1df7.jpg" width="500" height="375" alt="DSCF2357" /></a>
Poly bushes then installed in subframe and trailing arm mounts. TA mounts liberally coated in copper grease, in an attempt to prevent squeaks.
When installing the TA bushes, they seemed ok until I put the stainless steel inner part in, then they grew by 3-4mm and were too big for the TA mount brackets. After some thought I decided to trim the inside edge of the bush by 3mm, so that even with the steel inner the bush fitted the TA mount bracket ok. Not sure if this move will come back to haunt me, but given the advice received about TA poly bushes squeaking, thought it was worth a try. This pic shows the toe adjuster plates clearly.
<a href="http://www.flickr.com/photos/49790352@N06/5490046080/" title="DSCF2346 by Ian Kelly2, on Flickr"><img src="http://farm6.static.flickr.com/5295/549 ... 1cc8a4.jpg" width="500" height="375" alt="DSCF2346" /></a>
Finally installed the subframe bushes. Trick was to leave the stainless inners out to allow some movement of the subframe \ diff, then pop the stainless inners in once everything was in position. Ended up being nowhere near as bad as I thought to install.
<a href="http://www.flickr.com/photos/49790352@N06/5490043794/" title="DSCF2350 by Ian Kelly2, on Flickr"><img src="http://farm6.static.flickr.com/5251/549 ... 9d3862.jpg" width="500" height="375" alt="DSCF2350" /></a>
Drove the car today and the rear end feels great, really tight (in a good way) and "nuggety". Can't wait to get the front end sorted, but that will be started in a few weeks, spent far too much time in the garage recently!
Cheers,
Ian
Z3M rear Suspension refurb
Ian,what a cracking job on the ZM-respect!
I know what it can be like in a cold garage through the winter months as i have previously done similar work in my classic TVR day's-long gone,but I have to say not to the exceptional standards you have displayed.
Are you planning to do similar work on the front suspension/steering prior to your trip abroad.?
Keep up the great work and more pics when completed-regards and best wishes John
 Proud to be British!
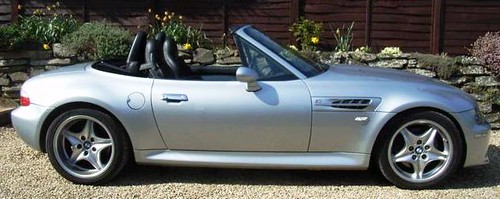
Thanks all,
Yep, the front end will be done in a similar way, I'm hoping it will be much simpler though! I knew the rear end was quite involved, that's why I started there (to test my resolve!).
After seeing the amount of movement in the subframe bushes when prying them with a large screwdriver, I knew that this movement would be causing some suspension & handling bagginess. I was also very keen to do my best to prevent any diff mount \ crossmember problems, as I do intend to 'give it the beans' when appropriate (despite it feeling almost pedestrian after my Fisher Fury!).
I previously commented on a slight forward \ backward rocking sensation when coming to a stop in slow traffic, quite unusual. That's much reduced now, I'm hoping that the front poly bushes will also help reduce this.
Once the front is cleaned up and a quicker rack installed, I'll set the geometry up and can then start exploring the car's handling on some favourite roads around the Yorkshire Dales. It won't be going on track, it just wouldn't feel appropriate trying to coax a 1300kg soft-top around a circuit. I'm still in need of a decent strut brace (cash waiting if anyone has one) as the front end does feel quite shaky!!!
Just one word of advice to anyone undertaking any work in a small garage - protect the bodywork! I had the car covered in a couple of sheets, but unfortunately dropped a ratchet spanner on the bonnet. I now have 2 dents near the BMW badge that I'm hoping can be sorted by a dent man (any recommendations in Liverpool\Warrington area?).
After the damage I covered the car in a sheet, then loads of carpet tiles, then another sheet, after which I knew the bonnet was protected so I used it as extra storage space.
Will add front end pics in a couple of weeks. I'm also tackling the seat bushes, odometer bulbs, bluetooth, getting the steering wheel re-covered, new gear knob and new speakers.
Cheers,
Ian