Z3M V8 Conversion
Z3M V8 Conversion
I have started prep work for my V8 conversion and will post up photos showing progress from time to time. The engine is a Chevy 4th generation V8 LS3. Its a stock crate engine at present, but will soon be getting a GM hot cam kit. Transmission is a Tremec T-56. All parts are new. LSx engines have been fitted to Z3's and E36's before and its a fairly straight forward job to install the engine. There is lots of guidance around on the internet and I have read most of it over the last couple of months. I will be doing the installation work myself and hope to have it done and running later in the year.
The old S50 engine is now out and is for sale. Its a good engine in good condition, so if anyone fancies 321hp in your Z3 bid away! eBay
I have been cleaning up the engine bay today. Its quite time comsuming, removing 10 years worth of grime!
As I get on with the installation I am designing and refining it using 3D CAD. This is great for getting everything right before cutting metal. I have taken loads of measurements of the engine and car, and have a good understanding of where the engine will sit, and some of the snags that I have to resolve.
The gear lever seems to be a couple of inches out of position but I need to drop the engine/trans in position to double check this. The first job I will do is to relocate the ABS unit, which would otherside foul with the nearside manifold. Measurements show the diff and engine are out of alignment by 1 3/4 degrees so I need to figure out how best to resolve that too. I need the S50 engine sold and removed to make some room before I can do much more work.
Wish me luck!
Z3M with a few mods...and a little bit more power
Yes, best of luck Deano. I used to do this for a living many, many moons ago, shoe-horning motors in where they weren't intended to go! The best fun ever...
You probably already thought to weigh each motor to get an idea what percentage increase/decrease may be necessary for the front springs. Of course you did..!
Keep us posted on progress.
Regards.
You probably already thought to weigh each motor to get an idea what percentage increase/decrease may be necessary for the front springs. Of course you did..!
Keep us posted on progress.
Regards.
- markrnorton
- Joined: Mon 05 Jan, 2009 13:19
- Posts: 841
- Location: Essex
I dont see a need to strengthen much. I will be fitting bigger ARB's so will seam weld the mountings for those. Im not planning on changing the suspension much. Its getting 230mm discs and 6-pot calipers and maybe new wheels if I can face the £4k cost of made to order 11" wide rims.markrnorton wrote:are you strengthening any parts of the chassis prior to putting the engine/gearbox in ?? (ie seam welding, gusseting etc)
Mark
Tonight the car and engine met for the first time...
IMG_0412 by deansie1712, on Flickr
I have the engine sat on wooden blocks and its looking a really nice fit. I can get it a little further rearward and the good news is that the gearlever is (just) within the existing hole. I should be able to make it work with a cranked lever.
This weekend should hopefully see the engine in its final position and the engine mounts designed and made.
Last edited by Deano1712 on Sat 10 Mar, 2012 10:40, edited 1 time in total.
Z3M with a few mods...and a little bit more power
Nice project. Keep us updated..
Have you seen this:
http://www.bimmerfest.com/forums/showth ... p?t=467800
Have you seen this:
http://www.bimmerfest.com/forums/showth ... p?t=467800
«» Z3 3.2 ///M Roadster - S50B32
«» Cruise control
«» RAID Daytona Race 340mm Steering Wheel with Airbag
«» AC Schnitzer Shortshift
«» Storm Motorwerks Gear knob
«» AC Schnitzer Electric Seats
«» AC Schnitzer Carbon centre console + door trim
«» SCHMIDT REVOLUTION 19's Wheels
«» Eisenmann Race Exhaust 4x83mm + Supersprint Center exhaust
Great project Mark
We'll need to have another listing on the Forum soon........Z3V8
Gazza
"Understeer is when you hit the wall with the front of the car, oversteer is when you hit the wall with the rear of the car. Horsepower is how fast you hit the wall and torque is how far you take the wall with you"
Z3 S54 M roadster , BMW Z1, BMW M3 CSL, Z4M Coupe
"Understeer is when you hit the wall with the front of the car, oversteer is when you hit the wall with the rear of the car. Horsepower is how fast you hit the wall and torque is how far you take the wall with you"
Z3 S54 M roadster , BMW Z1, BMW M3 CSL, Z4M Coupe
- markrnorton
- Joined: Mon 05 Jan, 2009 13:19
- Posts: 841
- Location: Essex
how much power?
go on , I cant resist asking, how many BHP will you get out of the V8?
post facelift 2.8 roadtser 2000 (W) titanium silver
Deano1712 wrote: I dont see a need to strengthen much. I will be fitting bigger ARB's so will seam weld the mountings for those. Im not planning on changing the suspension much. Its getting 230mm discs and 6-pot calipers and maybe new wheels if I can face the £4k cost of made to order 11" wide rims.
Progress looks good! Would like to see this when it's finished!
But are you really going to leave the suspension alone? I know you recently refurbed it but it's all OEM stuff isn't it? I reckon that will feel too soft and might struggle with that amount of power!
p.s surely you mean 330mm discs!!
Re: how much power?
480BristolZ3 wrote:go on , I cant resist asking, how many BHP will you get out of the V8?
Yes I meant 330mmc_w wrote:Progress looks good! Would like to see this when it's finished!
But are you really going to leave the suspension alone? I know you recently refurbed it but it's all OEM stuff isn't it? I reckon that will feel too soft and might struggle with that amount of power!
p.s surely you mean 330mm discs!!
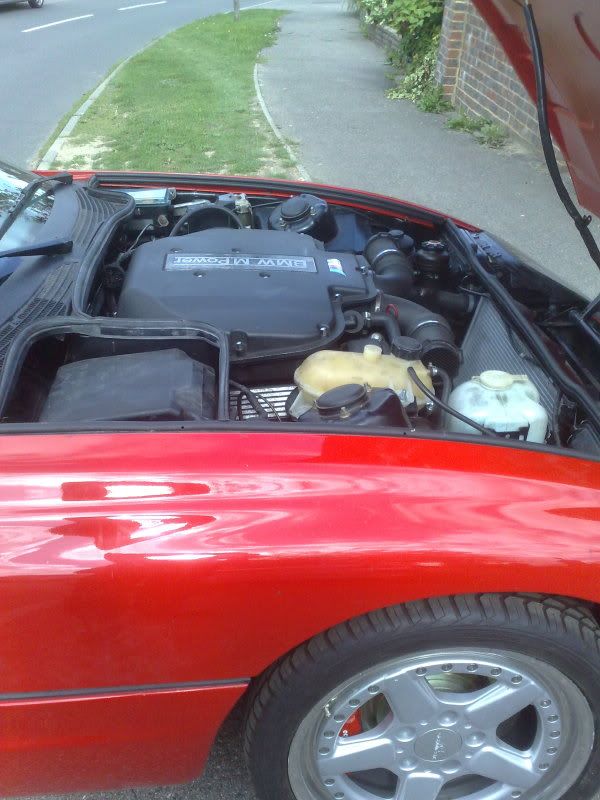
The car will weigh little more so I will see how it feels after its running, with its S54 suspension. Im not planning on it being the finished article this year. I have longer term plans to change the rear end to multi-link or double wishbone, but that will be another big job sometime in the future if I do it. Its getting H&R arb's for now.
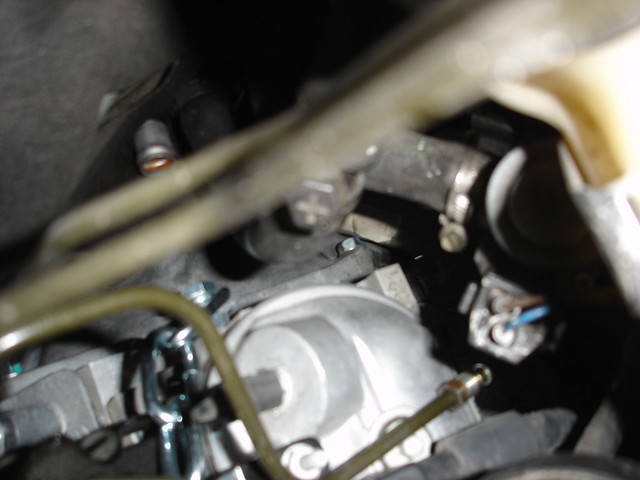
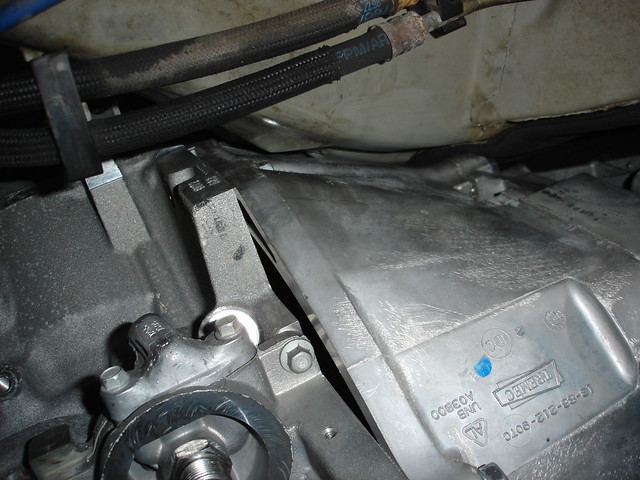
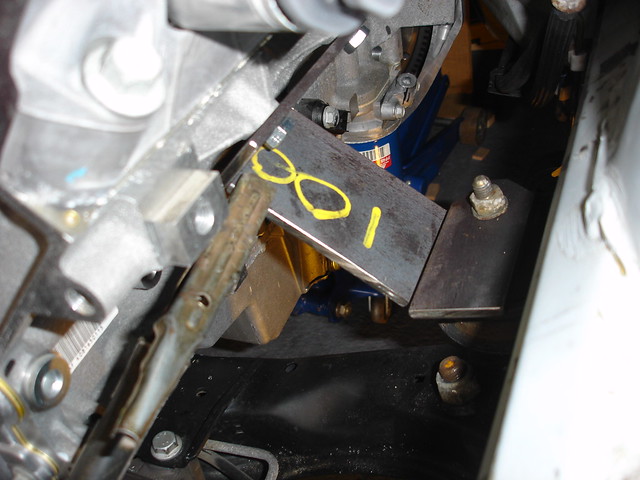
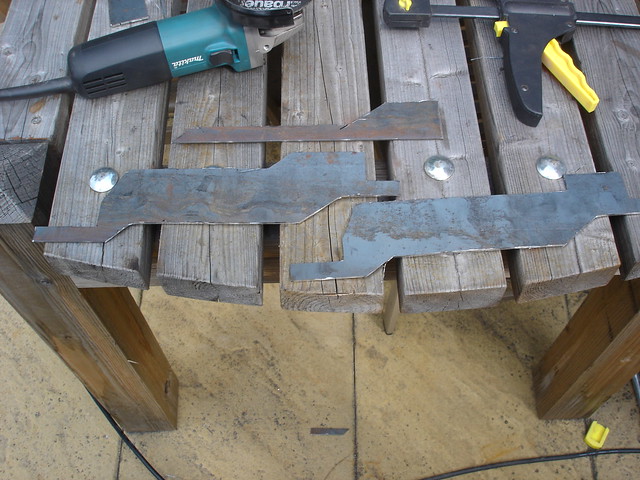
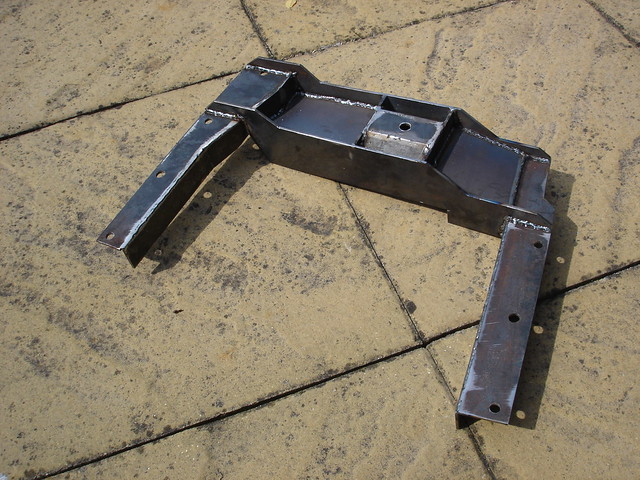
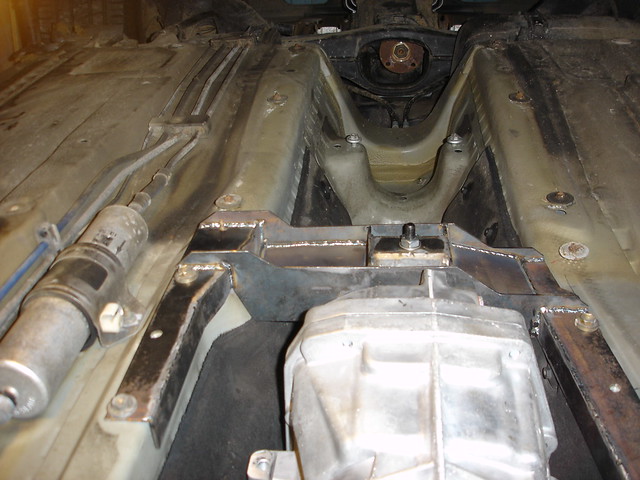
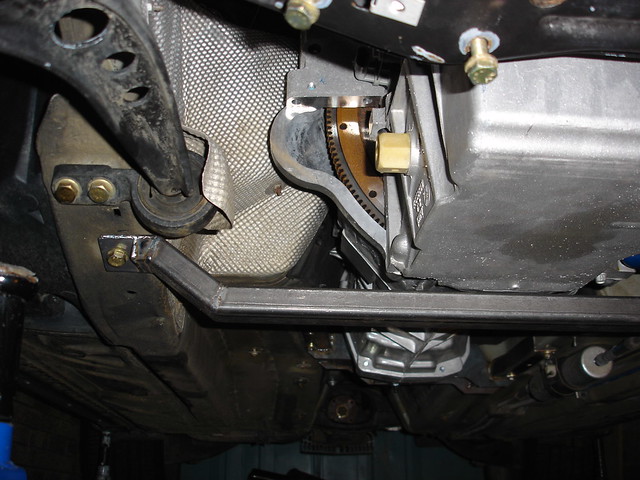
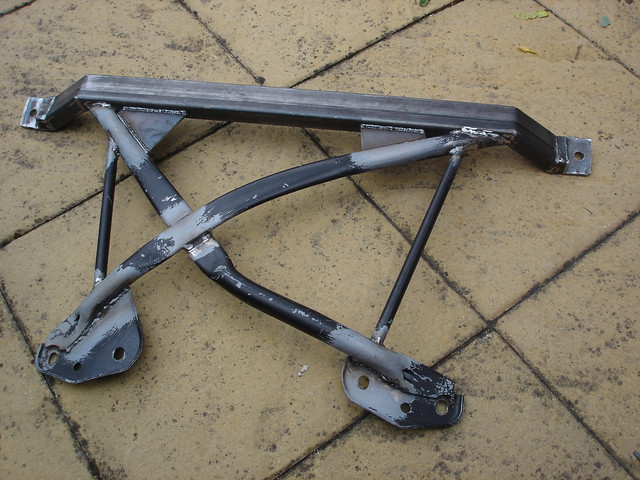
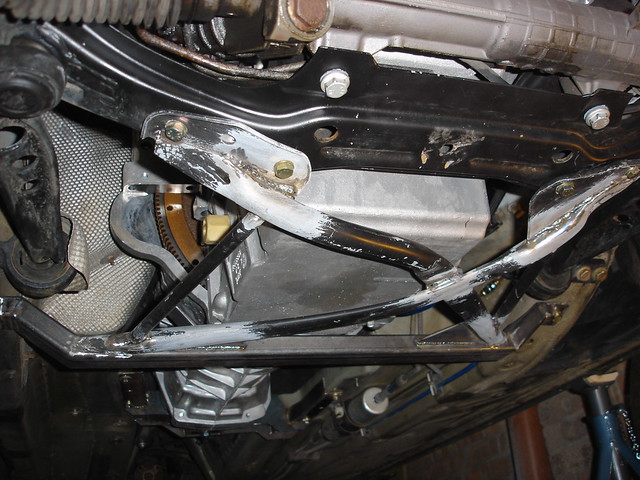
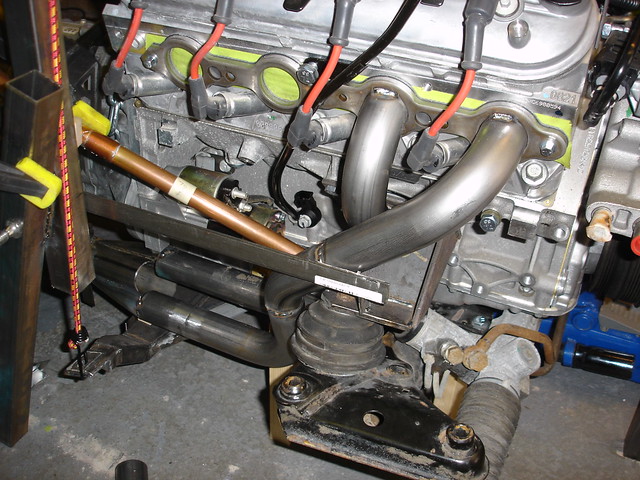
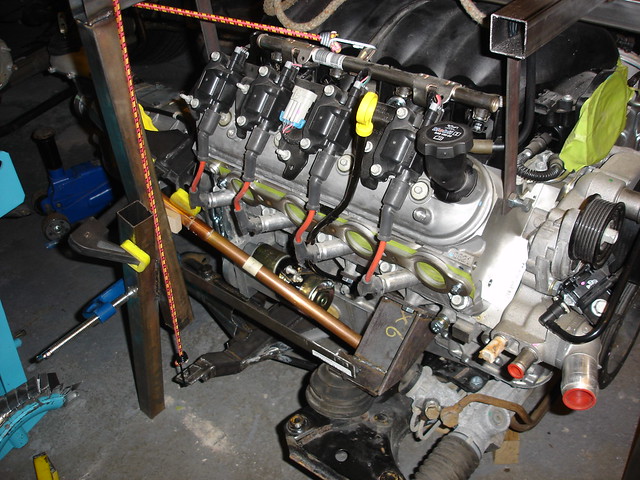
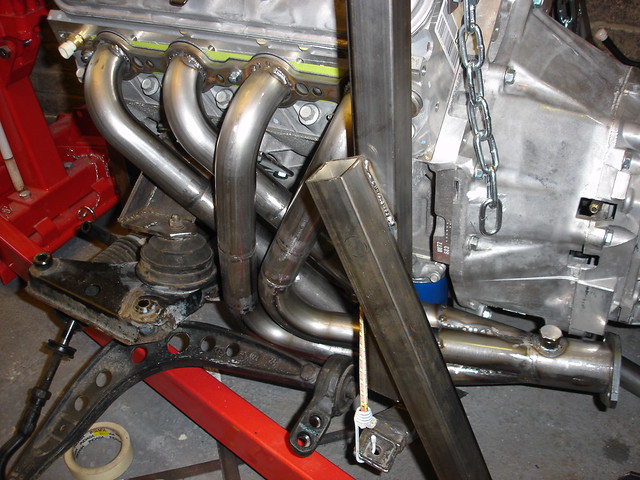
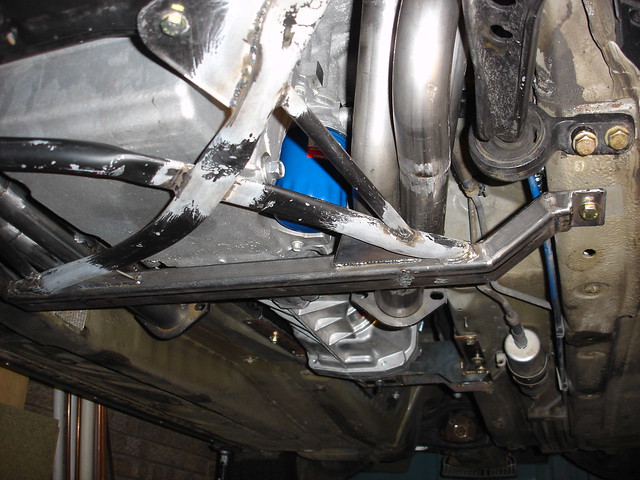
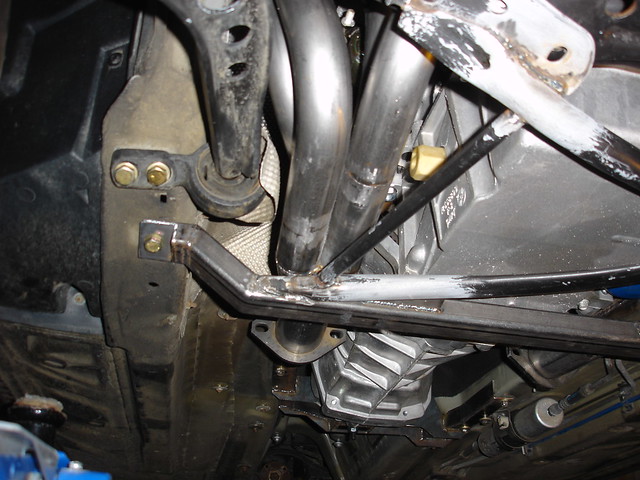
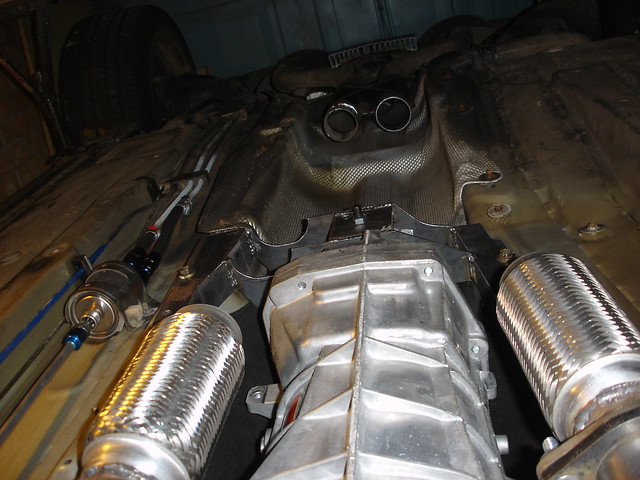
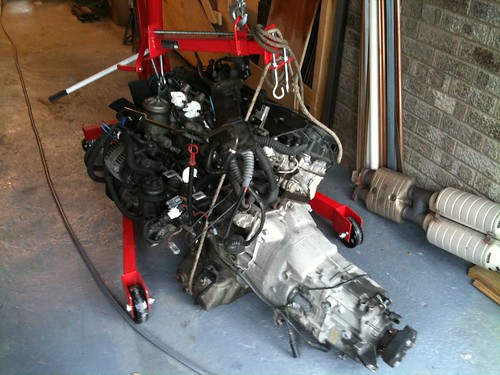
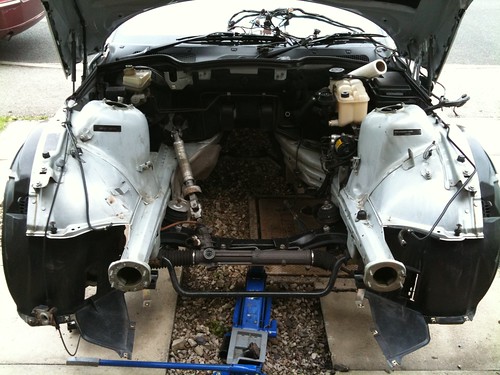
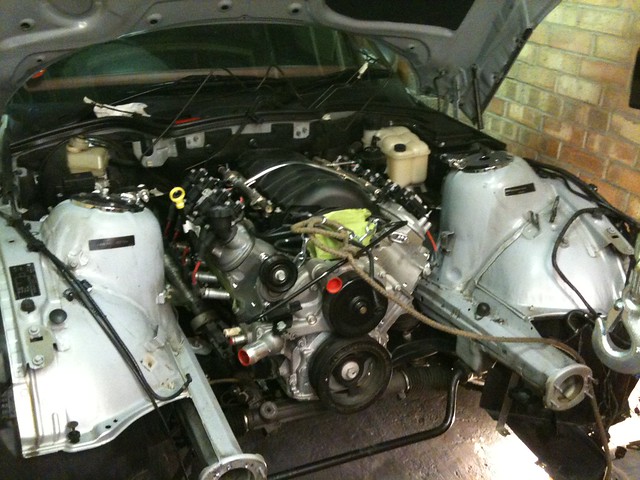
This weekend I had the engine in and out 3 times and there are now various surplus bits of the gearbox casing cut off and a few minor mods to the transmission tunnel done. The bell housing is VERY tight to the front part of the transmission tunnel. I have the engine as far back as it will go and as low too. The front of the sump is around 8mm below the cross member and just fits within the front part of the X-brace. The rear part of the X-brace fouls the sump but I plan on modifynig the X-brace and strengthening it too. Others have left the X-brace off but I think its important to retain it to stiffen mounting for the back of the wishbone.
The centre of gravity of the engine and gearbox is just 3" infront of the top part of the bulkhaed. Thats way further back than the S50.
The engine is sitting around 2.2 degrees down. The S50 measured 2.5 degrees. I need to angle the diff to 2.2 degrees too so will fit a (solid) offset bush in the rear casing, and shims under the rear diff mounting bolts.
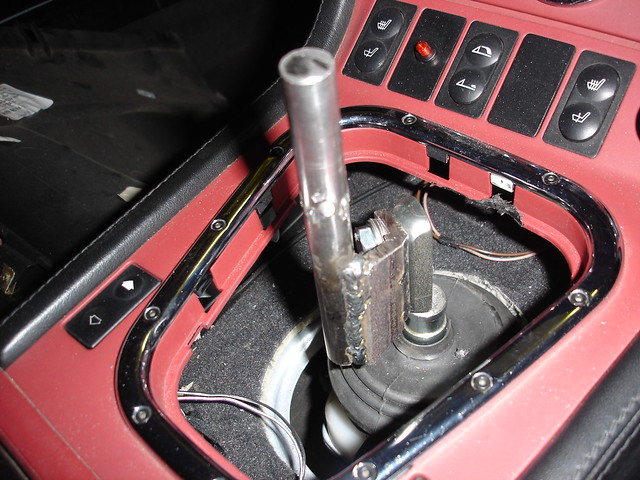
I had to extend the shifter hole 1" forwards since the lever centreline is around 1" forwards. A cranked lever will sort this. I could have bought (or made) a revised shifter mech to move it rear but I think it will be ok as I have it.
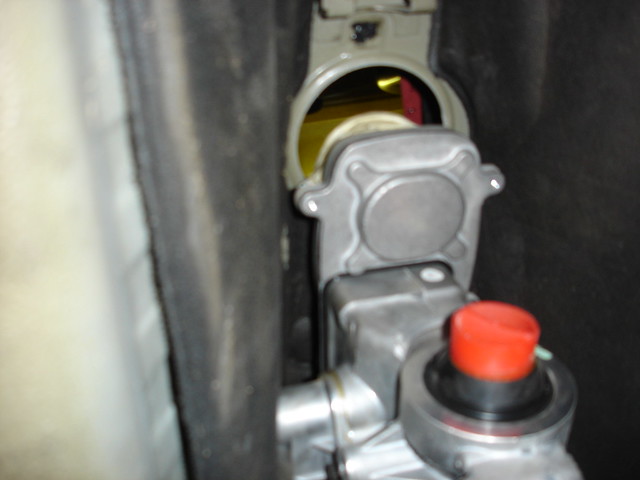
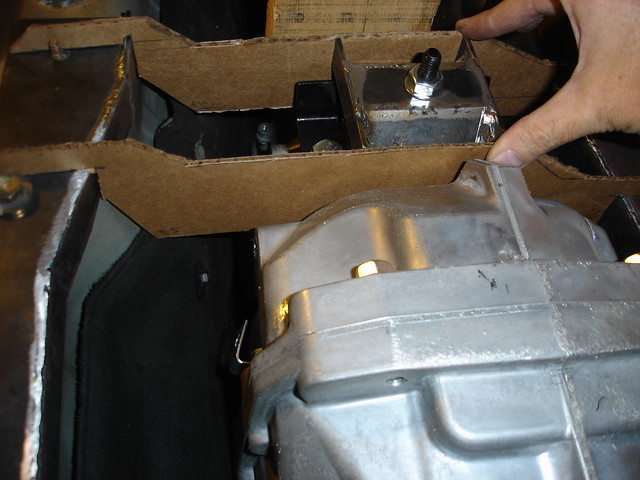
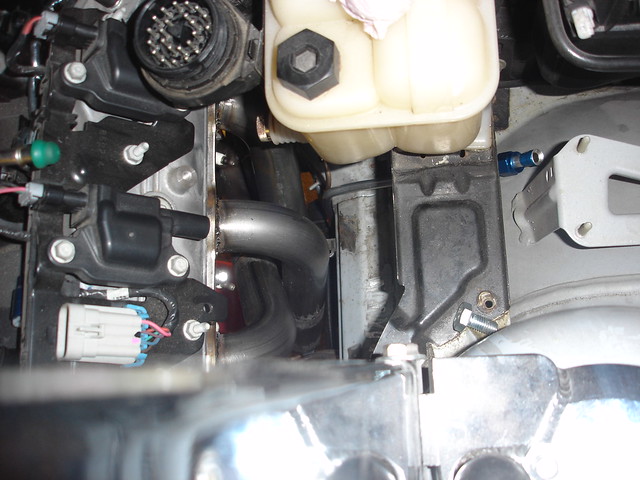
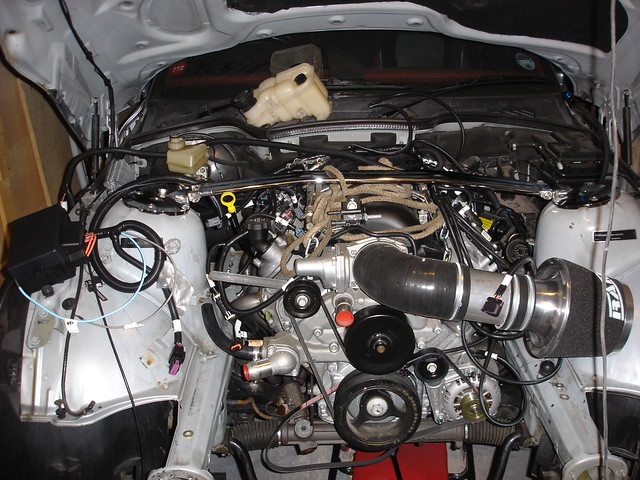
The engine is in its final resting place and I have made and fitted front engine mounts. The transmission mount is next and I will have to take the engine out just once more to fit the clutch hydraulics, and to paint the engine bay. The clutch bleed access hole is completely inaccessible so I have to figure a fix for that.
No photos for now - lost the camera lead
Z3M with a few mods...and a little bit more power
Sounds like fun
Is a LOT of work btu probably worth it. You can see that it's sat a lot further back in the photos, it may actually make it handle a little better! Ref the clutch bleed, could the line be bled before its fitted, I know that doesn't make a bleed easy once it's all fitted but it's not normally a regular job.
DEFINITELY keep the x-brace, the roadster needs all the structural rigidity it can get and this is why it's fitted to all BMW E36/Z3 cabs. I'm sure you could make it a lot stronger whilst you modify it too.
Update - the engine is now installed on it mounts. I made the front out of 6mm plate. The transmission mount was more tricky but looks the part now, in 3mm steel. The pics show how tight the engine is to the tunnel, but its all >5mm clear except for the bolt you can see in the centre of pic 3.
Next job is to remake the X-brace. I have been looking on CAD to see whether there is room to get 4x 1 3/4" primaries over the rear part of the brace. Its tight but I think it can be done. A world first though I think if I can do it!
041 by deansie1712, on Flickr
042 by deansie1712, on Flickr
043 by deansie1712, on Flickr
046 by deansie1712, on Flickr
049 by deansie1712, on Flickr
053 by deansie1712, on Flickr
058 by deansie1712, on Flickr
062 by deansie1712, on Flickr
064 by deansie1712, on Flickr
066 by deansie1712, on Flickr
071 by deansie1712, on Flickr
Last edited by Deano1712 on Sat 10 Mar, 2012 10:38, edited 1 time in total.
Z3M with a few mods...and a little bit more power
- markrnorton
- Joined: Mon 05 Jan, 2009 13:19
- Posts: 841
- Location: Essex
- markrnorton
- Joined: Mon 05 Jan, 2009 13:19
- Posts: 841
- Location: Essex
sure give me a month or so to get goingDeano1712 wrote:Nice one! I may come see if/when Im travelling in your area. What did you get?markrnorton wrote:Thats looking smart now.
just bought a v8 for mine this morning
i wish i was a little closer, i'd like to take a closer look
i bought a bmw m60, not as powerful as yours, but with a few tweeks it will be fine
Still modifying
eeerrr...no. But it reminds me the bonnet still needs a respray. On top of the £9k for the engine conversion its an expensive time!rgf wrote:Whilst you're at it Deano, are you going to fit a deer-catcher to the front bumper?
A few updates then...
The gear lever on the TUET2066 is about an inch out of position.
DSC02267 by deansie1712, on Flickr
I made a short offset lever out of dia14mm bar and will use the standard //M knob for now.
DSC02275 by deansie1712, on Flickr
DSC02276 by deansie1712, on Flickr
All gears seem to engage fine and it feels very good.
I made a new X-brace using 50x25mm box for the rear part.
DSC02277 by deansie1712, on Flickr
DSC02278 by deansie1712, on Flickr
DSC02279 by deansie1712, on Flickr
DSC02280 by deansie1712, on Flickr
The X-brace is around 8mm clear of the sump, and is a little lower than standard, since the LS3 sump is a lot lower than the S50 was.
I have plumbed the relocated ABS unit. This was rather time consuming. The pipe to the nearside wheel needed removing and this needed the arch liner out - a complete pain. The brake pipes are all outboard of the chassis rail and give plenty of room to the engine manifolds. This area will be covered with a heat shield.
DSC02269 by deansie1712, on Flickr
Next job is the manifolds which is the most difficult part of the whole conversion. Im planning 4-1 long tubes out of 1.75" tube. I bought a tube bender and 12metres of tube, but I cant get good bends using this, so its going to have to be made from pre-bent tube.
Last edited by Deano1712 on Sat 10 Mar, 2012 10:47, edited 1 time in total.
Z3M with a few mods...and a little bit more power
-
- Joined: Sun 24 Aug, 2008 11:19
- Posts: 739
- Location: Assen
Looks very impressive Senna. Can't wait to pay you a visit.senna wrote:Very envious. I wish we had such a big engine bays
The same counts for you Deano, very nice conversion. Just I would have liked a BMW V8 conversion more than a US V8. But that's a minor detail. Good luck with the conversion.
Last edited by Holland Harry on Sun 19 Sep, 2010 20:26, edited 1 time in total.
- markrnorton
- Joined: Mon 05 Jan, 2009 13:19
- Posts: 841
- Location: Essex
I had a look at the manifolds from my BMW V8 yesterday, they are nicely tubular from the 7 series so i am hoping to cut and shut them to fit. There are a few places that will mandrel bend tubing if you can draw it up.Deano1712 wrote: Next job is the manifolds which is the most difficult part of the whole conversion. Im planning 4-1 long tubes out of 1.75" tube. I bought a tube bender and 12metres of tube, but I cant get good bends using this, so its going to have to be made from pre-bent tube.
Are you working in stainless or mild steel ??
Mark
Still modifying
Manifolds are mild steel. Its easier to weld (with my MIG) and less chance of cracking. They will be ceramic coated. The intermediate exhaust will be in stainless. I will tack the joints on that and then get someone to TIG weld up after.markrnorton wrote:Are you working in stainless or mild steel ??
Mark
I ordered some collectors from Speedway but they are u/s so spent a couple of hours having a go at making one myself. It turned out good so just need to make another
DSC02285 by deansie1712, on Flickr
Last edited by Deano1712 on Sat 10 Mar, 2012 10:48, edited 1 time in total.
Z3M with a few mods...and a little bit more power
fantastic
very entertaining reading about it all. Great that you have the time, enthusiasm and skills to do it. It is great reading for the rest of us who might have the enthusiasm but not the other two....
Thanks
Thanks
post facelift 2.8 roadtser 2000 (W) titanium silver
- markrnorton
- Joined: Mon 05 Jan, 2009 13:19
- Posts: 841
- Location: Essex
I'm using a Corvette fuel filter regulator. That will mount under the car where the present filter is. From there I just have the pressure feed out which is in 3/8" aluminium. I will route that up above to rail somewhere and then to the engine via AN6 hose. It should be well clear of the manifolds - plenty of room on the nearside. The offside manifold is the tough one. Im half way through it and enjoy the challenge!markrnorton wrote:Are you going to isolate the fuel feed and return pipes away from the exhaust manifold ??
DSC02301 by deansie1712, on Flickr
Last edited by Deano1712 on Sat 10 Mar, 2012 10:49, edited 1 time in total.
Z3M with a few mods...and a little bit more power
- markrnorton
- Joined: Mon 05 Jan, 2009 13:19
- Posts: 841
- Location: Essex
I took a week off work to make manifolds (how sad!), and managed to get one of them done. It is the difficult one though and the nearside will be easy in comparison.
I'm quite proud of the outcome...
DSC02287 by deansie1712, on Flickr
I made the manifold with the engine out of the car, with the steering shaft and chassis rail mocked-up. The X-brace is attached under the engine, and the collector is welded temporarily to it in the position I want it. ITs just a matter of routing tube from the flange on the head, to the collector, in the limited room between the rail, steering shaft and starter motor. Clever stuff.
DSC02297 by deansie1712, on Flickr
DSC02308 by deansie1712, on Flickr
DSC02309 by deansie1712, on Flickr
Last edited by Deano1712 on Sat 10 Mar, 2012 10:51, edited 1 time in total.
Z3M with a few mods...and a little bit more power
Got the other manifold made now. 30 hours work for the first, and 12 for the second. I have managed to make this close to equal length primaries so Im happy.
DSC02317 by deansie1712, on Flickr
Tomorrow I'm going to drop the engine back in and see how the manifolds look in the car. They will either fit, or not!
DSC02317 by deansie1712, on Flickr
Tomorrow I'm going to drop the engine back in and see how the manifolds look in the car. They will either fit, or not!
Last edited by Deano1712 on Sat 10 Mar, 2012 10:52, edited 1 time in total.
Z3M with a few mods...and a little bit more power
Impressive stuff, looking forward to the next update.
If you like gaming with mature minded players visit our retirement home http://www.oap-clan.co.uk/
I was going to get them ceramic coated but quotes are £500+ and I'm reluctant to spend that until I know they dont knock into the body anywhere when running, or crack, or suffer some other problem. The plan is therefore to paint (or perhaps electroplate) and add insluating tape first off. I will run it for a while and see how it goes. It may be that I pull the headers off next year and get them ceramic coated if all is well. You are right to raise this point since there is loads of surface area on the headers and controlling radiated heat is going to be inmportant.siwilson wrote:Given the close proximity of those headers to engine and body are you going to have them ceramic coated or wrapped to reduce heat soak?
Very nice job in any case.
Z3M with a few mods...and a little bit more power
Got a few goodies this week:
Driveshaft cost me £250. Rear flange from Jagsthatrun, and the rest of it made at a company in Leeds.
DSC02320 by deansie1712, on Flickr
Steering shaft needs to be thinner than normal to pass through the manifold, and with no rubber parts in it which would melt. I made mine using an E36 saloon shaft as the starting point. My son drilled out the lower UJ and made a stainless shaft, which will be pinned to the UJ later.
DSC02319 by deansie1712, on Flickr
Both manifolds are now fitted and look really good, with around 10mm min clearance to the body, wishbones, engine etc. The nearside one needed adjusting a bit to get that, but it fits well.
DSC02323 by [url=http://www.flickr
DSC02324 by deansie1712, on Flickr
Last edited by Deano1712 on Sat 10 Mar, 2012 10:55, edited 1 time in total.
Z3M with a few mods...and a little bit more power
- markrnorton
- Joined: Mon 05 Jan, 2009 13:19
- Posts: 841
- Location: Essex
View from underneath...markrnorton wrote:blimey, i dont fancy changing that oil filter !!
DSC02330 by deansie1712, on Flickr
1-0 to Deano
Last edited by Deano1712 on Sat 10 Mar, 2012 10:55, edited 1 time in total.
Z3M with a few mods...and a little bit more power
- markrnorton
- Joined: Mon 05 Jan, 2009 13:19
- Posts: 841
- Location: Essex
Yes it is, and there are other places needing shielding too - ABS, starter, some parts of the transmission tunnel etc.c_w wrote:Is it worth heat shielding the lower rubber engine mount perhaps?
I have been doing a lot of work on the car with no obvious signs of progress recently. Today I managed to get the fuel system just about complete so thats a tricky job out of the way.
I have a Corvette FPR and have a 3/8" aluminium hard line from there forwards. This gets close to the headers but is no problem in solid tube.
DSC02340 by deansie1712, on Flickr
The pipe is flared AN6 at each end.
DSC02341 by deansie1712, on Flickr
The forward end is under the coolant header tanks and there will be a short hose from there to the engine. The inlet has the green cap on the left of the picture.
DSC02351 by deansie1712, on Flickr
I made a new gearbox mount which is neater than the first attempt and has cutouts for the exhaust pipes to run through.
DSC02350 by deansie1712, on Flickr
I have made a start on the centre exhaust. The rears are standard /M silencers and I have a X-pipe fitted to that with a slip on joint. At the front I have two 200mm flexi joints and need to mount a pair of Cats inbetween. I bought a pair but they were too large to fit. Im now waiting for a pair of 4" dia metal spun cats which will mount side by side. The tunnel measures 9.75" across.
Stainless steel welding is hard with Mig - I'm so glad I made the headers in mild steel!
Last edited by Deano1712 on Sat 10 Mar, 2012 10:58, edited 1 time in total.
Z3M with a few mods...and a little bit more power
- markrnorton
- Joined: Mon 05 Jan, 2009 13:19
- Posts: 841
- Location: Essex
I bought this and this a couple of weeks ago. The controller kit is the DB's - just add 12v and fire it up. It comes with a computer, relay box and accelerator pedal. I was expecting to have to dismantle the accelerator pedal to use the resolver with the existing pedal. There is room to mount the whole pedal though so I will do that.
Z3M with a few mods...and a little bit more power
- markrnorton
- Joined: Mon 05 Jan, 2009 13:19
- Posts: 841
- Location: Essex
- topfuelking
- Joined: Sat 26 Feb, 2005 15:13
- Posts: 674
- Location: Pays de la Loire
looking good pal
THANKS MARC
looking for a carp fishing hoilday we can help http://www.carpfishingmayenne.com
SYMPTOMS OF A BOOST JUNKY
1. You get excited when it's cold outside.
2. You fill up every three days.
3. The size of your grin is directly proportional to the amount of boost you’re on.
looking for a carp fishing hoilday we can help http://www.carpfishingmayenne.com
SYMPTOMS OF A BOOST JUNKY
1. You get excited when it's cold outside.
2. You fill up every three days.
3. The size of your grin is directly proportional to the amount of boost you’re on.
A little update - I have been sorting the ancillary drive and will hopefully have the PS pump mounted next weekend. Its going to the offside, quite close to the rack ports. There is plenty of room for it there since my car has no aircon.
I have the air inlet sorted. The MAF mounts in the aluminium tube shown. I have laid out the engine harness and it seems the controller and relay box needs to go the offside. I was hoping to move the coolant header tank to the offside to simplify plumbing but thats not an option now. There will be no room with the computer and relay box there. The harness lengths are too long but I can trim legs back ok and will also need open up parts of the harness to improve how it can be routed. THere is no connection to the fuel tank vent valve, so I have removed it and have the fuel tank venting to atmosphere now. Good news is that there is room to mount the DBW accelerator pedal in the footwell. I was expecting to have to re-configure it. There doesnt seem to be much pedal travel though - more like an on-off switch
DSC02364 by deansie1712, on Flickr
My new CATS are in Parcelforce Leeds at last so next weekend I shall be making the centre exhausts. Its soooo tempting to fire the engine up now for the first time! It will run with 12v to the engine relay box.
Last edited by Deano1712 on Sat 10 Mar, 2012 10:59, edited 1 time in total.
Z3M with a few mods...and a little bit more power