


 Visit my Progress Thread - http://zroadster.net/forum/viewtopic.php?f=32&t=35276 Visit my Progress Thread - http://zroadster.net/forum/viewtopic.php?f=32&t=35276
 Visit my Progress Thread - http://zroadster.net/forum/viewtopic.php?f=32&t=35276
 Visit my Progress Thread - http://zroadster.net/forum/viewtopic.php?f=32&t=35276 Visit my Progress Thread - http://zroadster.net/forum/viewtopic.php?f=32&t=35276

 Uploaded with ImageShack.com


 Visit my Progress Thread - http://zroadster.net/forum/viewtopic.php?f=32&t=35276


 Visit my Progress Thread - http://zroadster.net/forum/viewtopic.php?f=32&t=35276
 Visit my Progress Thread - http://zroadster.net/forum/viewtopic.php?f=32&t=35276
Z3cade wrote:Nice!
You will find once you start modding these cars you then cant stop
Next on the list... remove the amber lenses in the front lights
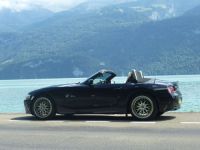
Visit my Progress Thread - http://zroadster.net/forum/viewtopic.php?f=32&t=35276 Visit my Progress Thread - http://zroadster.net/forum/viewtopic.php?f=32&t=35276I had to go from Killin to Spean Bridge twice this week for work, early morning, sun splitting the sky, it was beautiful. A couple of pics below (excuse the quality, taken on my iPhone).gedo wrote:The drive from Stirling to Skye through Glen Coe must be one of the top 10 drives in the world and I'd encourage anyone who hasn't experienced it to have a go. Top down in the Z with glorious sunshine all the way took it to another level

Brian H wrote:I had to go from Killin to Spean Bridge twice this week for work, early morning, sun splitting the sky, it was beautiful. A couple of pics below (excuse the quality, taken on my iPhone).gedo wrote:The drive from Stirling to Skye through Glen Coe must be one of the top 10 drives in the world and I'd encourage anyone who hasn't experienced it to have a go. Top down in the Z with glorious sunshine all the way took it to another level
Visit my Progress Thread - http://zroadster.net/forum/viewtopic.php?f=32&t=35276Zedonist wrote:Just one quick note on your fix, the nut in the picture is not a nyloc nut but a standard non locking nut. That said I think the pressure of the spring should prevent it loosening, if you get chance to remove the mirror again, I wold either double nut or use some thread locking glue, or both.
Great fix BTW
Visit my Progress Thread - http://zroadster.net/forum/viewtopic.php?f=32&t=35276


 Visit my Progress Thread - http://zroadster.net/forum/viewtopic.php?f=32&t=35276
with regards to the M-Style gauges it certainly has been done before if you search you will find the threads. The holes in the dash are in blanking plates that can be replaced for a few £££s each. I may even have a few spare that you can have, I will have a look.gedo wrote:Have some holes in the console where the alarm gubbins used to be but I fancy adding some M-style gauges here so off to trawl the threads to see if anyone has done this and get some tips !
Visit my Progress Thread - http://zroadster.net/forum/viewtopic.php?f=32&t=35276
 Visit my Progress Thread - http://zroadster.net/forum/viewtopic.php?f=32&t=35276
('_')Z3 wrote:Looking good, have you managed to source the chrome surround for gear stick gaitor? Also the plastic that supports the leather is different to the standard console so you'll need that also. When I did my ///M console conversion I had the bits covered in black alcantara. Looking forward to seeing the finished result.
Visit my Progress Thread - http://zroadster.net/forum/viewtopic.php?f=32&t=35276

 Visit my Progress Thread - http://zroadster.net/forum/viewtopic.php?f=32&t=35276 Visit my Progress Thread - http://zroadster.net/forum/viewtopic.php?f=32&t=35276
 Southernboy wrote:Use "old switches" even if they don't work...
Visit my Progress Thread - http://zroadster.net/forum/viewtopic.php?f=32&t=35276 


 Visit my Progress Thread - http://zroadster.net/forum/viewtopic.php?f=32&t=35276

 Visit my Progress Thread - http://zroadster.net/forum/viewtopic.php?f=32&t=35276
 Visit my Progress Thread - http://zroadster.net/forum/viewtopic.php?f=32&t=35276 Visit my Progress Thread - http://zroadster.net/forum/viewtopic.php?f=32&t=35276
Hi gedo,gedo wrote:Not been on here for a while due to being very busy at work and more or less finishing all of the work to the car that I had planned for this year. Car is now off the road for the winter and I'm looking for some advice on a trickle charger for the battery ? What do people recommend for over winter ?

TitanTim wrote:Hi gedo,gedo wrote:Not been on here for a while due to being very busy at work and more or less finishing all of the work to the car that I had planned for this year. Car is now off the road for the winter and I'm looking for some advice on a trickle charger for the battery ? What do people recommend for over winter ?
Regarding a charger there's only one I would consider and thats the CTEK
http://www.ctekchargers.co.uk/ctek-mxs-3.6.php
I have the previous model to this one and have used it on the Zed the past 4 winters with no probs whatsoever. I bought the additional adapter so I can plug it in via the cigarette lighter socket, just made sure yours is live with the ignition off. I'm using it on the Z4 this winter. Great little charger and fuss free.
You can buy cheaper but I like this one as it only charges when required so no danger of over charging the battery.
Tim.
Visit my Progress Thread - http://zroadster.net/forum/viewtopic.php?f=32&t=35276 Visit my Progress Thread - http://zroadster.net/forum/viewtopic.php?f=32&t=35276
Great photos, great place, I love glencoe was up there last novemberBrian H wrote:I had to go from Killin to Spean Bridge twice this week for work, early morning, sun splitting the sky, it was beautiful. A couple of pics below (excuse the quality, taken on my iPhone).gedo wrote:The drive from Stirling to Skye through Glen Coe must be one of the top 10 drives in the world and I'd encourage anyone who hasn't experienced it to have a go. Top down in the Z with glorious sunshine all the way took it to another level
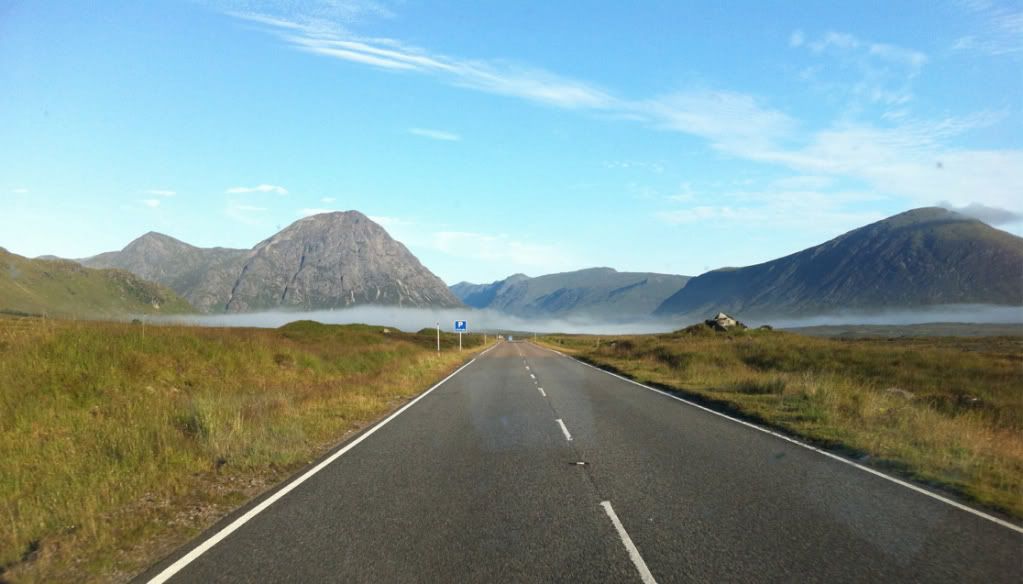
A82 Looking back toward Bridge of Orchy
A82 Just dropping down to Glen Coe
Cheers. Will get on the hunt today. Hope to remove the carrier later today as sun has finally decided to make it's first appearance in 2013 !!PCSAM wrote:look for e36 and e46 space savers mate , I'm sure they will fit OK . as standard alloys for them fit the z3
Visit my Progress Thread - http://zroadster.net/forum/viewtopic.php?f=32&t=35276 Visit my Progress Thread - http://zroadster.net/forum/viewtopic.php?f=32&t=35276 Visit my Progress Thread - http://zroadster.net/forum/viewtopic.php?f=32&t=35276


Going to do exactly the same job (hopefully today!)gedo wrote:Thanks to J_K on these forums I have this little lot to fit as my next project...
Roll hoop retrofit has been covered in the forums already but I may take a few snaps along the way to document my experience, which may help other thinking about the same project.
Visit my Progress Thread - http://zroadster.net/forum/viewtopic.php?f=32&t=35276 Visit my Progress Thread - http://zroadster.net/forum/viewtopic.php?f=32&t=35276
  Visit my Progress Thread - http://zroadster.net/forum/viewtopic.php?f=32&t=35276


