PROJECT: 1998 Black M Roadster (aka Giorgio)


Re: PROJECT: 1998 Black M Roadster (aka Giorgio)
Ah this must actually be the stuff you are talking about. It's called "black trim wax" so I am pretty sure this time.  For some reason it didn't come up in the search results at all... I ended up ordering something else, but Halfords doesn't deliver The Real black trim wax anyway so I'll need to pop in to my local Halfords someday to pick it up.


Re: PROJECT: 1998 Black M Roadster (aka Giorgio)
yep, that's it 
Re: PROJECT: 1998 Black M Roadster (aka Giorgio)
do a write up on the race logic fitting please ?
the badness makes me do it...!


Re: PROJECT: 1998 Black M Roadster (aka Giorgio)
Yep will do, definitely! 
Received two more things today: First, a gas soldering iron. My flat is on 2nd floor, thus a gas soldering iron is the only option, unless I want to use an electric soldering iron and 20m power extension lead when fitting Racelogic. Second, RS232 to USB cable - needed for interfacing Racelogic with any post-victorian computing device. Still need to RTFM and map wiring between Racelogic and Giorgio before I get to soldering and programming...
Received two more things today: First, a gas soldering iron. My flat is on 2nd floor, thus a gas soldering iron is the only option, unless I want to use an electric soldering iron and 20m power extension lead when fitting Racelogic.
Re: PROJECT: 1998 Black M Roadster (aka Giorgio)
As it was such a sh*tty weather yesterday, planned roadtrip up to Lake District was cancelled. Instead, I began having a look into fitting Racelogic TC on Giorgio.
A lot of reading through RLTC's manual and BMW's massive 375-page ETM (Electrical Troubleshooting Manual), but the resulting wiring diagram is actually pretty simple.
Here's a teaser of the wiring diagram. I still need to verify the wiring & colours against the actual car, but unless ETM is full of bollocks the diagram should be 99% correct. A writeup of the fitting itself is coming up when I get to it...

Re: PROJECT: 1998 Black M Roadster (aka Giorgio)
I just added the launch button to my Racelogic TC adjuster, as it was missing. Instead of paying a lot of money for a new adjuster, all that is needed is a momentary (non-latching) push button of your liking and a bit of time and basic tools.
I bought my switch from Maplin, just because there is one on my way home from work, but almost anything that fits inside the adjuster box will do. Maplin switch was a bit deep but fitted fine after bending the contacts. I wanted an illuminated switch but accidentally bought a 250v one, so no illumination.
Fitting is really easy. There are two empty soldering points behind the rotary switch, this is where the other ends of the launch button wires go to. The other ends of the wires are obviously soldered to the launch button itself.
Photos say more than a thousand words, so here we go.


Re: PROJECT: 1998 Black M Roadster (aka Giorgio)
A quick update.
This week I fitted new boot lid gas struts. Make & model is Magneti Marelli GS0930. Fit and look is identical to OEM, and they were delivered from Latvia for £20.50 in just a couple of days. Happy times!
http://www.ebay.co.uk/itm/141042675354
I was in a rush when I fitted them so no photos, sorry. But the fitting is simple: The end pieces have kind of a metal clip attached to them. Pry them open with a small screwdriver to pull out the old struts. The new struts can be just pushed in place, no need to pry open the metal clip. Job done in 10 minutes max.
Today, after a quick Sunday drive, I decided to try the Greased Lightning Showroom Shine do-it-all miracle waterless car wash & polish snakeoil stuff. Since the trip to Brighton, the car has been just sitting for two weeks. Apart from a bit of brake dust, it was pretty clean when I parked it. However, two weeks of "clean" London air, and a bit of rain, and it looked like this...

I was very sceptical about Showroom Shine... VERY. How can a car be 1) washed properly without plenty of soap and clean water, without scratching it, and 2) polished on the same go? But to my surprise, the results were more than impressive. On the above photo you can see not just dust and dirt, but some yellow spots (bird poo?) that had practically merged with the paint.
I applied GLSS very liberally and took my time polishing (bottle says it's good for 10 washes, and wash takes about 30min, but I ended up using half a bottle in about 1.5 hours), but as it says on the tin it just lifts the dirt off. Even the yellow spots came off easily. Same for the wheels: Applied liberally, wiped with a microcloth, polished with another, and all the brake dust is gone. They look like bloody new!
It was getting a bit dark towards the end and the final photo is a bit grainy, but you'll get the idea:


Now when the car is finally clean, I tried on the Halfrauds Advanced car cover that was recommended to me in another thread. Size small seems like a perfect fit for Z3, as long as the antenna is removed. I've been told it doesn't scratch the paint but might rub the roof a bit, so when the weather gets stormy and autumny I'll cover the roof with a large towel to prevent rubbing.


This week I fitted new boot lid gas struts. Make & model is Magneti Marelli GS0930. Fit and look is identical to OEM, and they were delivered from Latvia for £20.50 in just a couple of days. Happy times!
http://www.ebay.co.uk/itm/141042675354
I was in a rush when I fitted them so no photos, sorry. But the fitting is simple: The end pieces have kind of a metal clip attached to them. Pry them open with a small screwdriver to pull out the old struts. The new struts can be just pushed in place, no need to pry open the metal clip. Job done in 10 minutes max.
Today, after a quick Sunday drive, I decided to try the Greased Lightning Showroom Shine do-it-all miracle waterless car wash & polish snakeoil stuff. Since the trip to Brighton, the car has been just sitting for two weeks.

I was very sceptical about Showroom Shine... VERY. How can a car be 1) washed properly without plenty of soap and clean water, without scratching it, and 2) polished on the same go? But to my surprise, the results were more than impressive.
I applied GLSS very liberally and took my time polishing (bottle says it's good for 10 washes, and wash takes about 30min, but I ended up using half a bottle in about 1.5 hours), but as it says on the tin it just lifts the dirt off. Even the yellow spots came off easily. Same for the wheels: Applied liberally, wiped with a microcloth, polished with another, and all the brake dust is gone. They look like bloody new!
It was getting a bit dark towards the end and the final photo is a bit grainy, but you'll get the idea:


Now when the car is finally clean, I tried on the Halfrauds Advanced car cover that was recommended to me in another thread. Size small seems like a perfect fit for Z3, as long as the antenna is removed. I've been told it doesn't scratch the paint but might rub the roof a bit, so when the weather gets stormy and autumny I'll cover the roof with a large towel to prevent rubbing.


Re: PROJECT: 1998 Black M Roadster (aka Giorgio)
Not very much done on Giorgio this weekend, but at least something.
First, I programmed the spare key I had. It came with the car but the previous owner never bothered re-programming it. As I already had a working key and I just wanted to add another, I followed method 2 in this guide and it worked great:
It looks like there are some wires going to the box that are not connected though, which I find a bit weird. What other unit could be inside the same box? ASC? Also quite a few wires in the engine bay have been re-wrapped with electrical tape. I read from somewhere that the E36 S50 has quite a different loom, so I'm starting to think my engine is from an M3... Or maybe I am just paranoid.


I also had a look at removing the extra M-Power emblem from to of the engine. It is glued on with some seriously hardcore stuff. I need to get some acetone or something to soften / dissolve the glue and then try again.

I haven't been very lucky with the angel eye halos I ordered a good while back. As mentioned previously, one of the halos was a lot dimmer than the other three. Seller sent me a replacement, which unfortunately was broken. Now I'm waiting for a second replacement, which should hopefully arrive this upcoming week.
Anyway, I had a look under the bonnet to see what tools I need for removing the headlights for halo installation. It seems an 8mm socket is all I need. The smallest I have in UK is 9mm, so off to ebay again...
As last thing, I tinted the clear bumper light lenses. Smoke tint spray was a fiver from ebay and two layers of that stuff did the job just fine.
First I cleaned the lenses thoroughly with isopropanol solvent and a clean microcloth. Then I masked the back sides of the lenses with gaffer tape. Then I fitted the lenses to an improvised holder (that is, chicken kickers box from Domino's ), cleaned the lenses thoroughly again, and then just two layers of tint with 5mins between.
The pressure from the spray can lifted a bit of dust particles off the floor, which then landed on the freshly tinted lenses, but they are hardly noticeable. All in all, pretty good looking tint for £5. Also easily removable with another spray, if The MOT Man does not like the smoke effect.


First, I programmed the spare key I had. It came with the car but the previous owner never bothered re-programming it. As I already had a working key and I just wanted to add another, I followed method 2 in this guide and it worked great:
Then I had a look at installing Racelogic. I opened the ECU box but had trouble pulling the ECU out so that I could double-check the wire colours against my diagram. I want the traction control fitted on the car but I just didn't feel like doing a weekend of wiring & soldering, so I just gave up and closed the damn box.Method 2:
To do this procedure you need to have one working key and one key that needs to be programmed.
1) Get in and close all doors.
2) Turn on the ignition and turn off quickly. (No more than 5 seconds) to start the process. Next action must take place within 30 seconds.
3) Remove the 1st key.
4) Hold the key up near your left shoulder (this is so it is closer to the remote receiver antenna.
5) Hold down the unlock button and press the lock button 3 times. Release the unlock button and the doors lock which confirms the operation.
6) Quickly repeat steps 4 & 5 for key #2 etc.
If it does not work, try doing the keys in opposite order. Key 2 then key 1, vs 1 then 2.
It looks like there are some wires going to the box that are not connected though, which I find a bit weird. What other unit could be inside the same box? ASC? Also quite a few wires in the engine bay have been re-wrapped with electrical tape. I read from somewhere that the E36 S50 has quite a different loom, so I'm starting to think my engine is from an M3... Or maybe I am just paranoid.


I also had a look at removing the extra M-Power emblem from to of the engine. It is glued on with some seriously hardcore stuff. I need to get some acetone or something to soften / dissolve the glue and then try again.

I haven't been very lucky with the angel eye halos I ordered a good while back. As mentioned previously, one of the halos was a lot dimmer than the other three. Seller sent me a replacement, which unfortunately was broken.
Anyway, I had a look under the bonnet to see what tools I need for removing the headlights for halo installation. It seems an 8mm socket is all I need. The smallest I have in UK is 9mm, so off to ebay again...
As last thing, I tinted the clear bumper light lenses. Smoke tint spray was a fiver from ebay and two layers of that stuff did the job just fine.
First I cleaned the lenses thoroughly with isopropanol solvent and a clean microcloth. Then I masked the back sides of the lenses with gaffer tape. Then I fitted the lenses to an improvised holder (that is, chicken kickers box from Domino's
The pressure from the spray can lifted a bit of dust particles off the floor, which then landed on the freshly tinted lenses, but they are hardly noticeable. All in all, pretty good looking tint for £5. Also easily removable with another spray, if The MOT Man does not like the smoke effect.


Re: PROJECT: 1998 Black M Roadster (aka Giorgio)
This week I received new (used) kidney grilles, cheers Liam! They are exactly like the ones I already have, but just shiny black instead of matte black. I didn't have time to fit them yet, but I think the shiny blacks will look really good on a black car...
Today was the first day of a two-day roadtrip to Plymouth. Early tomorrow morning I will take Giorgio to a friendly man, who gives it a Strong-Strut butt strut and body braces. Then follows a drive back to London, hopefully via Dartmoor national park and a lot of b-roads. 
The way here was just M25 and a bunch of multi-lane a-roads, and quite boring to be frank. My own fault really, I left London too late to have time to get off the main routes. I hope to see more of the rural Britain tomorrow.
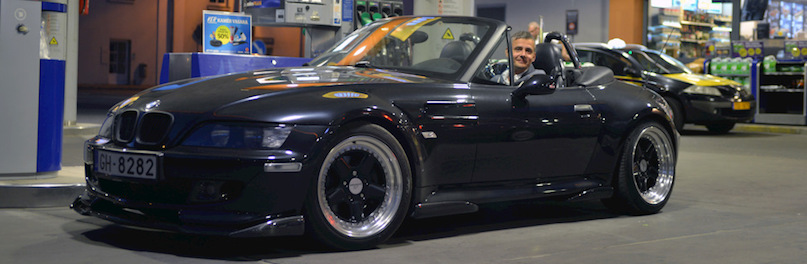
At some point I stopped to mark my territory, and also took a couple of photos of Giorgio. Here you'll see the smoked bumper lights fitted. It's amazing how such subtle changes can make a car look much less cluttered. The original plan was to de-chrome the door handles and windscreen frame, but I am starting to have second thoughts about it. IMHO the exterior looks much more balanced already. Still need to do the de-tangoing and halos for the headlights, and then reassess the need for de-chroming.


Today was the first day of a two-day roadtrip to Plymouth. Early tomorrow morning I will take Giorgio to a friendly man, who gives it a Strong-Strut butt strut and body braces.
The way here was just M25 and a bunch of multi-lane a-roads, and quite boring to be frank. My own fault really, I left London too late to have time to get off the main routes. I hope to see more of the rural Britain tomorrow.
At some point I stopped to mark my territory, and also took a couple of photos of Giorgio. Here you'll see the smoked bumper lights fitted. It's amazing how such subtle changes can make a car look much less cluttered. The original plan was to de-chrome the door handles and windscreen frame, but I am starting to have second thoughts about it. IMHO the exterior looks much more balanced already. Still need to do the de-tangoing and halos for the headlights, and then reassess the need for de-chroming.


Re: PROJECT: 1998 Black M Roadster (aka Giorgio)
Giorgio is now all braced up! Big thanks to RobGT4 for selling me his Strong-Strut kit, and his friendly mechanic buddy Mike who did a great job in installing the kit on Giorgio!
All in all the drive from Plymouth back to London was not the most enjoyable due to the crappy weather, high traffic and numerous long queues. Nevertheless, with the braces, the car is now noticeably better to drive. It feels like a completely different car, to be honest. Before the whole backend of the car would shake vigorously when driving over sharp bump. Now I can feel just a single jolt from the rear (or two if both rear tyres went over the bump) and that's it. It also feels like the back end of chassis acts as one unit, instead of both sides doing their own things. The braces reduce the body flex so much that the suspension suddenly feels a bit on the stiff side, but in a positive, controllable way.
For comparison: A while ago I had a Mazda MX-5 NC (the latest generation) which felt a lot stiffer than the standard M Roadster. However with the braced-up M, the difference is still noticeable but much reduced. Mazda does also have the weight advantage: As it is so much lighter, it can manage with less torsional rigidity, thus it would take some serious bracing to make the M feel as stiff as the Mazda.
Here's one of the many sources for the torsional stiffness of some convertibles:
http://mgf.ultimatemg.com/group2/body/
Judging by the drive yesterday, now this is a complete guesstimate pulled out of a hat, but I'd say the torsional rigidity is up by 1000NM or even more. I guess the bracing reduces longitudal and sideways flex as well, which contributes to the general feel of added stiffness.
Whatever the numbers, the car feels much more solid now, which in the end is all that matters.
Anyway, before and after shots. (as you can see, I am still missing some of the A/C gear and some underside plastic covers... Back to that some other day):


While the car was on a lift (the first time since I bought it!), we noticed something worrying: Two of the LH driveshaft bolts had already disappeared, one was very close, and the rest were also very loose. The CV joint boots looked relatively new, so my guess is that whoever idiot changed them didn't tighten the LH side bolts properly, or at all.
So I need two bolts. According to RealOEM the BMW part nr is 33211227664. What would be the best place in UK to order them from? Or alternatively I could take them to be fitted at a garage somewhere near N/NE London. The CV joint has spat two nice stripes of grease on the underside of the car, so it probably wouldn't hurt to clean the joint and re-fill it with grease while at it.

All in all the drive from Plymouth back to London was not the most enjoyable due to the crappy weather, high traffic and numerous long queues. Nevertheless, with the braces, the car is now noticeably better to drive. It feels like a completely different car, to be honest. Before the whole backend of the car would shake vigorously when driving over sharp bump. Now I can feel just a single jolt from the rear (or two if both rear tyres went over the bump) and that's it. It also feels like the back end of chassis acts as one unit, instead of both sides doing their own things. The braces reduce the body flex so much that the suspension suddenly feels a bit on the stiff side, but in a positive, controllable way.
For comparison: A while ago I had a Mazda MX-5 NC (the latest generation) which felt a lot stiffer than the standard M Roadster. However with the braced-up M, the difference is still noticeable but much reduced. Mazda does also have the weight advantage: As it is so much lighter, it can manage with less torsional rigidity, thus it would take some serious bracing to make the M feel as stiff as the Mazda.
Here's one of the many sources for the torsional stiffness of some convertibles:
http://mgf.ultimatemg.com/group2/body/
Judging by the drive yesterday, now this is a complete guesstimate pulled out of a hat, but I'd say the torsional rigidity is up by 1000NM or even more. I guess the bracing reduces longitudal and sideways flex as well, which contributes to the general feel of added stiffness.
Whatever the numbers, the car feels much more solid now, which in the end is all that matters.
Anyway, before and after shots. (as you can see, I am still missing some of the A/C gear and some underside plastic covers... Back to that some other day):


While the car was on a lift (the first time since I bought it!), we noticed something worrying: Two of the LH driveshaft bolts had already disappeared, one was very close, and the rest were also very loose.
So I need two bolts. According to RealOEM the BMW part nr is 33211227664. What would be the best place in UK to order them from? Or alternatively I could take them to be fitted at a garage somewhere near N/NE London. The CV joint has spat two nice stripes of grease on the underside of the car, so it probably wouldn't hurt to clean the joint and re-fill it with grease while at it.

Re: PROJECT: 1998 Black M Roadster (aka Giorgio)
It's good to get underneath the car and get to now the often neglected bits. That was a timely spot, particularly for an M pushing 300+ BHP through those drive shafts. Unbelievably negligent of the person who left them like that
Re: PROJECT: 1998 Black M Roadster (aka Giorgio)
Recently I've been too busy to do anything on the car, and I was also abroad for a couple of weeks. But now I am back, and I've made new purchases.

My angel eye project didn't really go anywhere: After two replacements for the bigger halo rings, a smaller ring started acting up. But then these headlights with halos already fitted came up for sale. Monies went to Germany, and a week later I got my haloed headlights.
Autumn does slow down working on the car though. When I get back home from work it is already dark, most likely raining and I don't have a garage, thus I get nothing done during the week. I'm hoping to have time (and nice weather!) on the weekend so that I can change the headlights, and do some other small pending things.
Racelogic TC is still waiting to be installed as well. For that I'd really need a sunny day, I don't think it is the best idea to do wiring in rain. I so wish I had a garage...

My angel eye project didn't really go anywhere: After two replacements for the bigger halo rings, a smaller ring started acting up.
Autumn does slow down working on the car though. When I get back home from work it is already dark, most likely raining and I don't have a garage, thus I get nothing done during the week. I'm hoping to have time (and nice weather!) on the weekend so that I can change the headlights, and do some other small pending things.
Racelogic TC is still waiting to be installed as well. For that I'd really need a sunny day, I don't think it is the best idea to do wiring in rain. I so wish I had a garage...
Re: PROJECT: 1998 Black M Roadster (aka Giorgio)
Progressing nicely
Re: PROJECT: 1998 Black M Roadster (aka Giorgio)
So, today I fitted the angel eye headlights.
Has anyone actually got the ebay halos working for more than a couple of minutes??
As I said earlier, I bought a halo set from ebay, of which one ring immediately needed a replacement, which was faulty and needed a replacement, and in the meanwhile one of the other halos failed, after which I gave up. Now I bought these f***ing lights, all ready made and ready to go on the car. They worked for all 20 mins, and then when I was just showing the new lights to my mate, one of the halos simply stopped working. I switched the halo connectors to rule out a faulty transformer, but alas the problem persists. There's a faint glow in the tip of the halo, just like on a broken fluorescent tube, thus wiring should be OK -> the halo itself is faulty. Why of course... It would have been way too easy to replace just the transformer, of which I have two spares.
So now I have two sets of headlights, and two faulty sets of halos, different colour as well so cannot mix'n'match. Not on the bestest of the moods right now. I think it is time for a pizza and a whiskey & coke.
I managed to get a photo before it failed though. They look really nice when they work...

Has anyone actually got the ebay halos working for more than a couple of minutes??
As I said earlier, I bought a halo set from ebay, of which one ring immediately needed a replacement, which was faulty and needed a replacement, and in the meanwhile one of the other halos failed, after which I gave up. Now I bought these f***ing lights, all ready made and ready to go on the car. They worked for all 20 mins, and then when I was just showing the new lights to my mate, one of the halos simply stopped working.
So now I have two sets of headlights, and two faulty sets of halos, different colour as well so cannot mix'n'match. Not on the bestest of the moods right now. I think it is time for a pizza and a whiskey & coke.
I managed to get a photo before it failed though. They look really nice when they work...


Re: PROJECT: 1998 Black M Roadster (aka Giorgio)
I tried many years ago when I had an M3 and I gave up in the end as they just blew and blew...............
2001 Z3 3 litre Sport Roadster - titanium and special
2006 Z4M coupe - Interlagos and red
http://i1167.photobucket.com/albums/q62 ... huiwqu.jpg
2006 Z4M coupe - Interlagos and red
http://i1167.photobucket.com/albums/q62 ... huiwqu.jpg
-
Wolverine_1999
- Joined: Mon 15 Feb, 2010 20:07
- Posts: 454


- Location: Munich
Re: PROJECT: 1998 Black M Roadster (aka Giorgio)
I've bought 2 sets of them and never had any issues.. combined usage of 4-5 years over 2 cars! Jani actually bought that set from me, but I never had issues with themZ3andZ4 wrote:I tried many years ago when I had an M3 and I gave up in the end as they just blew and blew...............
Could it be that the Z3 M has different wiring/ current ? I feel bad about it now
This was the exact title of them as sold on Ebay:
BMW Z3 WHITE CCFL ANGEL EYE KIT BRAND NEW 7000K UK !!
Seller was alltronix_ltd
Re: PROJECT: 1998 Black M Roadster (aka Giorgio)
Hi Daniel, good to hear from you and don't feel bad - in the end, the fault was just caused by a dodgy wire! It had come loose from the connector, which I noticed just when I was about to put the headlght into the oven and change the halos... A bit of soldering fixed it.
I didn't have time to do this until last week, and haven't fitted the light back on the car yet. There's some other things I need to do on the car as well... Watch this space
I didn't have time to do this until last week, and haven't fitted the light back on the car yet. There's some other things I need to do on the car as well... Watch this space
-
Wolverine_1999
- Joined: Mon 15 Feb, 2010 20:07
- Posts: 454
-
- Location: Munich
Re: PROJECT: 1998 Black M Roadster (aka Giorgio)
Excellent to hear! I knew those were some quality onesjanijoeli wrote:Hi Daniel, good to hear from you and don't feel bad - in the end, the fault was just caused by a dodgy wire! It had come loose from the connector, which I noticed just when I was about to put the headlght into the oven and change the halos... A bit of soldering fixed it.
I didn't have time to do this until last week, and haven't fitted the light back on the car yet. There's some other things I need to do on the car as well... Watch this space
I really want an M now as well
Re: PROJECT: 1998 Black M Roadster (aka Giorgio)
Long time no update! Today I finally re-fitted the door card I repaired two and half months ago, and did some other minor jobs.
The original door card had a long horizontal crease at the top because the base had cracked, so I wanted to do something about it. Basically the repair meant combining parts from three door cards, the original one and two extras I bought, to make one mint door card.
I took the leather covered handle, hockey stick and red leather insert from the original door card, the base itself from another, and the speaker grill and some missing plastic bits from a third one. The replacement base had some discolouration, so I treated it with black trim wax which restored the colour nicely. Here are some photos of the repair process, and a photo of the door card finally back on the car. I am quite chuffed with the result!


The refurbished cylinder head and spark plug covers arrived a couple of days ago. Now I am just waiting for spark plugs to arrive, then I am ready to do a quick top end service which includes changing spark plugs, checking valve clearances and changing the original covers (of which paint is flaking off) to nicer ones. I am not sure if I like the finish of the refurb'd covers, they are quite shiny compared to the originals... Maybe when I get the rest of the engine bay polished up they won't look too much out of place.

I finally removed the tacky plastic M-Power badge from the air intake tube on top of the engine. What a job! It took about half an hour to rub the glue off. The fuel injection and air intake tubes have some surface rust as can be seen from the photos, I am planning on repainting them in the near future. I am also not too happy about the strut bar, which only after a couple of months on the car has started oxidising... I need to do something about that.


I was also going to fit the Simota induction kit I bought a while ago, but I think I am missing some bits... Or what just occurred to me, maybe I have a wrong MAF?? The MAF body has a flange onto which the aftermarket air filter is screwed on to, whereas simota would need to be simply clamped onto a pipe with the provided trumpet hose. I stared at both ends for a good while but just couldn't figure out how they could ever meet. The kit looks correct but the MAF looks different from e.g. the one in the Simota installation article in knowledgebase. I'll need to check the part# of my MAF.


Then lastly I took the car for outside and engine bay wash, which it truly deserved. Not to mention that it is going to be much nicer to work on the engine when it is clean.


The original door card had a long horizontal crease at the top because the base had cracked, so I wanted to do something about it. Basically the repair meant combining parts from three door cards, the original one and two extras I bought, to make one mint door card.
I took the leather covered handle, hockey stick and red leather insert from the original door card, the base itself from another, and the speaker grill and some missing plastic bits from a third one. The replacement base had some discolouration, so I treated it with black trim wax which restored the colour nicely. Here are some photos of the repair process, and a photo of the door card finally back on the car. I am quite chuffed with the result!


The refurbished cylinder head and spark plug covers arrived a couple of days ago. Now I am just waiting for spark plugs to arrive, then I am ready to do a quick top end service which includes changing spark plugs, checking valve clearances and changing the original covers (of which paint is flaking off) to nicer ones. I am not sure if I like the finish of the refurb'd covers, they are quite shiny compared to the originals... Maybe when I get the rest of the engine bay polished up they won't look too much out of place.

I finally removed the tacky plastic M-Power badge from the air intake tube on top of the engine. What a job! It took about half an hour to rub the glue off. The fuel injection and air intake tubes have some surface rust as can be seen from the photos, I am planning on repainting them in the near future. I am also not too happy about the strut bar, which only after a couple of months on the car has started oxidising... I need to do something about that.


I was also going to fit the Simota induction kit I bought a while ago, but I think I am missing some bits... Or what just occurred to me, maybe I have a wrong MAF?? The MAF body has a flange onto which the aftermarket air filter is screwed on to, whereas simota would need to be simply clamped onto a pipe with the provided trumpet hose. I stared at both ends for a good while but just couldn't figure out how they could ever meet. The kit looks correct but the MAF looks different from e.g. the one in the Simota installation article in knowledgebase. I'll need to check the part# of my MAF.

Then lastly I took the car for outside and engine bay wash, which it truly deserved. Not to mention that it is going to be much nicer to work on the engine when it is clean.


Re: PROJECT: 1998 Black M Roadster (aka Giorgio)
I am stupid.  Of course the flange isn't at the end of the MAF body, part of the MAF happens to be inside the air filter... Oh well. Let's fit the Simota next sunny weekend day then.


Re: PROJECT: 1998 Black M Roadster (aka Giorgio)
It's coming along Jani will have to meet up again when the weathers better
///M Roadster - Evolve Stage 3

Re: PROJECT: 1998 Black M Roadster (aka Giorgio)
Definitely Liam! It would be nice to go for a mini top-down sunday cruise, when the weather finally permits...
Good news! Fresh set of NGK PKR7A spark plugs arrived today. Gaps all checked to be 0.7mm, and I also double checked I didn't receive fakes.
http://www.ngk-sparkplugs.jp/english/techinfo/fake/
Now everything should be ready for the cam cover / spark plugs / valve clearance job...
Good news! Fresh set of NGK PKR7A spark plugs arrived today. Gaps all checked to be 0.7mm, and I also double checked I didn't receive fakes.
http://www.ngk-sparkplugs.jp/english/techinfo/fake/
Now everything should be ready for the cam cover / spark plugs / valve clearance job...
Re: PROJECT: 1998 Black M Roadster (aka Giorgio)
A small update: On saturday I finally cleaned the windscreen washer fluid reservoir, it's been bugging me forever. I got 99% of the 15 years of oil, tar and grime off it with Greygate plastic polish, came off very easily.


I also used Greygate on the rear window, as it had got a bit hazy. Worked well, now I can actually see through it. I didn't remember to take a photo before or after...
The last use of the day for Greygate was to remove the white markings from the wheelarch trim that can be seen in the photo below. I suppose it had at some point been replaced with one from breakers. Worked a treat here as well, but again forgot to take the after photo (absent-minded this weekend...).
Simota induction kit also found its place from under the hood, replacing the very tatty el-cheapo induction kit. Small breather pipe filter had been installed on the wrong side of the heatshield, and it was pretty much completely blocked with oil and dirt. The big filter didn't look too good either. I took the car for a quick spin after installing Simota, and I swear I got at least 10dB more noise and 20 more horsies!


I was planning on doing a bit more on Saturday, but my back said "click" while installing Simota, and I was a cripple for the rest of the day.
On Sunday I did some wiring prep for the Racelogic Traction Control. I want the installation to be reversible without any soldering. To separate RL and car wiring, I chose a standard ATX PC power connector for several reasons: It's pretty reliable, it's got enough pins (24), it's not too bulky, it's very common, and Maplin (amongst others) sells an extension cable, which when you cut it in half gives you both male and female connectors, pre-wired, for mere £2.99.

Here the first six wires soldered and shrink-wrapped. They are the injector signals coming from ECU to TC.

I soldered TC -> Injector wiring on the second row, under the inputs. The injector wires need to be cut as the TC needs to be in the middle, adjusting injector pulses, thus if TC is removed, injector signals will need to be re-routed. Instead of installing four connectors (ECU->TC and TC->injectors) as TC manual suggests, I wired everything to a single connector, and made a loop connector to patch injector signals when TC is unplugged. Here you can see the connector wired to TC loom, and the replacing bypass connector. Top six pairs are looped, bottom six are left in place for possible future wiring changes but individually insulated to avoid shorts and then wrapped together.

I don't know what I did differently last time, but this time I managed to pull the ECU out of its box very easily. Then the scary part... Cutting the ECU loom. Injector wires were very easy to find, they are in the smaller group of wires where all other wires are either shielded or wrapped together.

Here the ECU->TC wires are already soldered to the connector. This is the last photo I took before it got too dark to take photos. I finished the rest of the injector wiring while wearing an LED head lamp... I plugged in the loop connector, put everything back together and went for a quick drive to make sure the car still works - so far so good. Next time I'll splice and connect the RPM sensor and +12V ignition wires, and then start pulling the cables for ABS sensors, TC adjuster and RS232 interface through the firewall to the cockpit. I also need to decide where I want to put the adjuster...


I also used Greygate on the rear window, as it had got a bit hazy. Worked well, now I can actually see through it.
The last use of the day for Greygate was to remove the white markings from the wheelarch trim that can be seen in the photo below. I suppose it had at some point been replaced with one from breakers. Worked a treat here as well, but again forgot to take the after photo (absent-minded this weekend...).
Simota induction kit also found its place from under the hood, replacing the very tatty el-cheapo induction kit. Small breather pipe filter had been installed on the wrong side of the heatshield, and it was pretty much completely blocked with oil and dirt. The big filter didn't look too good either. I took the car for a quick spin after installing Simota, and I swear I got at least 10dB more noise and 20 more horsies!


I was planning on doing a bit more on Saturday, but my back said "click" while installing Simota, and I was a cripple for the rest of the day.
On Sunday I did some wiring prep for the Racelogic Traction Control. I want the installation to be reversible without any soldering. To separate RL and car wiring, I chose a standard ATX PC power connector for several reasons: It's pretty reliable, it's got enough pins (24), it's not too bulky, it's very common, and Maplin (amongst others) sells an extension cable, which when you cut it in half gives you both male and female connectors, pre-wired, for mere £2.99.

Here the first six wires soldered and shrink-wrapped. They are the injector signals coming from ECU to TC.

I soldered TC -> Injector wiring on the second row, under the inputs. The injector wires need to be cut as the TC needs to be in the middle, adjusting injector pulses, thus if TC is removed, injector signals will need to be re-routed. Instead of installing four connectors (ECU->TC and TC->injectors) as TC manual suggests, I wired everything to a single connector, and made a loop connector to patch injector signals when TC is unplugged. Here you can see the connector wired to TC loom, and the replacing bypass connector. Top six pairs are looped, bottom six are left in place for possible future wiring changes but individually insulated to avoid shorts and then wrapped together.

I don't know what I did differently last time, but this time I managed to pull the ECU out of its box very easily. Then the scary part... Cutting the ECU loom.

Here the ECU->TC wires are already soldered to the connector. This is the last photo I took before it got too dark to take photos. I finished the rest of the injector wiring while wearing an LED head lamp...

-
Southernboy

- Joined: Thu 07 Oct, 2010 12:39
- Posts: 6437


- Location: Johannesburg
Re: PROJECT: 1998 Black M Roadster (aka Giorgio)
Nice work Jani ! But damned if I would try anything like that...a bit out of my abilities to grasp when it comes to electronics.
You need to remove the cam cover and have it re-coated at some time too...but generally that engine bay looks very tidy...
You need to remove the cam cover and have it re-coated at some time too...but generally that engine bay looks very tidy...

Re: PROJECT: 1998 Black M Roadster (aka Giorgio)
Thanks mate! I've never been too scared of electronics, I disassembled my RC cars and other tech toys when I was a kid. Years ago I even studied electronics, that career didn't really take off but nevertheless it has been helpful in the long term, even though I have forgotten most of it...
Nothing very complicated about this job though - it's just about hooking up to a couple of wires (wheel speeds and RPM to be exact) to Racelogic so that it knows when it needs to cut fuel injection to lessen wheel spin, and routing the injector wires through Racelogic so that it can cut the fuel.
I have bought a refurb'd cam cover (there's a photo a couple posts up) and also all seals, spark plugs and tools needed for a combined valve cover / spark plug change and valve clearance job... I just need to get to it. Intake plenum could also use a lick of paint, maybe something I'll do when the weather improves a bit so that I can paint it outside...
Nothing very complicated about this job though - it's just about hooking up to a couple of wires (wheel speeds and RPM to be exact) to Racelogic so that it knows when it needs to cut fuel injection to lessen wheel spin, and routing the injector wires through Racelogic so that it can cut the fuel.
I have bought a refurb'd cam cover (there's a photo a couple posts up) and also all seals, spark plugs and tools needed for a combined valve cover / spark plug change and valve clearance job... I just need to get to it.
-
Southernboy
- Joined: Thu 07 Oct, 2010 12:39
- Posts: 6437
-
- Location: Johannesburg
Re: PROJECT: 1998 Black M Roadster (aka Giorgio)
Summer will be along soon enough, and hopefully it'll be a good one for doing all the renovations. 
Re: PROJECT: 1998 Black M Roadster (aka Giorgio)
Did some more wiring this weekend. I took the dash underside trim off on both driver's and passenger's side, soldered a connector to the wheel speed sensor wires (near ABS unit behind glovebox), and pulled cables for speed sensor signals, RLTC controller unit and RS232 through the firewall to the ECU box.
Then I soldered almost everything on the ECU box side: Only +12V, ground and RPM signal are left to do. Inside the car I only need to add a connector between the cable to the controller unit, and then I can start testing!
The whole installation has taken a LOT longer than I thought, although I am being a bit anal about everything: All joints are soldered and shrink-wrapped, several connectors in place so that I can detach everything without cutting the wires or de-soldering them, cables follow the same routes as OEM harness... Also no electricity at my driveway doesn't help: I am using a cheap gas soldering iron, which takes forever to heat up but goes through its gas container so quickly that I have to switch it off when possible.
Not very exciting photos to show, just a couple of blurry shots of cables, so I'll save them for an upcoming HowTo guide.


Re: PROJECT: 1998 Black M Roadster (aka Giorgio)
Please do a write up on the cruise control fitting. I also bought all parts (I think I am missing just steering wheel trim), but I don't have a clue about where to fit each part.
Re: PROJECT: 1998 Black M Roadster (aka Giorgio)
No worries, I'll snap some photos while at it. Should be pretty much plug'n'play (apart from bolt'n'play for the actuator).
Re: PROJECT: 1998 Black M Roadster (aka Giorgio)
Well the cruise control installation wasn't exactly plug and play.
Firstly, I have been sold a wrong control unit. Unit needed is 1387625, whereas the unit received (judging by the connector and manufacturing timestamp, as the part# sticker is missing) looks like 1379876, which only fits E34 5 series and E32 7 series. The connector has a push-on lock, but the connector on the car has a latch lock. I'll provide some photos of this later. Annoying, as the seller sold the unit as 1387625.
Secondly, a confirmation - E46 actuator bowden cable that came with my actuator does NOT fit an M Roadster. All bits are the same, but the distance between the throttle linkage and cable support bracket is too long on an M for E46 cable to fit. The full cable is a bit too long for a Z3, but only a couple of cm, thus this might not have been an issue. Anyway, as someone had already pointed out that the cable is not the same, this didn't come as a big surprise. I think I'll just order a brand new cable from Cooper and get done with it.
Thirdly, the control stalk fits perfectly, but its connector doesn't. Title of the ebay item says it fits Z3, but description says it is from a 1993 325.
Browsing the parts catalog makes it obvious that the stalk changed in January 1995, and the new stalk is compatible with Z3, but the old stalk, which is the one I received, isn't.
http://bmwfans.info/parts-catalog/61318360926/
So two unsuccessful ebay purchases, both from US sellers... I will lose at least the import duties and whatever is lost in the currency exchange, plus return postage. Plus all the hassle. Maybe to reduce hassle I'll ask the stalk seller for a partial refund, take the connector apart, and just plug the pins directly to the car side of the connector. Old connector has 8 pins but only 5 wired, and the new connector has 5 pins, so should be just a matter of matching the wire colours.
On a positive note, the clutch switch and the actuator fitted perfectly. I've also been doing a couple of smaller jobs, another post with photos coming up later.
Firstly, I have been sold a wrong control unit.
Secondly, a confirmation - E46 actuator bowden cable that came with my actuator does NOT fit an M Roadster. All bits are the same, but the distance between the throttle linkage and cable support bracket is too long on an M for E46 cable to fit. The full cable is a bit too long for a Z3, but only a couple of cm, thus this might not have been an issue. Anyway, as someone had already pointed out that the cable is not the same, this didn't come as a big surprise. I think I'll just order a brand new cable from Cooper and get done with it.
Thirdly, the control stalk fits perfectly, but its connector doesn't.
Browsing the parts catalog makes it obvious that the stalk changed in January 1995, and the new stalk is compatible with Z3, but the old stalk, which is the one I received, isn't.
http://bmwfans.info/parts-catalog/61318360926/
So two unsuccessful ebay purchases, both from US sellers... I will lose at least the import duties and whatever is lost in the currency exchange, plus return postage.
On a positive note, the clutch switch and the actuator fitted perfectly. I've also been doing a couple of smaller jobs, another post with photos coming up later.
-
Southernboy
- Joined: Thu 07 Oct, 2010 12:39
- Posts: 6437
-
- Location: Johannesburg
Re: PROJECT: 1998 Black M Roadster (aka Giorgio)
I think you have a case to raise with eBay...the seller has misrepresented the part numbers...this should result in a 100% refund if you lodge a complaint with eBay. If you used PayPal, Lodge a claim there too... I think you have a good case to claim the postage, the duty and VAT, since those expenses were incurred as a result of the seller selling the wrong items with incorrect part numbers !!
Re: PROJECT: 1998 Black M Roadster (aka Giorgio)
I've already raised a case about the control unit. I basically gave him two options: Either to send a correct replacement unit, or give full refund. I really wish he'd have a replacement unit to send and he'd be willing to do that, as I just couldn't be asked to go through the hassle of the refund!
What I read about what is refunded, the price and postage are covered but I am not sure about import duties and return postage. If it comes to refund, I'll need to ask eBay. But you are right, IMHO 100% should be refunded if the seller sells wrong items.
For stalk, I'll go out and check the wiring now. If it seems possible to connect the stalk without cutting into car's wiring loom, I'll raise a partial refund case.
Re: PROJECT: 1998 Black M Roadster (aka Giorgio)
Spent most of yesterday installing the Racelogic TC. I had some trouble finding the 12v feed from ignition key to ECU, but found it in the end, as well as the correct wire from crankshaft (rpm) sensor.
I started doing the calibration using the software. The data connection is okay but not 100%, I reckon because my serial data cable is quite long. It goes all the way from ECU box (RH side of the engine bay) to passenger footwell, and there's probably 2m extra. I'll need to shorten it at some point, and improve shielding if no improvement.
Anyway, what matters more, in the software's real time graph view I can see a lot of erroneous spikes in wheel speed and rpm sensor signals when driving. Around 3000-3500rpm there are so many spikes that the TC kicks in. I'll need to improve the shielding of the cables and see if the signal improves.
Good thing is that the TC sees all signals and cuts injectors off when needed (or it thinks when needed), and no smell of burnt wire or electronics... So it's just a matter of ironing out the kinks and finishing the calibration.
I started doing the calibration using the software. The data connection is okay but not 100%, I reckon because my serial data cable is quite long. It goes all the way from ECU box (RH side of the engine bay) to passenger footwell, and there's probably 2m extra. I'll need to shorten it at some point, and improve shielding if no improvement.
Anyway, what matters more, in the software's real time graph view I can see a lot of erroneous spikes in wheel speed and rpm sensor signals when driving. Around 3000-3500rpm there are so many spikes that the TC kicks in. I'll need to improve the shielding of the cables and see if the signal improves.
Good thing is that the TC sees all signals and cuts injectors off when needed (or it thinks when needed), and no smell of burnt wire or electronics...
-
Southernboy
- Joined: Thu 07 Oct, 2010 12:39
- Posts: 6437
-
- Location: Johannesburg
Re: PROJECT: 1998 Black M Roadster (aka Giorgio)
Well done Jani! Sounds as though you have 99% of the install done then...Look forward to the next installment update...
Re: PROJECT: 1998 Black M Roadster (aka Giorgio)
Giorgio went in for an inspection II service to Phil / CPC Performance Engineering. Very friendly and knowledgeable chap, and immediately noticed things I hadn't, from small issues to major - a failing water pump, amongst others! Also said he'll go through the car in detail this morning and then call me to verify I'm cool with everything to be done before doing anything. Very professional and something some other garages should learn from!