Hi
Im looking for the loom with connector block that is allegedly pre installed, BUT im specifically looking for end that connectors to the passenger side metal bracket and not the end which the switch is attached to.
After hours of trawling through posts here all I want to know is it the loom end located either
A) Behind The carpet of the passenger seat or
B) Underneath the central storage bin
ideally im looking for responses from people with 1st hand experience locating
Thanks in advance - im pulling my hair out trying to locate this "unicorn" loom
pre-installed hardtop wiring loom - facelift + pwr hood

Well to get at either, you will need the storage box off. 
The carpet is secured by three large plastic plugs all buried under the storage box bits - one in the centre and one under each seatbelt turret.
My first choice would be to remove the storage box liner. This is easy if you don't have the HK sub-woofer or roll-hoops, and a right royal PITA otherwise, as the hoops have to be removed first.
Mine was pre-wired, but I don't recall seeing where the wires went when I had the lot off to fit my rollhoop brackets. I found the rear speaker wires as I had to disconnect them temporarily. The harness runs to a relay at the front of the car, so the wiring has to either run down the centre or the side of the car. I would guess that it probably comes out of the bundle that goes through to the boot on the passenger side of the car.
Cheers R.
Arctic Silver '99 Z3 1.9 & Black '59 Frogeye 1275cc


more info
my car is a facelift 1999 2.0
and I found my wire tied back on the wiring that runs behind the passenger seat near the top by the speaker housing top box storage thing. It is wrapped in black tap so looks as if it isnt an extra wire.
I could have located if I could have gotten under the carpet from the door.
But i had already had the top box of so it was easy.
If you can get at it without having to remove the hoops and storage box, so much the better.
You can loosen the side-trim by removing the scuff plate from the bottom of the door - it pulls straight up and is held on by three plastic plugs. Then the trim can be partially freed by removing two of it's three screws - one screw is under the end of scuff plate and another in the middle of the trim in a recess about halfway up the door post. Leave the top one as it under the seatbelt turret and you will have to remove the storage box to get that off.
You might just about have enough room to get behind the carpet then.
Cheers R.
Arctic Silver '99 Z3 1.9 & Black '59 Frogeye 1275cc
Update~~~
Today I took the whole entire rear cabin, roll bars, and seat belt turrets off.
I also peeled the carpet back behind passenger seat and took the side door trims off and the carpet in the rear behind rear cabin storage.
I also traced bunches of looms to the boot and looms to the speakers etc
FINAL conclusion my car cannot have the alleged pre wired de mister harness
I wasted an afternoon and good money purchasing the switch
thoroughly fed up and gutted


oh dear, but are you sure, I would look again, it would bug me, it must be there 
Seriously if its not there then they are obviously not all pre wired
You have a dilema now, source a harness, fuses, relay ?
I almost feel guilty that I found mine so easily with a little advice from here by just undoing 2 screws and lifting the rear of the centre consol and my fingers went striaght to it
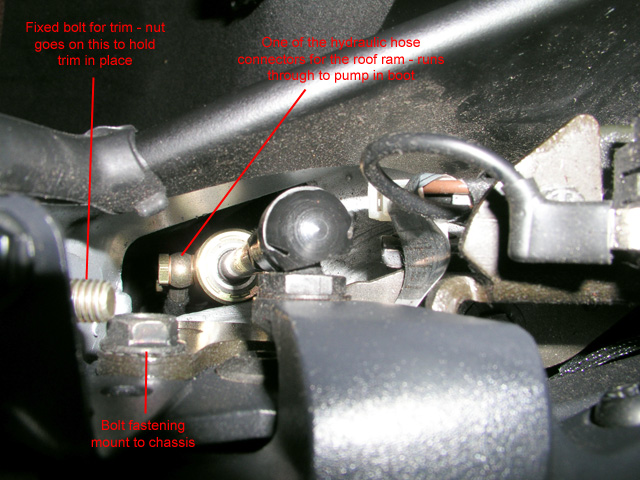
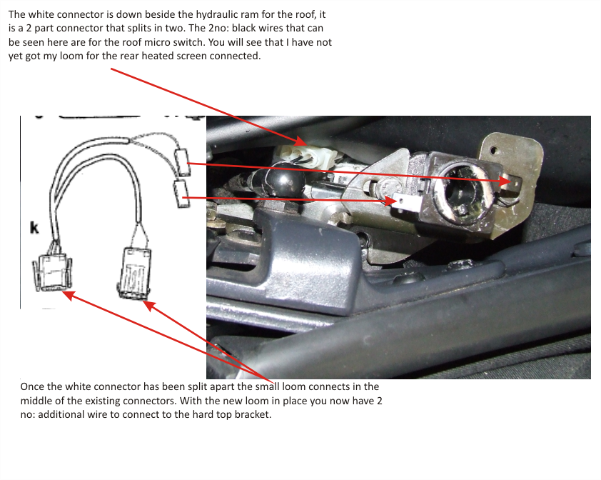
Someone else recently posted on here that the roof microswitch for the leccy roof also comes from the same connector. This explains why on cars with leccy roof fitted the wiring is already taken through to the correct point on the car.
Are you sure you are looking for the right thing? I would need to look at the fitting instructions for the hardtop (can't find my electronic copy) as I seem to remember a small adapter that connects from the harness to the two space connectors on the hardtop mount. Looking on RealOEM, part #4 on this diagram seems to show this - not just sure how it fits - together as I didn't fit mine - but it looks like you are looking for rectangular connector with 4 or 5 pins.
In this diagram the main wiring harness is shown on the passenger side of the car, running from the fusebox through to the rear lights.
As BMW sell retrofit kits, I would expect the essential wiring to be on all cars. If I can find the instructions, I can tell you exactly what is in the fitting kit.
Cheers R.
Arctic Silver '99 Z3 1.9 & Black '59 Frogeye 1275cc
The part that I linked to above is correct. The fitting instructions can be found online here:
http://www.waycoolinc.com/z3/essentials ... tation.pdf
Part k is the adapter cable. Picture 11 shows where the tied back connector is.
Cheers R.
http://www.waycoolinc.com/z3/essentials ... tation.pdf
Part k is the adapter cable. Picture 11 shows where the tied back connector is.
Cheers R.
Arctic Silver '99 Z3 1.9 & Black '59 Frogeye 1275cc
Um, just re-read your thread title. 
If you have a power hood, then there should be a connector for the roof microswitch near where you want it already. In which case all you need is the adapter cable that would have been in the fitting kit.
Really sorry if I've led you on a wild goose chase.
Cheers R.
If you have a power hood, then there should be a connector for the roof microswitch near where you want it already. In which case all you need is the adapter cable that would have been in the fitting kit.
Really sorry if I've led you on a wild goose chase.
Cheers R.
Arctic Silver '99 Z3 1.9 & Black '59 Frogeye 1275cc


drdrake,
Glad you found it
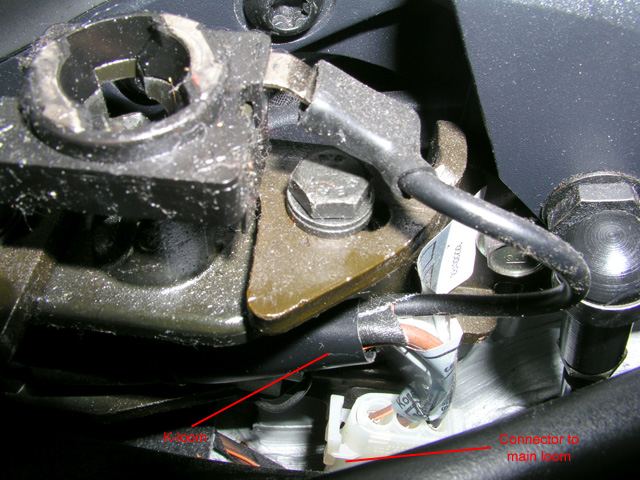
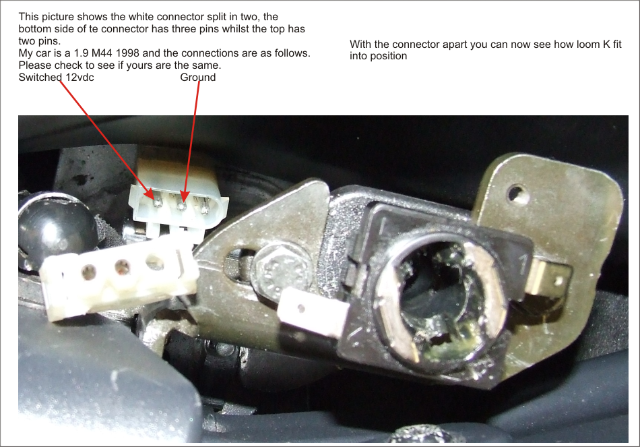
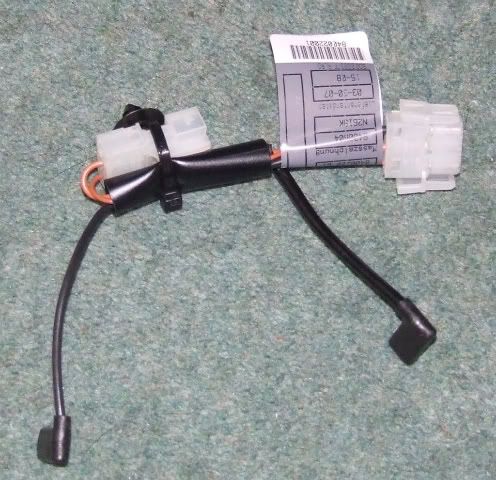
If you have the additional wiring loom (item K on my picture) then this sits in the middle of white connector.
If you do not have this loom then you could modify the existing loom at the bottom side of the connector. To modify the loom you will need to identify 2no: cables, the first is the ground and the second is the switched 12vdc. You will need a multimeter to identify the ground wire, the switched 12vdc is located opposite the empty hole on the connector (as if looking from the top)
I hope this all makes sense?
Good Luck
Brian
Update:
Just checked my car see pic below
Glad you found it
If you have the additional wiring loom (item K on my picture) then this sits in the middle of white connector.
If you do not have this loom then you could modify the existing loom at the bottom side of the connector. To modify the loom you will need to identify 2no: cables, the first is the ground and the second is the switched 12vdc. You will need a multimeter to identify the ground wire, the switched 12vdc is located opposite the empty hole on the connector (as if looking from the top)
I hope this all makes sense?
Good Luck
Brian
Update:
Just checked my car see pic below
-
FredBloggs
- Joined: Fri 24 Nov, 2006 20:42
- Posts: 29


- Location: Ilminster
Hard top wire loom
I found it in the boot. Teped very securely to the wiring loom. had to undo it and pull back into the cabin.
It was on the nearside.
Hope it helps.
Freedy B
It was on the nearside.
Hope it helps.
Freedy B
Pulled the whole boot carpets and tool tray out this morning in search of the infamous LOOM!!
I dont even think Dog the bounty hunter could find the bugger in my car - he he
Anyway all that remains unclear in my head is can I purchase this loom as a single item or will I have to buy the whole HT kit from BMW?
I dont even think Dog the bounty hunter could find the bugger in my car - he he
Anyway all that remains unclear in my head is can I purchase this loom as a single item or will I have to buy the whole HT kit from BMW?
Have you found the connector that Ardchyle indicated? This is the one you need and and it needs a small adapter to take the wires off for the heated screen - the other end of the adapter should be rejoined and carry on to the roof microswitch.
If you look about 6 posts back I posted a link to RealOEM giving the part number for the wiring adapter marked k in the fitting instructions. Assuming it hasn't been discontinued, you can go into any BMW and order it from the parts desk. At a guess it will cost you around 15 quid.
Cheers R.
If you look about 6 posts back I posted a link to RealOEM giving the part number for the wiring adapter marked k in the fitting instructions. Assuming it hasn't been discontinued, you can go into any BMW and order it from the parts desk. At a guess it will cost you around 15 quid.
Cheers R.
Arctic Silver '99 Z3 1.9 & Black '59 Frogeye 1275cc
Sorry, but I think people have been leading you down the path here. If you have a power hood then you have all the wiring you need in the car.
The connector you found near where the hardtop bracket goes is the one you want. Without a hardtop it feeds just the hood micro-switch. With a hardtop it feeds both the hood micro-switch and the demister. You seperate this connector and put the hardtop bracket wiring in-line with this. Then plug in the demister switch and you're all done. Facelift cars had the demister relay already installed.
There is a note in the intructions that some earlier cars had a slightly different connector for the power hood micro-switch, so when you seperate it it doesn't fit the hardtiop bracket. The hardtop kit does include a new connector and pins. If you have this issue and don't have the connector from your kit then PM me and I'll send you mine as I didn't need it. I doubt you will need this though as you have a facelift car.
You're very close to success now
siwilson wrote:Sorry, but I think people have been leading you down the path here. If you have a power hood then you have all the wiring you need in the car.
The connector you found near where the hardtop bracket goes is the one you want. Without a hardtop it feeds just the hood micro-switch. With a hardtop it feeds both the hood micro-switch and the demister. You seperate this connector and put the hardtop bracket wiring in-line with this. Then plug in the demister switch and you're all done. Facelift cars had the demister relay already installed.
There is a note in the intructions that some earlier cars had a slightly different connector for the power hood micro-switch, so when you seperate it it doesn't fit the hardtiop bracket. The hardtop kit does include a new connector and pins. If you have this issue and don't have the connector from your kit then PM me and I'll send you mine as I didn't need it. I doubt you will need this though as you have a facelift car.
You're very close to success now
EXCELLENT!! - sorry to be dence but I do have the white connector block already connected (i thought it was for the hood) it has 2 wires connected into it and spece in the block for 4 wires, do I need to disconnect this block and split it somehow or do i still need another part?
please help im getting totally confused now
The two pictures posted by Ardchyle show this quite well. You split that power hood connector and then both ends to the wiring that's part of the hardtop bracket (shown as item K in the first picture). On my hardtop kit that item K was already attached to the bracket. i found it easier to connect the wiring before securing the bracket.drdrake wrote:EXCELLENT!! - sorry to be dence but I do have the white connector block already connected (i thought it was for the hood) it has 2 wires connected into it and spece in the block for 4 wires, do I need to disconnect this block and split it somehow or do i still need another part?
please help im getting totally confused now
Si.
ARDCHYLE - PLEASE KEEP ME POSTED ON THAT PART NUMBER AS SOON AS YOU COLLECT IT AS I WANT TO ORDER ONE TOMORROWArdchyle wrote:Got a message from the dealer this morning, they have apparently found the part number for the additional loom, It costs £11.80. I'll post the part number early next week once I have picked it up.
Update
UPDATE!! I have just installed both the switch and additional wiring loom/harness, and im glad to observe the demister button lighting up but it does not activate the rear window demister
Apart from the fuse can anyone think of any other checks I can do please?
* one foot note, the loom came with an white adapter block which does not appear to be required in my circuit. so I do have 1 x small white adapter block left over.
Apart from the fuse can anyone think of any other checks I can do please?
* one foot note, the loom came with an white adapter block which does not appear to be required in my circuit. so I do have 1 x small white adapter block left over.

I'm having a similar issue to the OP I will be fitting a Hard Top to my 2000 3.0 this weekend and in anticipation I wanted to get the wiring sorted out to try to avoid having to dismantle the Storage Bin and the Roll Hoops etc, hunting for the loom.
The switch end was easy(ish) found the plug taped to the underside of the centre console and after much swearing and broken finger nails I managed to get the switch panel reassembled.
I'm hoping that the other end of the loom is in the same place as the one in the photo earlier in this thread, although mine appers to be hidden under a trim piece. Does anyone know how this piece comes out or am I going to have to dismantle the interior?


Wil the next person that finds the roof power connector and installs a hard top PLEASE take lots of good photos of the entire installation.
Thanks.
Thanks.

Use the Search button before posting newbie questions about hard tops and fitting kits, footwell speaker amps, water in the boot, hood maintainance and those horrific angel eyes. We get like 10 threads a week on the same subject, it's obvious that you haven't searched.
Bit late on my car, estocks - it's had hardtop brackets on it for the last 10 years!
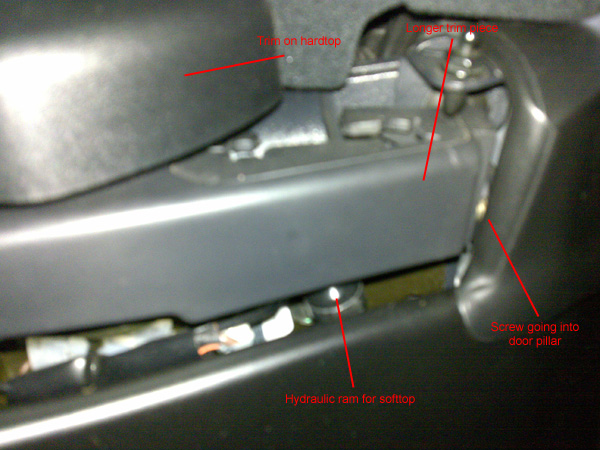
I took a couple of piccies of the trim on my car so that you can see how it is attached. The piece that goes round the ram and roof pivot looks like it comes off and is replaced by a larger piece that covers the hardtop bracket as well.
The whole trim piece (well as much as isn't hidden by the hardtop):
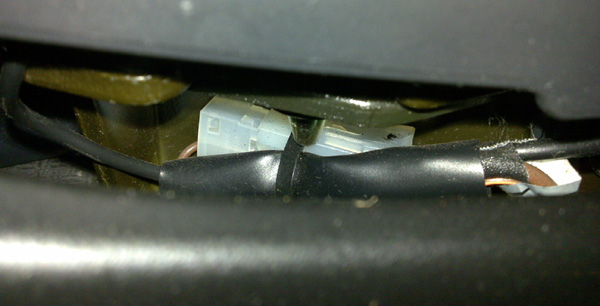
You can just see one of the connectors for the K-loom lurking under the trim:
And this is where the screw goes - much easier to get at without the hardtop on - it is probably also worth removing the rubber top to the door seal - it is a push fit, but note where all the little fiddly bits are tucked in before you remove it:
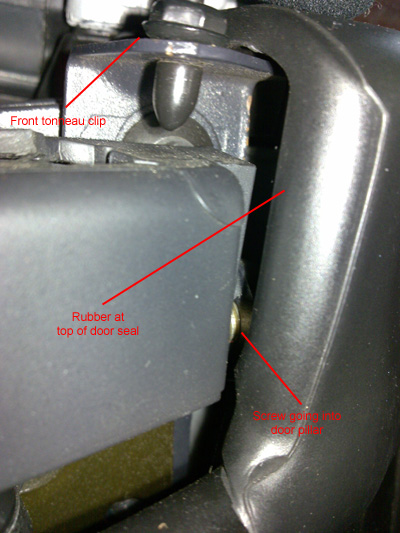
The reason you can see part of the screw on my car is because the loop through which the screw passes is broken - no idea when that happened, might even have been when it was being fitted!
Cheers R.
I took a couple of piccies of the trim on my car so that you can see how it is attached. The piece that goes round the ram and roof pivot looks like it comes off and is replaced by a larger piece that covers the hardtop bracket as well.
The whole trim piece (well as much as isn't hidden by the hardtop):
You can just see one of the connectors for the K-loom lurking under the trim:
And this is where the screw goes - much easier to get at without the hardtop on - it is probably also worth removing the rubber top to the door seal - it is a push fit, but note where all the little fiddly bits are tucked in before you remove it:
The reason you can see part of the screw on my car is because the loop through which the screw passes is broken - no idea when that happened, might even have been when it was being fitted!
Cheers R.
Arctic Silver '99 Z3 1.9 & Black '59 Frogeye 1275cc
Heh, we need a simple guide from somone who has done the job. It should include every step, including locating the cable and inserting the new cables. People always get to the end without taking a single picture and then the next person goes through the same grief.Robert T wrote:Bit late on my car, estocks - it's had hardtop brackets on it for the last 10 years!
Use the Search button before posting newbie questions about hard tops and fitting kits, footwell speaker amps, water in the boot, hood maintainance and those horrific angel eyes. We get like 10 threads a week on the same subject, it's obvious that you haven't searched.
Can't really tell from the pics above but when I got my ///M the hardtop fitting kit had been retrofitted.
However, the "top" replacement trim which has the new holes and rotating covers for the hardtop pins to go through into the bracket were not actaully attached to the car but still in the wrappers from BMW. I didn't know why and thought it must be a hard job to do.
When I had a go it took me all of 2 minutes.
There is only the existing screw/hex bolt (can't remember which) facing the front of the car that is unscrewed. The new trim is offered up and the screw goes through its original hole and into the new trim to secure it. There is then a further small retaining screw that is under the rotating cover.
So to remove should only be a case of removing these two screw/bolt and easing out the trim.
Not sure if this makes sense,of course if someone had taken pictures
ps all from memory as car 50 miles away so don't shoot me (and pics of my first Z thats why the trim is worn, brand new on my current Z.
Nice one.Dave L2 wrote:I'll take some piccys over the weekend during the install and perhaps we can create a guide from them.
Use the Search button before posting newbie questions about hard tops and fitting kits, footwell speaker amps, water in the boot, hood maintainance and those horrific angel eyes. We get like 10 threads a week on the same subject, it's obvious that you haven't searched.
OK, found it.
Having found another set of notes and re-read the BMW instructions I realised that the trim piece in my other photo is the "Cover underneath the holding fixture for the tonneau" as described in the BMW instructions.
Armed with the other notes I "Pressed together..." as instructed (yeah right) and after a substantial amount of pressing, pulling and a bit of tearing it finally came out.

The piece is made mostly of foam with some rubbery plastic (right side one is all foam) and it is glued to the bodywork. The picutre above shows a "Hard Edge" to the piece which fits under the side trim and has to be worked loose, however the side trim does not need to be loosened or removed to get the piece out.

All of this will be included in the Install Guide that I'm aiming to write next week, but for the time being this might help someone out.
Having found another set of notes and re-read the BMW instructions I realised that the trim piece in my other photo is the "Cover underneath the holding fixture for the tonneau" as described in the BMW instructions.
Armed with the other notes I "Pressed together..." as instructed (yeah right) and after a substantial amount of pressing, pulling and a bit of tearing it finally came out.
The piece is made mostly of foam with some rubbery plastic (right side one is all foam) and it is glued to the bodywork. The picutre above shows a "Hard Edge" to the piece which fits under the side trim and has to be worked loose, however the side trim does not need to be loosened or removed to get the piece out.
All of this will be included in the Install Guide that I'm aiming to write next week, but for the time being this might help someone out.